Thursday, April 11, 2019

Peacock Jeans

After my fitting issues with my last pair of pants I decided I wanted to try again but with a different pattern.


About 6 months ago I started work on a new pants pattern by creating a duct tape double of the bottom half of my body. I then cut my duct tape double down the sides and back trying to keep those lines as straight as possible, and then used these as the basis for my pattern. I created a leggings pattern out of it - but at the same time I also created a slim legged pants pattern. At the time I never got around to making up the resulting pattern, but I figured now was the time to try it out.

I cut the pattern pieces out of a piece of lightweight denim/lycra I had in stash and then the first thing I did was draw vertical and horizontal lines across the back side of my cut out pieces so I could try and get my pattern balanced. 


one of my early basting attempts before I got everything aligned.

I did much pinning, basting, unpicking, re-pinng and re-basting to try and get my pattern just right and I'm pretty happy with how it turned out.


 I still have some wrinkling under the bum, but I need that to be able to move. Everything else seems to be aligned...although if I were to make it again I would move the side seam forward by about 1" Whilst it's nice and straight its a bit too far back at the moment. 


Once I was happy with my pattern (and after transferring all my changes to my paper pattern) I started sewing my pants. All seams are sewn on the machine and then finished on the overlocker before being top stitched in a combination of neon green and blue thread. 


Since I did not cut on a fly I had to learn how to sew on an additional fly piece - I used the Grainline Studios tutorial for this and it turned out OK.

The front pockets were made with a freehand curve 


and the pocket bags extend to the front fly and right down to the thigh - I like a nice deep pocket!


The inside pocket bags are made from cotton batik.

Next up was the back pockets... I was recently introduced to the idea of using the free motion quilting foot on my sewing machine to embroider designs and I was really intrigued. I sketched out a fairly simple peacock design and tried it out of a piece of my denim that I stabilised with a medium weight interfacing. My first attempt was a bit sparse, but by my second attempt I was really impressed with how it all came together and I had the idea of using my design as a back pocket for a pair of jeans. I did a third peacock similar to the second and lined them both with a batik material to create jeans back patch pockets.


The peacock pockets were sewn on the back with a purple top thread so it didn't interfere with the peacock design.  

I really  really love these pockets.


The waistband I cut as my normal 4 piece wasitband.  I sewed th the outer waistband in place and sewed the inner wasitband to the outer along the top edge.  Rather than interfacing any of my waistband pieces, I stabilised it with some 1.5" wide knit elastic. I used a zig zag stitch to attach the elastic to the seam at the top of the wasitband and then top stitched around the top of the waistband stretching it as I went.

I then turned under the bottom of the inner waistband and top stitched it in places as well.  It looks all puckered when I'm not wearing it, but once the pants are on it creates a nice snug clean waistband finish.

Snaps in a matching neon green are used to close the waistband.


The length on this pattern was only just long enough so the bottom of the legs are overlocked and then turned under 1/4" and stitched in place.


I actually don't think the photos do these pants justice. I like these pants a lot more in person than I do the pictures. They seem to stay up a lot better than my last pair of pants and are really comfortable. I'm still not convinced about the slim leg on me - I feel like I need a little bit of flare to balance out my waist/bum/hips, but that'll be easy enough to modify and in the mean time I'll try out a new silhouette for me and enjoy my really cool peacocks.


Tuesday, April 9, 2019

Pretty Purple Pants

I've been feeling very uninspired by my winter wardrobe this year.  Everything is just very blah.  Just about everything I wear is in some shade of blue/grey/black. I need more colour in my life.  So I decided that I would made a new pair of pants in a bright colour.

I took myself off to the fabric store and went looking for pants fabric.  I found 2 that I really liked.  One as a teal green fabric - a stretch cotton sateen type fabric, and the second was a slightly heavier weight twill in purple.  I tossed up which one to make and in the end decided on the purple.  Really purple goes with just about everything in my wardrobe.  Reds, teals, greens, blues, they can all be paired with purple.  So I grabbed 2 yards of the purple twill and got to work.


(I also whipped up a the top shown here - same pattern as last time from poly sweater knit fabric I found on the same shopping expedition)

I went back and pulled out my pattern that I used to make my last true pair of jeans.

I modified the front pocket shape a bit from what I used last time - eliminated the yoke under the pocket and squared it off a bit but that's really the only changes that I made to the flat pattern.

I then got started sewing. I started with some decorative stitching on the back pocket.  I bought a burgundy topstitching thread and  threaded my machine with both that and a gold metallic thread and stitched my design onto the back pockets.  It took a bit to get the thread tension right and it never did turn out perfectly, but after ripping it all out once and sewing it a second time I learned to live with it. 


I then did some more decorative top stitching along the back of the front pocket.


I sewed in the front pockets using french  seams, and did the front fly.


I then  moved onto joining the back pieces. I took my time and taught myself haw to do true flat fell seams.  Not as tricky as I had supposed.  I flat felled the back crotch seam and then sewed on the back yoke using the same flat fell  technique.


 I then basted together the side and inside leg seams to test the fit.

I took the side and inside leg seams in a bit from the hips/crotch down to the knees just to get the shape that I was looking for.  Everything else was good except for the yoke.  There was way too much fabric at the top of the yoke.  I pinched out the excess then transferred that change to my pattern piece and cut out a whole new yoke.  The I had to unpick all the flat fell stitching of the yoke to take the old one off and put the new on.  That was not fun.  And then I ran out of top stitching thread.  I didn't want to wait a week till I could get back to the fabric store so I decided that I would just use normal thread in the same burgundy colour.  But this time instead of adding the gold metallic thread at the same time I did all the stitching in burgundy first and then went back over it on the gold. I liked the look of this a lot better, but not enough to rip out everything I'd done and start over!

I flat felled the inside leg seams (with just burgandy - no metallics) and then just stitched and serged the outside leg seams top stitching in just burgandy down the side seam to the bottom of the pocket for extra stability.

Then I tried on my pants and realised just how scratchy that gold metallic thread was.  It's really not comfortable and there was quite a bit of it through my pants.  At this point I decided that I wanted to line my pants.  That would also make them just a little bit warmer which is never a bad thing in my opinion,  I went through my stash and decided to line them in jersey.  I had scraps of two different blue jerseys that I could use up.  I had to do a bit of piecing to get my pattern to fit but I did it in the end.  In the end I could possibly have skipped some of the piecing - as due to the vertical stretch in the jersey I ended up taking a good three inches off the length of the lining.

 I joined the outer and lining at the waist and then put the waistband on.  I cut both the inner and outer layers of the waistband from the purple fabric. The inner waistband I interfaced with a heavy weight interfacing the the outer with a medium weight interfacing.  I even hand basted the bottom of the waistband down before top stitching to make sure it was a good as I could get it.  I really wanted to using my mettalic top stitching around the waistband too but decided that the scratchyness just wasn't on so the waistband is top stitched in red only.


I used a real jeans button for once and therefore had to make a button hole.  As per ususal my trial button hole worked perfectly, but once i moved onto the real fabric it all fell apart and I ahd to unpick and redo it about 3 times before I said enough is enough and just made it work.

The last tricky bit was getting the lining to fit around the zipper without interfering.  It took a bit of working - and taking the fly shield off and putting it on the opposite side as I realised it was all wrong way around.  It's a bit disappointing in the end I went to a lot of trouble to finish the insides of these pants beautifully and then went and covered it all up with a lining.


These pants felt quite tight when I first put them on.  I realised that the flat sell seams take up more seam allowance than my standard seams so they ended up a bit more snug than I hoped.  But after wearing them for a while they loosened off and feel quite good.  I washed them once and line dried them and they are now quite loose - I may have to throw them in the dryer next time and see how they come out.  I've left the bottom cuff basted on so that if they do shrink lengthways (which is something that I seem to have a problem with with pants) I can let down the cuff for some extra length.

However.....There are a few problem with these pants.  The first you can see in these photos - this fabric is terribly wrinkly. I did in fact iron these pants about 10 mins before taking these photos and you can see just how bad the wrinkles are.  That's not something that I care about in everyday, but I really hate the photos of these pants.


The second problem is that it  seems from the photos that the wrinkles under the bum at the back are back - I don't know why - the last time I made this pattern I didn't have this problem.  But there is definitely an issue with that outer back panel...


And finally the biggest problem is that the minute I start walking they slide down at the back and I have to hitch them back into place.  I wish I could figure out why this happens -  I think it has to have something to do with the back crotch curve but I'm not quite sure what. 


It looks like I'm going to have to do some more fitting work.

But in the mean time I now have a very bright cool new pair of pants. They are warm and snugly thanks to the lining and I really love the colour of these, they are very easy to match with the rest of my wardrobe - Bring on more colour! 

Maybe I can buy a little more of this fabric and turn these into a pair of overalls/bibs - that should keep them from sliding down at the back.


Monday, March 25, 2019

Blooms Knitted Sweater

After finishing my last sweater which was a marathon I wanted something a bit simpler to knit.  I knew what yarn I was going to use.  A beautiful 8 ply wool from Bendigo Woolen Millis called Blooms.  Its a variegated yarn with two colours twisted together, then one of the colour strands changes, then the other one so the colour is constantly changing.

Unfortunately, when I pulled out the yarn and started swatching it I found that the moths had gotten to it and it was all in pieces.  I still wanted to use the yarn though and decided that I would just make a basic raglan sweater.  Something that was comfy and warm but nothing special that wouldn't matter if I had a bunch of joins on the inside.  I only had two balls (200g/400 m each) so it was right on the cusp of having enough for a sweater so I decided to just go for it.


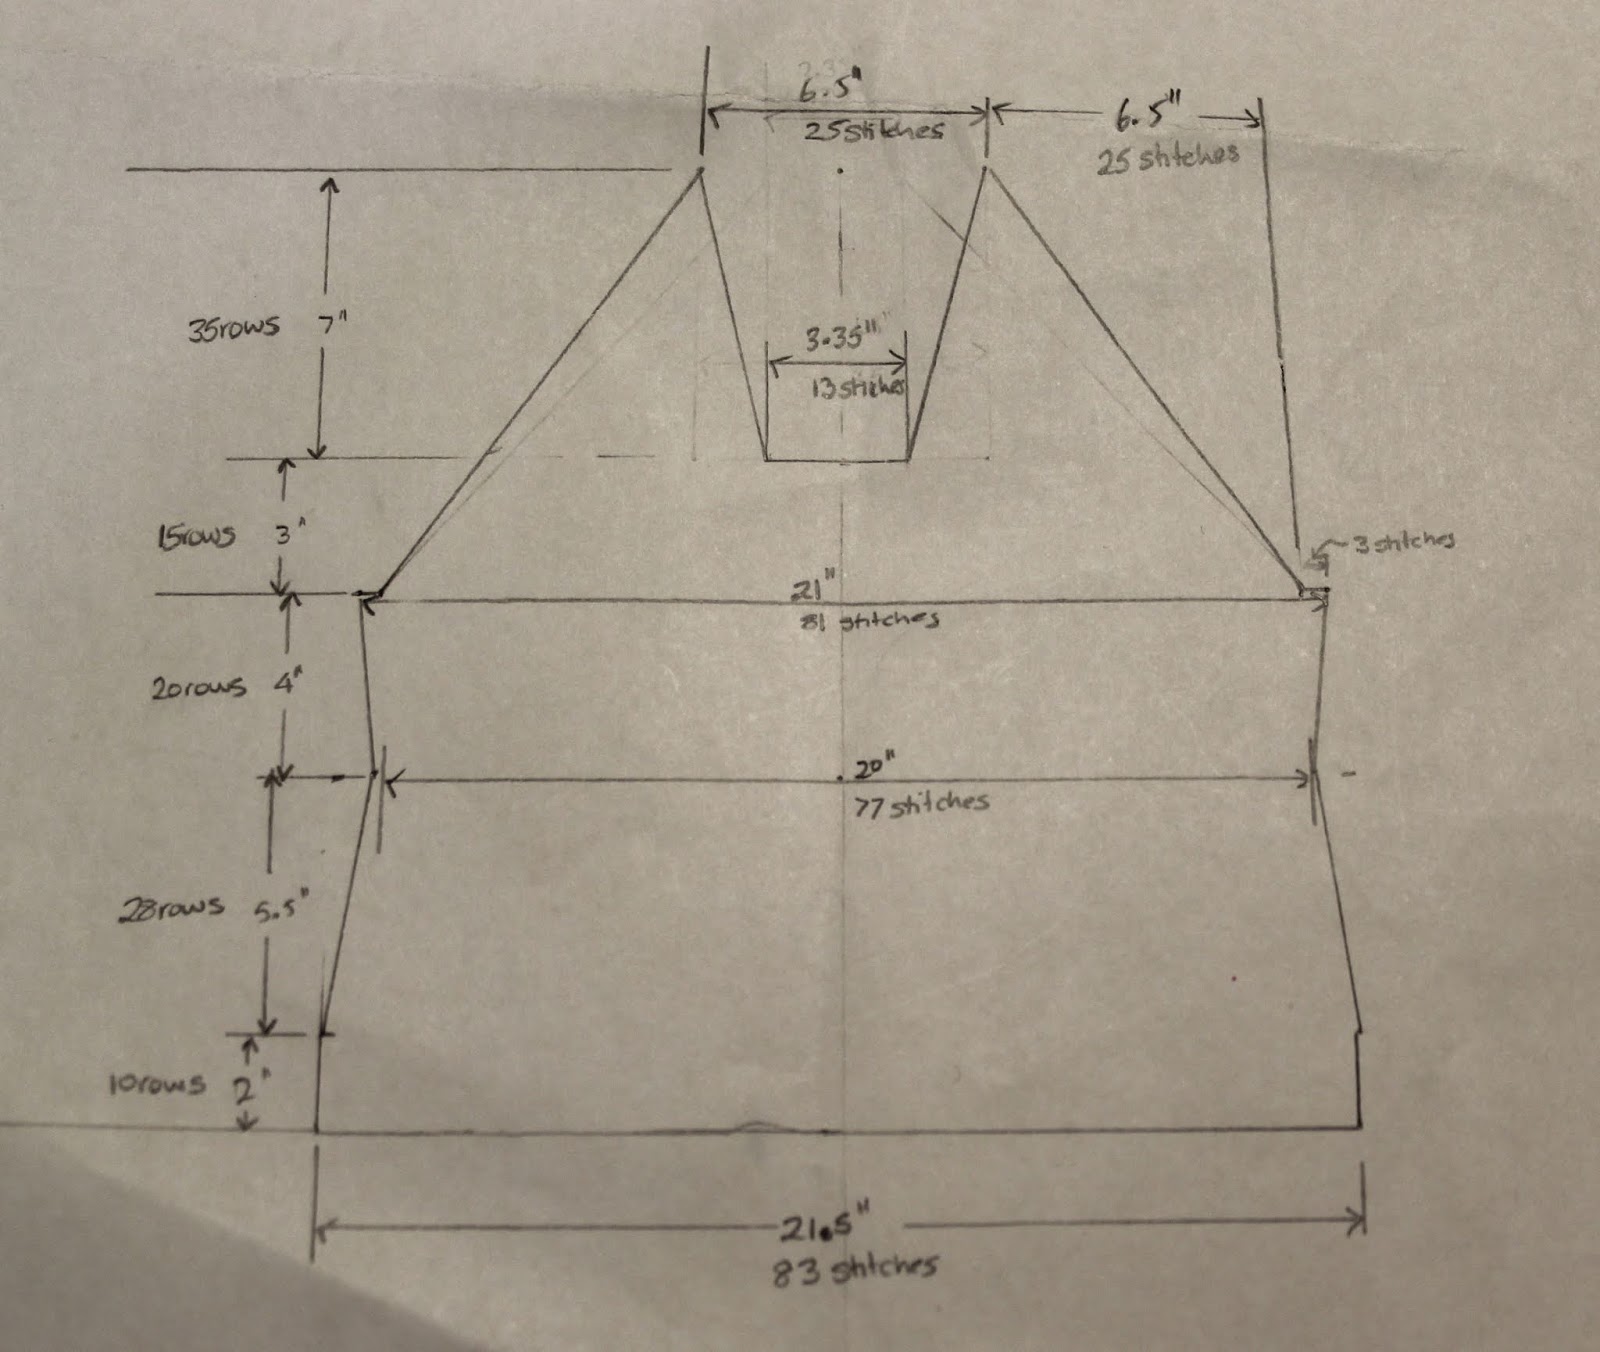
To create the pattern I drew a miniature version of what I wanted with all my dimensions on it and then using the gauge I found from my swatch figured out how many stitches and rows at each point and then just dispersed the increases and decreases evenly between the number of rows and stitches.


I've included a basic version of my pattern at the end for future reference.

I made a few tweaks as I went along - Oh I've done the number of rows specified but it doesn't look quite long enough I'll add another of couple - that sort of thing.

It's all knit in stockinette - which was boring but easy. 

I did run out of yarn when I finished the second sleeve and still had the neckband to go.  However I have a couple of other left over bits of Bendigo Woolen Millis yarns in a slightly lighter 5ply so I used two strands of that together and changed yarns once or twice and worked up the neckband in that.  I had to go down in needle size a bit to get it to match but I'm happy with how it worked out.  I had planned on making a shawl type collar but for it just didn't work so I went back to just a basic ribbed collar instead - It's still pulling at bit at the center but oh well!


When It was all done I decided the length was a bit short so used the same technique as for the neckband to add an extra waistband as well.


I really love this jumper.  It doesn't look great on the inside and the yarn is pilling a bit,  but its so easy to wear and warm and comfortable  and best of all bright! its already on high rotation in my wardrobe.


Pattern:

Yarn - Bendigo Woolen Millis Blooms  My tag says the colour is Jewel but that's not showing up as an option any more.  It looks like Royal to me.
Needles - 6.5 mm circular needle

Gauge
1" = 3.875 st
1" = 5 rows

Front
Cast on 83 stitches
Work 10 rows k4 p1 (I went back and added a further 10 rows at the end for a total of 20 rows)
switch to stockinette
Work 28 rows decreasing  both sides on rows 8, 18 and 28
work 20 rows increasing both sides on rows 3 and 7
Cast off 3 stitches at beginning of next 2 rows.
work 12 rows  decreasing at outer edges on rows 4, 6, 8, 10 and 12
Next row - K25 cast off 13, K25
work 35 rows decreasing at outer (sleeve edge) every 2 rows and at neck edge at row 3 and then every 6th row.
1 stitch remaining at end.  pull end through to finish.

Back
Cast on 83 stitches
Work 10 rows k4 p1  (I went back and added a further 10 rows at the end for a total of 20 rows)
switch to stockinette
Work 28 rows decreasing both sides on rows 8, 18 and 28
work 20 rows increasing on both sides on rows 3 and 7
Cast off 3 stitches at beginning of next 2 rows.
work 13 rows  decreasing at outer edges on rows 4, 6, 8, 10 and 12
work 30 rows decreasing at both sides every second row
work 5 rows decreasing at both sides every row,
Cast off 23 stitches


Sleeves
Cast on 44 stitches
work 9 rows K4 P1
switch to stockinette
work 78 rows increasing both sides at every 8th row. (8, 16, 24, 32, 40, 48, 54, 62, 70) 62 stitches
Cast off 3 stitches at beginning of next 2 rows. 56 stitches
work 2 rows 
work 43 rows decreasing both sides this row and every second row until 12 stitches remain
cast off.

Neckband - using 2 strands of 5 ply yarn and 4mm needles
pick up 27 stitches along front left side of neckband, 12 from sleeve, 23 from back, 12 from sleeve and 28 along front right neck.
K1P1 for 11 rows
Cast off loosely
sew to lower edge of front neckline.

Notes for next time: Add some short rows at bust for extra length - jumper rides up at front.


Saturday, March 23, 2019

More joggers and T shirts

Well the Pattern Review Sewing Bee is over - and once again I didn't win anything!

In the aftermath of disappointment I needed an easy happy make so I could feel good about my sewing again.  No matter how many times I tell myself that it doesn't matter that I didn't win,  I never really listen to myself.

But I needed to move on.  and what I need most right now is some more easy wearing clothes....what I really want is something in a bright print, I feel like my winter wardrobe is just so blah.  However finding fabric that is bright in the warm materials that I want to wear at this time of year is elusive.  And so once again we have black pants and a grey and maroon striped top...


The Pants - This fabric is an offcut that I picked up at Sewfisticated for $1.99/ yard.  It's a beautiful fabric - a black wool with a faint herringbone pattern in blue.  It's quite a heavy weight so I knew it'd be nice and warm, but also just a smidge scratchy so I also knew it would have to be lined.  My biggest problem with the fabric is just the lack of it.  There was just over 1 yard of it  and it was only 45" wide so there was not much fabric to play with.  As the fabric was patterned I had to make sure the pattern was going the right way so I couldn't cut it on the cross grain which is my standard way to make pants out of a small offcut of fabric.

So the first decision was to make slim fitting pants rather than my preferred flares. I  would normally also cut some length off the rise to give the the length I need however this time I decided to add length to the rise.

One of my biggest issues with pants is the fact that I have to constantly hitch them up.  A lot of this comes from the fact that my waist (at belly button) is just about the same circumference as my hips so there's no flare to keep the pants in place they just slide down.  I thought that maybe if I were to make them high enough and bring them right up to my natural waist I could cinch them in more and they might stay in place better.  So I added an extra 2" to the rise of the pants. 


Once all these things were taken into account, to get my pattern cut out of the material I had I had to cut about 3" off the bottom of the pants...I decided to give it a try - I planned to add a cuff to the bottom anyway I'd just make it a longer cuff....


I used the same basic pattern that I had used for the Joggers for the sewing bee just made a minor modification to the pockets and changed the rise. 


Once I had my main fabric cut I rummaged around my scraps pile for some left over rayon - I wanted something light to line these pants and Rayon is my lining of choice.  I found some royal blue with enough yardage and cut out the same pattern but without the pockets.


I then found some black ribbing to use as the cuffs and waistband.  The waistband is a simple elastic band. 1.5" wide ribbing and 1" elastic.


So my final feeling on these pants!  well they are warm and comfortable which is good, but they're a bit too big around the hips and despite the high waist they still slide down.  So not 100% perfect.....and they could definitely do with an extra inch or two in the length.


The Top.  I wanted to use up some more of my stash fabrics so pulled out this beautiful maroon and grey stripe sweater knit.  I decided to use the raglan pattern with the angled side seams that I've used numerous times before and really like the shape of.  I like how it's fitted around the bust but skims over all the bulgy bits beneath!

This was a really easy make.  The only slightly difficult bit was when I decided to line it with another grey jersey fabric.  I like my tops warm and lining is a easy solution.  It just basically meant making the shirt twice in the two different fabrics then joining them together to add the neckband and do the hems. 


The neckband I cut on the cross grain which reduces the amount of stretch, but its enough to get it over my head and that's all that's necessary. The hems are simply double turned and stitched with a small zip zag.  I did contemplate finishing the neckband neatly inside which would have made the shirt reversible but I decided I would never really wear a plain grey tshirt so decided not too (It wasn't lazyness really!)


I really like this shirt - It's warm and comfortable, the colour is a bit more boring than I had hoped but at least it's not plain.  However I learned that I should not make this pattern out of a stripe.  I did attempt to line up my stripes but between the angled raglan sleeves and the angled side seams its just about impossible to match anything, so in the end I just gave up and didn't bother matching anything!


Monday, February 25, 2019

Sewing Bee Round 4 - SuperHeros

For the first time ever I actually made it through to the final round of the Sewing Bee - Very exciting stuff.  We found out who was going through on Thursday Feb 14th and then the new round started on the Friday.  Of course I already had plans for the Friday so when I learned what the final challenge was on Friday morning I had the whole day to figure out what I was going to do.  That certainly wasn't an easy task.    The challenge as specified was:

We believe that we all have a superhero inside of us. Each day we conquer something great, no matter how small or big it may be. Show us your super strength, whatever it may be, by sewing a complete outfit inspired by a superhero (fictional or real).


Yikes that really leaves it quite open - with a challenge like that you could literally make anything you want - as long as you can spin the story right.  So the question was do I try for the story first - or just come up with an outfit and then work backwards for the story.

The more I thought about it the more the idea of a big winter coat got stuck in my head. My good big winter coat seems to have shrunk (it couldn't be that I've put on weight - no I'm sure it's the coat that has shrunk) and I've been thinking for a while about making a new one.  Maybe I should bite the bullet and use this as an excuse to make a new one......and I've always wanted to try a Doctor Strange big pointy collar.


So I decided to go for it and spent Friday afternoon and evening designing the coat I wanted then muslining the coat pattern to make sure it would fit and figuring out how to make the new collar that I wanted.  


Then I had to sit down and think about what I was going to make to go with it.  I knew I didn't want anything too hard - it was going to be hard enough finishing the big coat in the time frame.  So I sat down and sketched out an outfit.


It took a couple of iterations but finally I came up with something that was 1.  something I would actually wear (no costumes allowed per the rules) 2. Comfortable 3. relatively easy.

The pants were pretty easy.  I've been wanting to make a pair of joggers for a while so I decided to go with that.  I then added pin tucks diagonally across the front of the thighs from Start Lords costume.

.  
I found a picture of The Ancient One from Doctor Strange with this really cool pleated effect on the front of her shirt and I decided I wanted to try that on my top.


I spent the next couple of days sewing without break before I finally managed to come up with a back story for my outfit. 


From my entry:

As per usual the challenge for the sewing bee really made me stop and think...Superheros. What is it about superheros that appeals to me? After much consideration I realised that the superheros that I am most drawn to are not the ones who are all good, but rather the guys who started off bad but in the end have made the choice to do the right thing rather than just taking the easy way out.

Doctor Strange...When we first meet him he is an egotistical, arrogant man. Yes hes a great surgeon, but he's not really a great guy. It's only through his journey to find magic that he learns to think about others before himself. In the end he chooses to fight against the dark dimension allowing himself to be killed time and time again until finally Dormammu agrees to bargain. 

Star Lord from Guardians of the Galaxy was raised by the ravagers - an interstellar crime syndicate comprising of thieves, smugglers, criminals, bandits, mercenaries, bounty hunters and pirates. But despite his "upbringing" he chooses to fight against Thanos in order to save others.

Black widow, was raised as an assassin, but chooses instead to fight with the avengers.

And that is when it hit me. Superheros are not always born good, they are often just regular guys who,when it counts, choose to do the right thing even when its not easy, even against all odds. And in the end that is what makes them superheros...the choices they make.

Designing the outfit
So how do I translate my idea of superheroes into an outfit for myself. If I work from the premise that superheros are born from the choices they make then that means that for me to be a superhero in my life, I have to make the right choices rather than the easy choices. A superhero will often choose to put others before themselves, think about the greater good. Have I ever done that? In general I've lead a pretty easy life, I've never really been tested, but one of the biggest choices I've had to make in my life was the choice to move my family from Australia to the north east of the US. Now I'm an Aussie girl through and through. I love the warmth, the sun, the beaches, the outback and I hate the cold. ...with a passion. So for me the idea of living in a place where it is cold at least 9 months of the year was hard.....but it was the right thing to do for my family! And so I made my choice. And now, for me, my superhero fight is against the thing that I hate the most...my own personal villian.....The Cold...

Everyday in winter I have to make the choice to get up and get the kids to school. I have to shovel out the driveway and battle the ice to get to the grocery store. In order to do that I need a superhero outfit and what is better in a fight against the cold than a full length winter coat.

Now a coat is not an outfit by itself so I also needed to make something to wear under my coat. Obviously it needed to be warm, but it also needed to be comfortable. I wanted my superhero outfit to be something that I was able to throw on in the morning without too much thought, something that I could wear no matter what was on the agenda - cleaning house - sure, teaching STEM - great, getting in some exercise - totally, delivering meals on wheels - no problem. So I decided to make a pair of pants and a long sleeve shirt - my standard winter wardrobe. Relatively simple, but made unique through the addition of some superhero design elements.


Pattern Descriptions: 
My superhero coat is based on the standard super hero cape. However I'm not making a costume here, I wanted wearable so I decided to make a full length coat instead. (That will also be warmer giving me better defence against "the cold"). To retain the swish factor of a cape I went with a full skirt, fit and flare style coat and chose the McCalls pattern 7478 as my starting point. I then wanted to include a big stand up collar like Doctor Strange's Cloak of Levitation. I also added shoulder epaulets inspired by the coat worn by Star Lord and used the same fabric to add a few more armour type details at the cuffs, hem, pockets and back.

When it came to designing the shirt knew I wanted a really strong detail at the front neckline to peak out of the coat and found a photo of The Ancient One in Doctor Strange wearing a shirt with a pleated V shape at the front. My shirt is self drafted from my sloper and then modified to include a center V panel of pleats . To balance out the strong design at the front I decided to add strapping to the sleeves as found on Doctor Strange's costume.

For the pants I wanted a relaxed fit and went with a basic jogger style pant to which I added pin tucks diagonally across the thigh similar to Star Lords pants in Guardians of the Galaxy. My pattern was again modified from my basic pants pattern which was originally based on the Old McCalls pattern 9517. For my superhero pants I removed the center back seam and tapered the legs in before finishing them off with a cuff. To make the pants and top cohesive I used the pleating detail from the top on the back of the pants pockets and added a stripe of the contrasting fabric down the outside of the pants. 

The pants and top are made from coordinating fabrics so when worn together they give the impression of a jumpsuit like Black widow, or Gamora would wear when fighting bad guys.

Fabric Used:
The coat.
The outer fabric of the coat is an upholstery fabric of unknown origin. I'm assuming its a poly of some sort, although it did press very well during construction so maybe there is some wool in there! The fabric is a brick red colour and has a basket weave pattern woven into the front side.

The coat is then interlined with fleece and then lined in a satin jacquard fabric in a rich blue colour with gold medallions woven into it. 

The red fabric for the coat was chosen based on Doctor Strange's Coat of levitation and the blue lining was chosen as a nod to the typical superhero colour combination found in costumes of superheros such as Superman and Spiderman.

I then used a vinyl fabric with a basket weave texture in bronze and brown colours as an embellishment. I chose this as it have a very armor vibe to it.

The Shirt
The shirt is made from two different fabrics. The first is an active wear fabric in black with a faint grey diamond pattern on it, and the second a royal blue knit fabric, this has a crushed texture that has been created by lightly smocking the entire material (The material came that way I did not do any smocking this time). The sleeves are underlined in a blue cotton jersey for additional warmth.

The Pants
The pants are made from the same royal blue fabric but with a black sweater fleece for the main parts.

Pattern design, fitting and sewing:
Coat
To make the coat I started with McCalls 7478, view A.


I cut a size 14 around the shoulders, neckline and armhole grading out to a 22 in width for all pieces. During fitting I found that I had to take the coat in about 1/4" along the princess seams front and back from just below the shoulder to just after the waist. The center back seam was then taken in about an extra 1/4" at the waist. the overlap at the front of the coat was removed to add in the front zipper.

To get the collar that I wanted I added extra height to the collar flaring it out as much as I could at the free end and creating the sharp point at the front and then started playing around with the dart that shapes how the collar is attached to the body to make the collar stand up like I wanted. In the end I ended up eliminating this dart and instead added a seam that comes right around to the center front of the coat. The collar then starts right down at the center of the body, curves gently up to the ears and then creates a sharp point and wraps around the back of the head. I love this collar and it's dramatic effect, but should I not feel up to it I can wear the collar folded down against the shoulders.


The collar is lined with the same red fabric and a heavy weight interfacing was used on the outside layer of the collar. Horsehair braid was also added along the top edge and down the points to make sure the collar can stand up on it's own.

The sleeves - I eliminated the cuff that was specified and cut the sleeve off at the wrist. I then added some of the accent fabric to create a new cuff and lined the cuff with my red fabric.


I eliminated the pockets specified by the pattern and instead once the outside of the coat was finished I added welt pockets using the accent vinyl as the welt. The pocket bags are made from a cotton off cut.


The inside shoulders of the coat are finished with a sleeve head and a slight shoulder pad.

The epaulets are simple rectangles with rounded corners sewn to a backing of red fabric and then hand stitched in place over the shoulders.


A strip of the accent fabric has been used to decorate the back of the coat. This is hand sewn in place with two buttons.


The front of the coat is closed using a 24" separating zipper with a red tape and gold metal teeth. The zipper starts about halfway up the collar and extends down to about mid thigh.


The interlining of the coat is exactly the same pattern as the main coat but without the collar pieces.

The lining of the coat is exactly the same pattern as the main coat minus the collar, but with a 1" pleat added to the center back seam The lining and interlining attach to the collar and down the inside of the zipper and is understitched in place.


To finish the bottom of the coat a 4" wide strip of the red fabric (cut to fit the curve of the bottom of the coat) is sewn to the bottom of the lining fabric and finished with a simple machine sewn hem. The bottom of the main fabric is also turned under and stitched and then a 4" wide strip of the accent material (also cut to fit the curve of the bottom of the coat) is top stitched in place over the bottom edge of the coat.


Shirt.
To begin the creation of this shirt I used my basic moulage. 

The pattern for the back is taken directly from my moulage but with a V neckline (to allow room for my head as the front neckline is quite high)


For the front I rotated all darts into side darts and then cut a V into the top of the front piece starting at the shoulder and ending just below my bust. This would be the pleated inset. The pleated inset was made by creating doubled over strips of my blue material and stitching them onto a backing piece overlapping at the center front. Once this was made I sewed it into the front piece, added my darts and sewed back to front. The sleeves are underlined with another blue jersey material and I used the same active wear material as for the front and back to create 3 straps that wrap around each arm. These were top stitched in place on the flat sleeve and the sleeve was sewn up and set into the shirt. The shirt is finished with a blue band around the bottom.


The neckline is finished with a small 3/8" facing of the black material that runs around the back neckline and around the backing fabric underneath all the pleats at the front.

Unfortunately something went wrong with my drafting somewhere and the front piece ended up with really strange wrinkles under my breasts. In order to eliminate these I had to take a dart up the center front of the shirt from the lower hem to the bottom of the V. This means the shirt has ended up tighter than I originally intended. 

Pants
I started with the last iteration of my pants pattern. It began life as McCalls pattern 9517 but has been modified so many times now that I don't think anyone would recognise it. For this version I eliminated the back seam - which unfortunately eliminates the lovely shaping around the butt and now I have wrinkle butt again!

I also tapered the leg in significantly to create a slimline look to the pants. I then added a 2" stripe of the blue down the outside seam taking 1" off both the front and the back pattern pieces to accommodate the stripe.

To create the pocket I cut pocket bags out of the same plain blue jersey I used to underline the sleeve and then used the same technique as for the top to create pleats with one side running up and down the leg and the other parallel with the pocket opening. However here I stitched each of the pleats together as I didn't want my fingers getting caught in any pleats when I put my hands in my pockets. The pleating was sewn into the top corner of the pocket bag and a final pleat was added to the edge of the pocket to tie it all together.


To get the pin stripes on the thighs I drew parallel lines on the front pants pieces then folded carefully along those lines and stitched a 1/8" seam along each line.  This shortened the length of the front pants piece by about 1" which I just took off the back leg length to match.


I added a blue waistband with 1.5" wide elastic at the waist and 3" wide blue cuffs to the bottom of each leg.


Overall I'm quite happy with the outfit - It does tend to come off a bit costumey, but certainly each piece separately is something that I will wear.  The pants and the coat especially have already been worn numerous times - and I've only had them made for a week.


With the Collar turned down