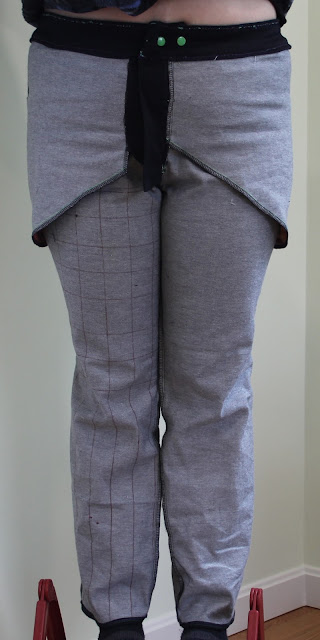
About 6 months ago I started work on a new pants pattern by creating a duct tape double of the bottom half of my body. I then cut my duct tape double down the sides and back trying to keep those lines as straight as possible, and then used these as the basis for my pattern. I created a leggings pattern out of it - but at the same time I also created a slim legged pants pattern. At the time I never got around to making up the resulting pattern, but I figured now was the time to try it out.
I cut the pattern pieces out of a piece of lightweight denim/lycra I had in stash and then the first thing I did was draw vertical and horizontal lines across the back side of my cut out pieces so I could try and get my pattern balanced.
 |
| one of my early basting attempts before I got everything aligned. |
I did much pinning, basting, unpicking, re-pinng and re-basting to try and get my pattern just right and I'm pretty happy with how it turned out.
Once I was happy with my pattern (and after transferring all my changes to my paper pattern) I started sewing my pants. All seams are sewn on the machine and then finished on the overlocker before being top stitched in a combination of neon green and blue thread.
The front pockets were made with a freehand curve
and the pocket bags extend to the front fly and right down to the thigh - I like a nice deep pocket!
The inside pocket bags are made from cotton batik.
Next up was the back pockets... I was recently introduced to the idea of using the free motion quilting foot on my sewing machine to embroider designs and I was really intrigued. I sketched out a fairly simple peacock design and tried it out of a piece of my denim that I stabilised with a medium weight interfacing. My first attempt was a bit sparse, but by my second attempt I was really impressed with how it all came together and I had the idea of using my design as a back pocket for a pair of jeans. I did a third peacock similar to the second and lined them both with a batik material to create jeans back patch pockets.
The peacock pockets were sewn on the back with a purple top thread so it didn't interfere with the peacock design.
I really really love these pockets.
The waistband I cut as my normal 4 piece wasitband. I sewed th the outer waistband in place and sewed the inner wasitband to the outer along the top edge. Rather than interfacing any of my waistband pieces, I stabilised it with some 1.5" wide knit elastic. I used a zig zag stitch to attach the elastic to the seam at the top of the wasitband and then top stitched around the top of the waistband stretching it as I went.
I then turned under the bottom of the inner waistband and top stitched it in places as well. It looks all puckered when I'm not wearing it, but once the pants are on it creates a nice snug clean waistband finish.
Snaps in a matching neon green are used to close the waistband.
The length on this pattern was only just long enough so the bottom of the legs are overlocked and then turned under 1/4" and stitched in place.
I actually don't think the photos do these pants justice. I like these pants a lot more in person than I do the pictures. They seem to stay up a lot better than my last pair of pants and are really comfortable. I'm still not convinced about the slim leg on me - I feel like I need a little bit of flare to balance out my waist/bum/hips, but that'll be easy enough to modify and in the mean time I'll try out a new silhouette for me and enjoy my really cool peacocks.


These turned out great! The peacocks are amazing, and I don’t know that I have ever seen a straighter side seam. I’m also intrigued by the waistband treatment. The elastic is a cool idea. —Lisa
ReplyDeleteOMG I love these! You are such an amazing artist, the peacocks came out great. These are so creative, I am really in awe. Also amazed with the top-stitching, I would have so much anxiety with that color, but it looks really good.
ReplyDelete