Monday, March 25, 2019

Blooms Knitted Sweater

After finishing my last sweater which was a marathon I wanted something a bit simpler to knit.  I knew what yarn I was going to use.  A beautiful 8 ply wool from Bendigo Woolen Millis called Blooms.  Its a variegated yarn with two colours twisted together, then one of the colour strands changes, then the other one so the colour is constantly changing.

Unfortunately, when I pulled out the yarn and started swatching it I found that the moths had gotten to it and it was all in pieces.  I still wanted to use the yarn though and decided that I would just make a basic raglan sweater.  Something that was comfy and warm but nothing special that wouldn't matter if I had a bunch of joins on the inside.  I only had two balls (200g/400 m each) so it was right on the cusp of having enough for a sweater so I decided to just go for it.


To create the pattern I drew a miniature version of what I wanted with all my dimensions on it and then using the gauge I found from my swatch figured out how many stitches and rows at each point and then just dispersed the increases and decreases evenly between the number of rows and stitches.


I've included a basic version of my pattern at the end for future reference.

I made a few tweaks as I went along - Oh I've done the number of rows specified but it doesn't look quite long enough I'll add another of couple - that sort of thing.

It's all knit in stockinette - which was boring but easy. 

I did run out of yarn when I finished the second sleeve and still had the neckband to go.  However I have a couple of other left over bits of Bendigo Woolen Millis yarns in a slightly lighter 5ply so I used two strands of that together and changed yarns once or twice and worked up the neckband in that.  I had to go down in needle size a bit to get it to match but I'm happy with how it worked out.  I had planned on making a shawl type collar but for it just didn't work so I went back to just a basic ribbed collar instead - It's still pulling at bit at the center but oh well!


When It was all done I decided the length was a bit short so used the same technique as for the neckband to add an extra waistband as well.


I really love this jumper.  It doesn't look great on the inside and the yarn is pilling a bit,  but its so easy to wear and warm and comfortable  and best of all bright! its already on high rotation in my wardrobe.
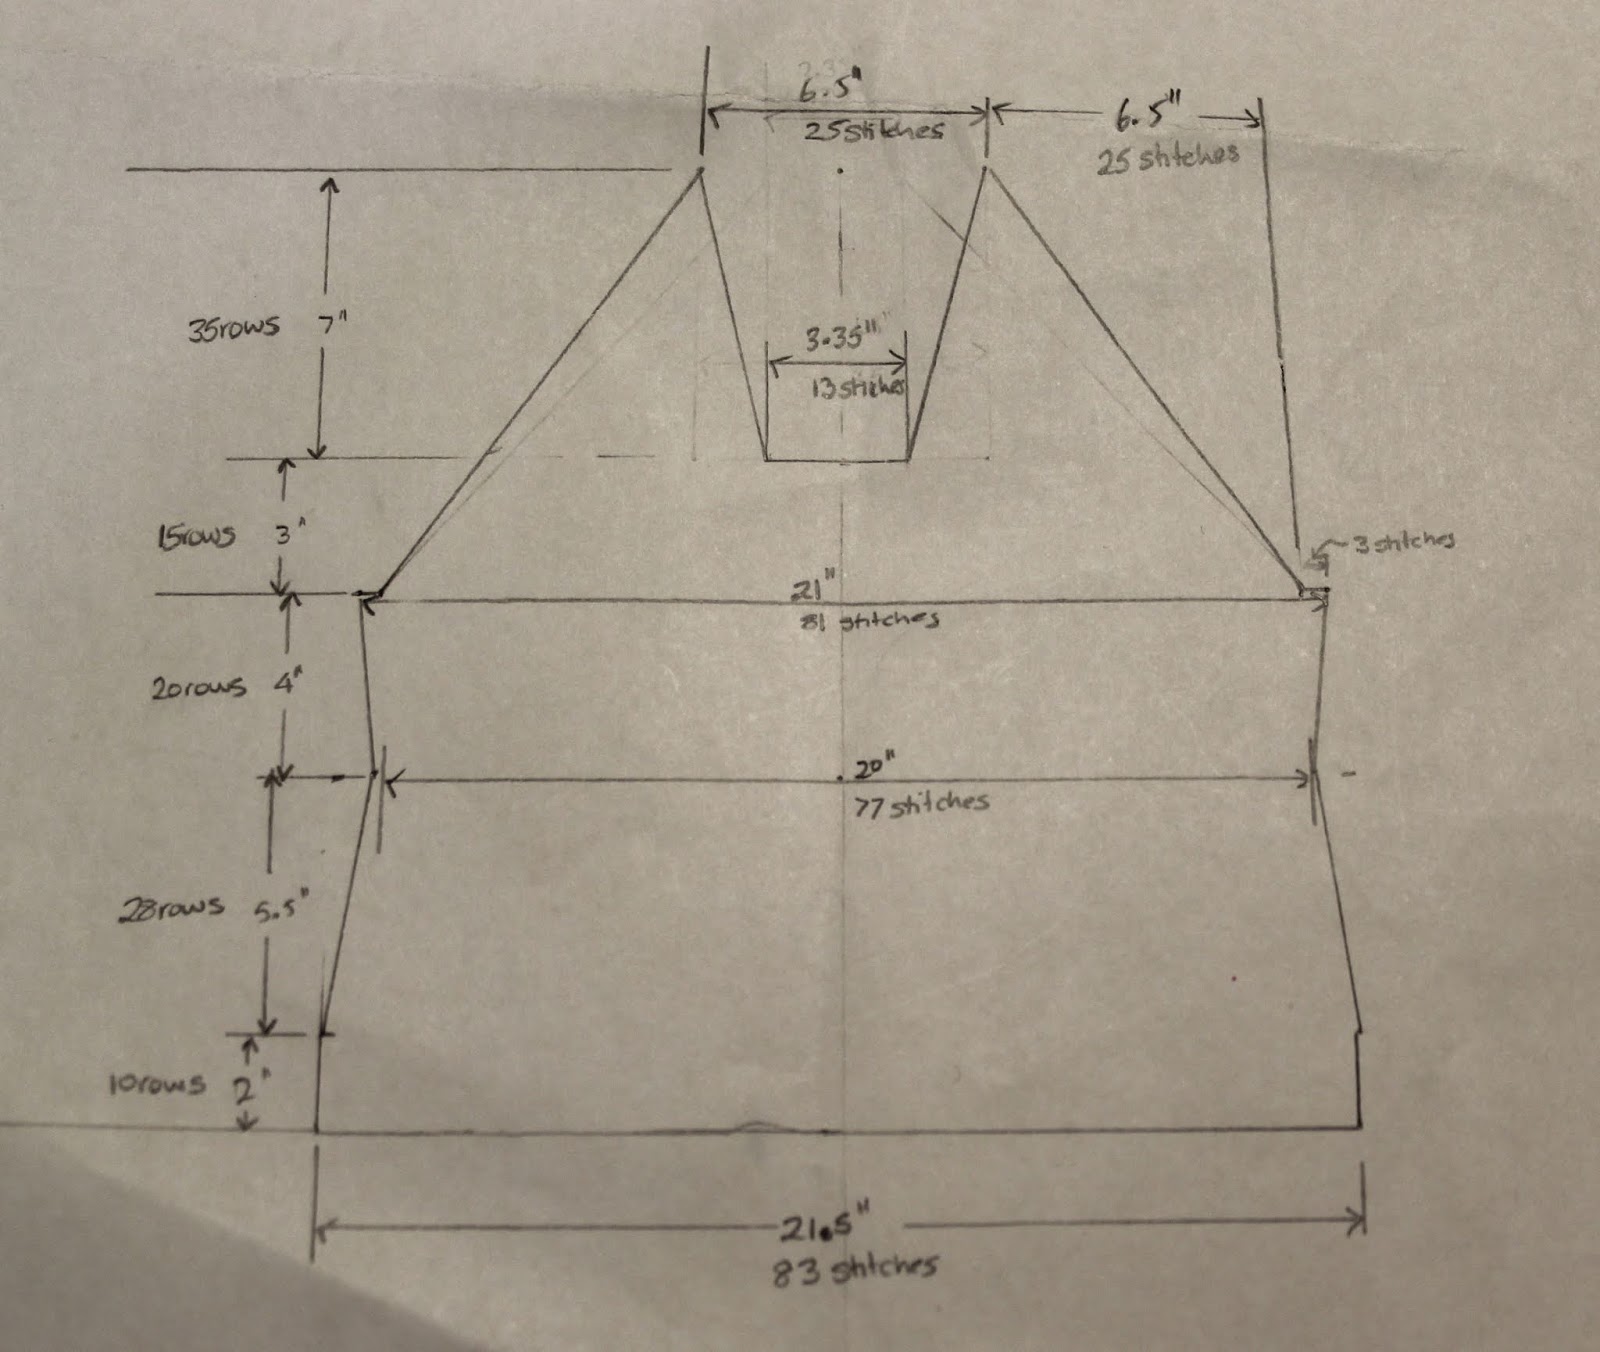


Pattern:

Yarn - Bendigo Woolen Millis Blooms  My tag says the colour is Jewel but that's not showing up as an option any more.  It looks like Royal to me.
Needles - 6.5 mm circular needle

Gauge
1" = 3.875 st
1" = 5 rows

Front
Cast on 83 stitches
Work 10 rows k4 p1 (I went back and added a further 10 rows at the end for a total of 20 rows)
switch to stockinette
Work 28 rows decreasing  both sides on rows 8, 18 and 28
work 20 rows increasing both sides on rows 3 and 7
Cast off 3 stitches at beginning of next 2 rows.
work 12 rows  decreasing at outer edges on rows 4, 6, 8, 10 and 12
Next row - K25 cast off 13, K25
work 35 rows decreasing at outer (sleeve edge) every 2 rows and at neck edge at row 3 and then every 6th row.
1 stitch remaining at end.  pull end through to finish.

Back
Cast on 83 stitches
Work 10 rows k4 p1  (I went back and added a further 10 rows at the end for a total of 20 rows)
switch to stockinette
Work 28 rows decreasing both sides on rows 8, 18 and 28
work 20 rows increasing on both sides on rows 3 and 7
Cast off 3 stitches at beginning of next 2 rows.
work 13 rows  decreasing at outer edges on rows 4, 6, 8, 10 and 12
work 30 rows decreasing at both sides every second row
work 5 rows decreasing at both sides every row,
Cast off 23 stitches


Sleeves
Cast on 44 stitches
work 9 rows K4 P1
switch to stockinette
work 78 rows increasing both sides at every 8th row. (8, 16, 24, 32, 40, 48, 54, 62, 70) 62 stitches
Cast off 3 stitches at beginning of next 2 rows. 56 stitches
work 2 rows 
work 43 rows decreasing both sides this row and every second row until 12 stitches remain
cast off.

Neckband - using 2 strands of 5 ply yarn and 4mm needles
pick up 27 stitches along front left side of neckband, 12 from sleeve, 23 from back, 12 from sleeve and 28 along front right neck.
K1P1 for 11 rows
Cast off loosely
sew to lower edge of front neckline.

Notes for next time: Add some short rows at bust for extra length - jumper rides up at front.


Saturday, March 23, 2019

More joggers and T shirts

Well the Pattern Review Sewing Bee is over - and once again I didn't win anything!

In the aftermath of disappointment I needed an easy happy make so I could feel good about my sewing again.  No matter how many times I tell myself that it doesn't matter that I didn't win,  I never really listen to myself.

But I needed to move on.  and what I need most right now is some more easy wearing clothes....what I really want is something in a bright print, I feel like my winter wardrobe is just so blah.  However finding fabric that is bright in the warm materials that I want to wear at this time of year is elusive.  And so once again we have black pants and a grey and maroon striped top...


The Pants - This fabric is an offcut that I picked up at Sewfisticated for $1.99/ yard.  It's a beautiful fabric - a black wool with a faint herringbone pattern in blue.  It's quite a heavy weight so I knew it'd be nice and warm, but also just a smidge scratchy so I also knew it would have to be lined.  My biggest problem with the fabric is just the lack of it.  There was just over 1 yard of it  and it was only 45" wide so there was not much fabric to play with.  As the fabric was patterned I had to make sure the pattern was going the right way so I couldn't cut it on the cross grain which is my standard way to make pants out of a small offcut of fabric.

So the first decision was to make slim fitting pants rather than my preferred flares. I  would normally also cut some length off the rise to give the the length I need however this time I decided to add length to the rise.

One of my biggest issues with pants is the fact that I have to constantly hitch them up.  A lot of this comes from the fact that my waist (at belly button) is just about the same circumference as my hips so there's no flare to keep the pants in place they just slide down.  I thought that maybe if I were to make them high enough and bring them right up to my natural waist I could cinch them in more and they might stay in place better.  So I added an extra 2" to the rise of the pants. 


Once all these things were taken into account, to get my pattern cut out of the material I had I had to cut about 3" off the bottom of the pants...I decided to give it a try - I planned to add a cuff to the bottom anyway I'd just make it a longer cuff....


I used the same basic pattern that I had used for the Joggers for the sewing bee just made a minor modification to the pockets and changed the rise. 


Once I had my main fabric cut I rummaged around my scraps pile for some left over rayon - I wanted something light to line these pants and Rayon is my lining of choice.  I found some royal blue with enough yardage and cut out the same pattern but without the pockets.


I then found some black ribbing to use as the cuffs and waistband.  The waistband is a simple elastic band. 1.5" wide ribbing and 1" elastic.


So my final feeling on these pants!  well they are warm and comfortable which is good, but they're a bit too big around the hips and despite the high waist they still slide down.  So not 100% perfect.....and they could definitely do with an extra inch or two in the length.


The Top.  I wanted to use up some more of my stash fabrics so pulled out this beautiful maroon and grey stripe sweater knit.  I decided to use the raglan pattern with the angled side seams that I've used numerous times before and really like the shape of.  I like how it's fitted around the bust but skims over all the bulgy bits beneath!

This was a really easy make.  The only slightly difficult bit was when I decided to line it with another grey jersey fabric.  I like my tops warm and lining is a easy solution.  It just basically meant making the shirt twice in the two different fabrics then joining them together to add the neckband and do the hems. 


The neckband I cut on the cross grain which reduces the amount of stretch, but its enough to get it over my head and that's all that's necessary. The hems are simply double turned and stitched with a small zip zag.  I did contemplate finishing the neckband neatly inside which would have made the shirt reversible but I decided I would never really wear a plain grey tshirt so decided not too (It wasn't lazyness really!)


I really like this shirt - It's warm and comfortable, the colour is a bit more boring than I had hoped but at least it's not plain.  However I learned that I should not make this pattern out of a stripe.  I did attempt to line up my stripes but between the angled raglan sleeves and the angled side seams its just about impossible to match anything, so in the end I just gave up and didn't bother matching anything!