Sunday, June 23, 2019

New Everyday Bag

A couple of years ago I had a great little bag for everyday wear - it was just big enough to hold my drink bottle, wallet, phone and keys.  Unfortunately it fell apart on me and I had to throw it out.  I've made numerous bags since then but they've all ended up too big or too bulky and I never want to reach for them.  I've still got one that I use everyday that's a bit smaller - just fits wallet, phone and keys but that's getting a bit old too so it was about time I made a new one.


So the first thing to do was to figure out what size I wanted.  Unfortunately I seem to have thrown out that old perfect one so I couldn't measure it for size so I gathered all my other bags together and worked it out by a process of elimination.

It needs to be bigger than my small bag, but smaller than my big bag, about the same size as my teal bag, but with a longer strap and less bulky - you get the drift.  I finally came up with the dimensions I wanted and then it was time to think about fabric.

The original bag was made from patchwork corduroy with no interfacing so it was quite soft but still quite sturdy.  This is the larger version of the bag that I do still have and use (though it's looking a lot more worse for wear now!).


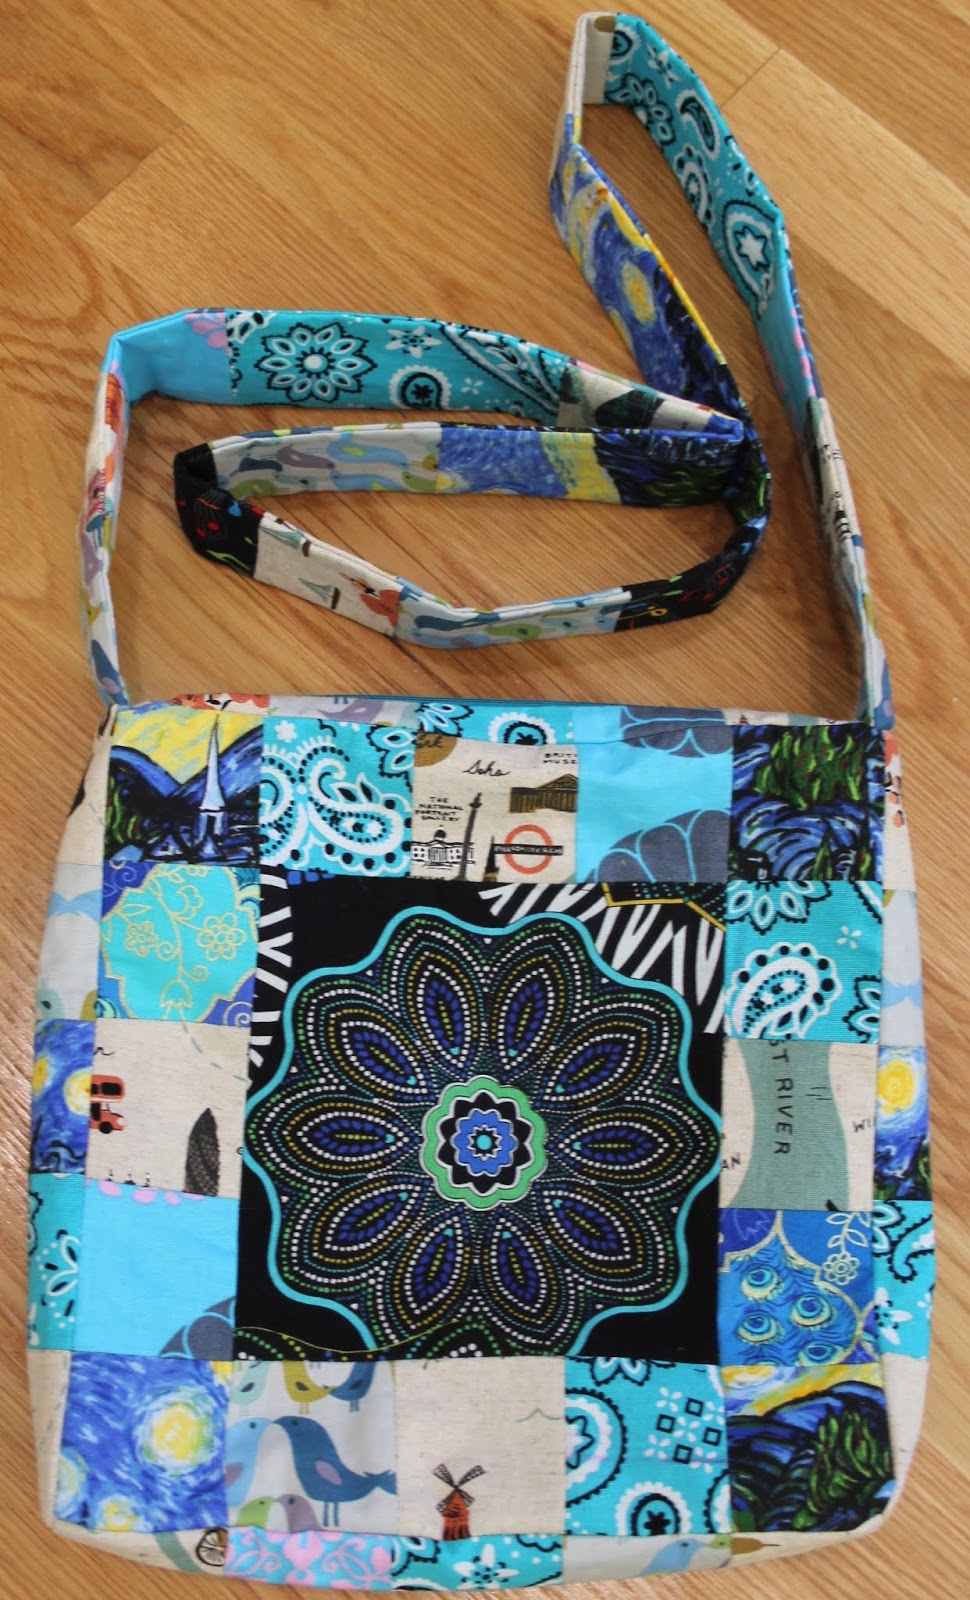
Unfortunately, I'm out of corduroy scraps otherwise I would have done that again cause I really love these bags.  But in the spirit of this I decided I would do patchwork again, this time in cotton scraps and actually interface it so it has just a touch more structure.

I headed for my scraps bin and started picking out my favourite fabrics.


A little bit of the map fabric from my Rue dress, some of the peacock fabric from my cathedral bag, the starry night fabric donated by the town hall to my sewing class, the bird fabric chosen by my best friend when she was in town, plus a couple of other scraps from my sewing class in a similar colourway.  As I was sorting through my scraps I found a small piece of the fabric I used to make shoes a couple of years ago.  The two scraps had beautiful flower pattern that I thought would make a fantastic centerpiece to the bag - one of each side and they were the perfect size that I could use that, and then patchwork a border of 2"squares around it and the bag should be just the right size. 


And so I started cutting 2.5"squares and laying them out until I got a perfect arrangement.  I sewed the two patchwork faces together plus a strip of squares to use as the sides and the bottom, interfaced them using just a medium weight interfacing and then sewed the main part of the bag together.

Then onto the lining.  I found a plain blue cotton to use as lining plus another cool scrap of music note fabric - donated to my sewing class. 


I added a zipper separating the lining into two pouches a smaller zipper pouch on one side and the main pocket bag.


To make the top of the bag I made up another strip of patchwork, cut it down the center and added a zipper.  The blue lining was added to hide the zipper tape and then the patchwork was sewed to the bag along the two long edges.


Now to make the strap - I will admit I cheated a bit here and rather than using all 2.5"squares I used some longer strips to get the strap to the length I wanted. 


Once my strap was made and turned inside right sandwiched it in between the top and the sides of the bag and sewed in in place.  I was really pleased with how neat it turned out!


The final step was the attach the lining.  I turned it all inside out and sewed the lining to the top all except for a gap along one long edge.  I used this to then turn the bag back inside right and then hand sewed the gap closed.


Not too shabby for a mornings work.  I love how this bag turned out.  It is big enough to fit my drink bottle, but not to large to carry around if I don't have it.  Hopefully It'll become my new go to bag.


Tuesday, June 11, 2019

Curved Cardigan

I've been trying to make myself a good cardigan for quite some time now. It'd been quite a struggle with many failures along the way, but by George I think I've done it!


My first attempt at a cardigan was based on my bathrobe coat pattern using a lightweight double cotton jersey in a black and grey chevron.  This just ended up being way too oversized and just plain baggy and sloppy for my to want to wear it.  I tried taking it in, but it's still not great so I've resigned it to my to be remade pile. I figure there is enough material there to make a nice shirt.


My second attempt at a cardigan does occasionally get worn but only cause I have nothing better.  Its based on my flannelette shirt pattern and made out of a black fuzzy poly fabric.  It's not quite fleece but almost has a waffle pattern in it.  I bought it to make a bathrobe out of but ended up trying to make a cardigan instead.  I changed out the normal collar for a shawl collar and just used one snap to close it.


My third attempt was my living coral cardigan for this years Pattern Review Sewing Bee.  I love this cardigan....except that in the fabric that it's made from - a scuba knit - its more of a coat than a cardigan.  I don't feel like I can lounge around the house in it.


So my original plan for this cardigan was to remake that style in a different fabric.

I took a trip to the fabric store to look for some material and found a beautiful piece of fabric in a black and white checkered houndstooth pattern.


This fabric feels delicious.  I found it with all the flannel fabrics but I don't know if it really is a flannel.  The pattern is definitely woven in rather than printed on and whatever it is it feels nice and warn and snuggly.  As I was just about to leave I also spotted a black and multicoloured boucle wool fabric that I liked and decided to grab a bit of that as well.


When I got my fabric home I started researching houndstooth cardigans to try and get a feel for what my fabric would look like made up into a cardigan and whilst browsing I ran across this picture.


which piqued my interest.   I like the idea of the cut away at the front and the simple collar. and so I decided to try and recreate it.

To create the pattern I started with the McCalls 7478 pattern.


I decided how long I wanted my cardigan at the back - which turned out to be 6"shorter than the pattern and traced off the center back and side back pattern pieces to this length.  This pattern has princess seams that go to the shoulder and I wanted princess seams that start at the front and back armhole so I modified the pattern accordingly. I then took some of the flare out of the skirt.  I straightened out the center back seam so that it can be cut on the fold.  I think I took about 4" off each side at the bottom of the back princess seams and the same at the side seam.

Then I started work on the front.  The side front pieces I again took from the McCalls pattern modifying the princess seam to come from the armhole rather than the shoulder.  I took about 4"off each side of the princess seam and the side seam to match the back.  The front piece is taken from the McCalls pattern but then I extended the front line straight up to shoulder height.  This can then be turned back into a simple collar.

Now I was ready to figure out the front curve.  I started on the front princess seam curving it from about the waistline out to the side seam about 5"above the new hemline.  I modified the center front pattern piece to match this curve and then curved the front seam line from the waist out to the same point.

The sleeve pattern I used from the McCalls pattern but slimmed it down by about 1"on either side at the cuff tapering to the original pattern at the sleeve head. I also removed all the extra length for the cuff so its now a straight sleeve.

I wasn't entirely sure that the front patter pieces were correct so rather than test it on my good herringbone checkered fabric I decided to use the wool boucle first.  Technically this fabric was more expensive but it was less precious to me so I was more happy to sacrifice it if it didn't work.  I cut out my pattern pieces and basted it all together and I was really happy with it.


The only modification I had to make was to take in the seam at the underarm by 1" tapering to nothing at the cuff and the waist.  I felt like I didn't need quite so much ease there in a cardigan was I would in a big winter coat.

Now for the finishing touches.  I added pockets into the side front panels by just cutting a second layer of the lower half of the panel creating another curve at the pocket opening to match.


 I finished the top of the pockets using a piece if satin ribbon  turned under and top stitched in place.

I then recut the center front pieces and the top 1/4 of the center back pieces to use as facings securing the facings by stitching in the ditch along the princess seam lines.


I used a small piece of interfacing between the front and facing at the center front where I wanted to put the buttons.

I added two blue sparkling buttons from the stash and added two pink button holes on the otherside.


I have to say I love this cardi and I can't wait to see what this pattern is going to look like in the houndstooth fabric.


Thursday, June 6, 2019

More Sirocco Jumpsuits

Well my Butterfly Sirrocco Jumpsuit has been a big hit in my wardrobe.  I feel like I have to actively hold myself back from wearing it every time it's clean, otherwise I'd be wearing it all the time.  So I thought I'd make some more.


But first up I wanted to update my pattern.  I summarised the changes I made in my last post but in reality the changes were much more piecemeal and all over the place so I wanted to see just how close I was to what I said.

So I went back and took the base size 42 pattern.  I then took out the length I needed - 1"at the thigh, 2"at the knee and 1"at the rise and then graded out to 46 at the hip and 52 at the waist.   Turns out I was pretty close, but I did notice that I had stuffed something up somewhere in my original pattern and the front was actually 1"shorter than the back....oops.  All fixed now.

As for the top. I started with the 42 and did a 4"full bust adjustment (2"added to the half pattern).  Turns out I was pretty close which was quite interesting. The back I cut to 42, but left the added length at the shoulder.

I did make one further change to the pattern for this next iteration.  I removed an extra 1"in the rise of the pants, but on further consideration I'm a bit sorry I did that.  This version is now a bit short in the crotch.  Nothing too noticeable though. 

Now to figure out what material to use this time.

I had some teal and pink  and red striped upholstery type fabric that I picked up recently in a fabric swap and decided I wanted to try that out.  I started with the pants and had just enough to cut them out.  Now the big issue here is that this fabric is a woven not a knit - so I knew I'd need something else for the waistband.  I found a purple knit rib that matched nicely and went with that.  I basted the pants together and tried them on.  Just a smidge tight getting them up over the hips - so I took out the back darts and just eased the fabric into the stretchy waistband.  You can barely tell  the darts are missing and now they slide on nicely.


But I didn't have enough fabric left to make the to top, plus I figured I should probably make the top out of something more stretchy to make getting it on and off easier.  So I cut the top out of the purple knit rib.  Unfortunately this was too stretchy.  So the top is a bit big.  I took about an inch off each side right down the sleeves and sides grading out to match the pants just below the waistband, but it still feels a little big and it just doesn't sit nicely - hence all the wrinkles. 

I also added long sleeves to this version to make it a more winter worthy jumpsuit.  I used the sleeve pattern from my rainbow zipper dress.


I also made a self fabric belt to go with it.  In the mirror I like this look better, but in the photos I think I actually prefer it without.


 Either way, my husband still said it makes me look frumpy.  Oh well bugger him.  I love the pants They are just so bright and fun and really so comfortable too.  I don't love the top - It just doesn't sit that well as you can see from all the wrinkles here. I have thought about cutting the top off and just using the pants as it, but I know I'll always struggle to find a shirt to match these pants so for now I'll leave it as is. I really do love the pants part of it.

So of course I had to go back and try again. This time I went shopping specifically for fabric and found an amazing blue purple leopard print fabric that I really love.  I made this straight to my modified pattern and the fit is pretty good,  Could be a bit tighter at the waist, but that'd make getting it on and off harder so I doubt I'll take it in. 


There is just one issue with this pair.....that yellow splodge down the inner thigh on both legs - I reckon it looks like I wet myself.  But I'm not quite sure what to do other than scrap it and start again...I do have some fabric spray paint downstairs - I wonder if a quick spray in purple would make it look better.  I'm really bummed about it because apart from that this jumpsuit is fabulous!