Showing posts with label knitting. Show all posts

Tuesday, December 22, 2020

Zig Zag Knitted sweater

 Back in September I wrote an update on my knitting including the sweater that I was in the middle of - Well I finally finished said sweater.  


I started this project back in March.  I picked up this yarn at the closing down sale at one of my local yarn shops - Dee's Nimble Needles and Yarn.  I was browsing through what she had left and found this beautiful blue with green flecks alpaca yarn. It was classic Elite Inca Alpaca in colour 1146 -  But there were only 3 skeins left of it - not really enough to do anything with.  Then I found 2 skeins of the same yarn in the green colourway (1135),  1 skein of black (1113) and 4 skeins of Classic Elite Inca Marl in colour 1193 - a blue marled colour.  I decided to go ahead and buy them all and see if I could come up with something to make out of them.

I knew I wanted to make a sweater with the yarn so I browsed Ravelry looking for patterns that I could use with 4 or more colours.  Of course I couldn't find what I was looking for, so once again I turned to the drawing board - I decided to create my own pattern.  The first thing to do was knit a swatch to find my gauge, then I used that, and one of my basic sewing patterns to create a basic knitting pattern for a sweater. 

When I knew how many stitches and rows I was working with I then took some graph paper and drew out a pattern using all my different colours.  I decided to use the Marl yarn - which I had the most of as the back ground colour and then drew zig zags in all the other colours.


I wanted to make sure that I didn't have a lot of floats on the back of my work - mainly cause I only just had enough yarn by my calculations - I didn't have any to waste running in floats along the back of the fabric.  I didn't realise until I started knitting the front just how hard a job I had created for myself.  I was working with something like 15 different strands of yarn at any given time.


I created a device with a plastic container and a bunch of pegs to try and keep all my threads from getting tangled together but it wasn't easy.

The next problem occurred when I got about halfway up the front side and I realised that I was not going to have enough of the Marl yarn to finish the sweater.  In order to try and make it work I decided to add some solid sections of other colours to the top half of the sweater.


I decided to knit a strip of blue and then transition to the green at the shoulder with a strip of black in between.

I finished the front, and then the back - I ran out of the Marl colour 2 rows before I had stopped on the front so I just started the blue two rows early.  

But now I had to figure out what to do with the sleeves.  I started working them, two at  a time, from the top down so I could match the green, the black strip and then the blue with the front and the back sections.   

Once I had that done I had to make a decision - try and buy more of the Marl colour or work up the sleeves with the rest of the blue, green and black yarn.  I seared the web for more of the Marl yarn and came up blank.  The only option I had was buying from someone's stash on Ravelry.  I contacted one person but they had already sold theirs and forgot to update their listing, and the second person never got back to me so now I was totally out of options.

Back to plan B  knitting the sleeves in a different colour I came up with a sleeve design using the blue as a back ground and the green and black as accent colours,  threaded a life line through my work so I could easily go back if I had and started knitting.


I got to about 6" from the bottom of the sleeves and ran out of the blue yarn so continued with stripes of the green and black until I ran out of yarn entirely.  At this point I had 2.5" of the sleeve and the neckband and the sweater would be finished.  But I was totally out of yarn.


I basted it all together and tried it on.


Then did some magic on my computer to see what would work best.


Option1, go back to trying to find the Marl to finish the jumper like I had first planned.
Option 2, use black for the neckband and cuffs, Option 3 blue neckband and cuffs and Option 4 green neckband and cuffs.

After seeking input from my knitting group and my Facebook friends I decided to rule out Option 1 - Yeah at least I didn't have to pull out all that sleeve knitting and start again.  As for what colour to use to finish it off - I decided it would come down to what I could buy most easily out the other three.

I went back to Ravely and found someone willing to sell some of the blue and decided to go for it....I was only going to buy two skeins, but she offered me all 5 for only $5 more so I went with that.  Of course I now have 4 skeins left over....matching beanie and gloves?

I knitted up the rest of the sleeve and the cuffs in the new blue yarn, then did a 1 x 1 rib V neckband and finished it off with 6 rows of stockinette which when cast off rolls to form a beautiful edge to the neck.


All I had to do then was to sew it all together and I finally finished my sweater.


It was a long process but I really like the finished result.  There is really only one small detail that I don't love and that is a bit of gathering at the top of the shoulder seam.  I obviously got some of my measurements mixed up and to get the green and black lines to line up on the shoulder I had to do quite a bit of gathering at the very top.  It's not something I've overly worried about, just a small niggle in an otherwise good jumper.


Tuesday, September 29, 2020

An update on knitting

I haven't been doing a lot of knitting lately.  I feel like I'm a bit stuck.  I started a sweater back in March/April. I knitted the front and back, but then ran out of the main "Marl"colour.  I decided to forge ahead and knit up the sleeves using the other contrasting colours I was using, but at about bracelet length I ran out of the those colours too.  So now I'm struglling with how to finsih it off.  It really just needs cuffs on the sleeves and a neckband.  I've tried buying more of the  Marl colour but I can't find any!  Maybe I'll go back and see if I can find any more of the blue.  But I don't want to start another big project until I've finished this off.  


Looking at these photos I'm wondering if I can get away with black to finish off the cuffs and the neckband?  

In the mean time - as it sits there waiting for inspiration - I've knitted a couple of pairs of socks.

I bought a ball of sock yarn called Queensland Collection Perth in the colourway Kings Canyon.  I think someone's a bit confused about Australian geography! - but what do you expect it's made in China.  It's a 80% superwash, 20% nylon and the colours are beautiful - that's the main thing.

The first pair of socks I knitted using my standard foot and heel pattern with 4 simple cables running up the leg and finished with a 1 x 1 rib.


The second pair was made with the left overs from the yarn of the first pair.  I felt like doing something a little different so I added a lace section running along the inside of my foot.


I added tiny little 1 x 1  cables to the ribbing around the ankle. and then just added a couple of rows of stockinette to the top to create a little roll. 


The length of these was dictated by the amount of yarn I had available so they are just ankle socks.


Then I decided that I needed to learn something new and decided to try some brioche. 

I found a pattern on Ravely for the Triangular Brioche Cowl.  It was listed as a beginner project but with some interesting design.  I pulled a couple of left over balls of Caron Simply Soft glitter out of my stash in blue and green - I love that colour combination.  For this pattern you start knitting at the tip of the triangle and I found I was really struggling with all the increases with all the new notation etc so I went back and did a swatch just to figure out all the terms and so I could see just what each stitch was doing and why.  Once I had that down I got to work.  I followed the first section of the pattern ( the set up part) exactly  as written, but It was starting to get really long so once I got onto the repeat part I decided to add in a few extra increases so that I got to my goal number of stitches faster.  The pattern calls for 6 repeats of the pattern, but with my extra increases I only had to do 4.  I then also left off a repeat or two of the "in the round " section,. doing the repeat 2 times instead of 4 (I also ran out of yarn at that point).  

A quick google search and youtube tutorial showed my how to do a two colour bind off since there was really no instructions in the pattern - it just says bind off with main colour - and my cowl was done.


And the back.


Maybe its just that I'm not used to it, but it feels quite awkward to wear - too much at the front and not enough at the back.  The good news is that L loves it - so I think it's going to be given to her.

But I've now learnt how to do brioche knitting - next step is to design a new pattern using my new skills.  Hopefully I can figure it out!


Tuesday, January 7, 2020

Knitting - Socks and Mittens

When I was in Australia mid last year I stopped into the local spotlight to see what they had.  I wasn't too impressed with their fabric - there was some nice stuff but it was more expensive than I usually pay and nothing was standout enough to pay the extra price....but I did find a pretty ball of sock yarn.  It's not really anything special it's a  Moda Vera Not Just Socks 50% wool, 25% bamboo 25% Polyamide (Nylon).  But its a  great Colour "Bright Multi Mix.


Of course I wanted to make a pair of socks out it.  I basically made up the pattern as I went along.  Working toe up trying it on as I went to get the sizing right. 

The toe is stockinette, there is  1x1 ribbing on the bottom of the sock to mold around the arch of the foot, then a gusset, heal turn. 


The heel is my standard k2 p2, sl2,k2, picking up stiches as you go along so there is no sewing or picking up stitches along the length of the heel. 


It's then knit in K2P2 ribbing for about 12cm.


A nice simple pair of socks.

And when I was finished I still had about 1/2 ball of yarn left over.

So I decided to make a pair of mittens out of it. 


Again the pattern for these was made up as I went along. about 5cm of 1x1 ribbing, another 4 rows of stockinette then increases for the thumb. Once I split the stitches for the thumb out I knitted a few more rows and then added in a few short rows to account for the fact that my pinky is lower set than my index finger.  I think I added a few too many short rows but that better than not enough.

 I then switched to 2x2 rib and knit for another 4.5 cm before casting off.


 I finished off the thumb and then went back, cast on the same number of stitches as across the bottom of my hand and then picked up stitches across the back and started knitting a mitten top to go over the top. 


The underside was in 2x2 rib and the back in stockinette.  A few decreases at the top and then a three needle cast off.


I really love these mittens.  I can slip off the top and have my fingers free to answer/play on the phone, or even slip the whole thing back onto my wrist is I need my hands free without having to take off - and usually lose - the mittens.


Monday, March 25, 2019

Blooms Knitted Sweater

After finishing my last sweater which was a marathon I wanted something a bit simpler to knit.  I knew what yarn I was going to use.  A beautiful 8 ply wool from Bendigo Woolen Millis called Blooms.  Its a variegated yarn with two colours twisted together, then one of the colour strands changes, then the other one so the colour is constantly changing.

Unfortunately, when I pulled out the yarn and started swatching it I found that the moths had gotten to it and it was all in pieces.  I still wanted to use the yarn though and decided that I would just make a basic raglan sweater.  Something that was comfy and warm but nothing special that wouldn't matter if I had a bunch of joins on the inside.  I only had two balls (200g/400 m each) so it was right on the cusp of having enough for a sweater so I decided to just go for it.


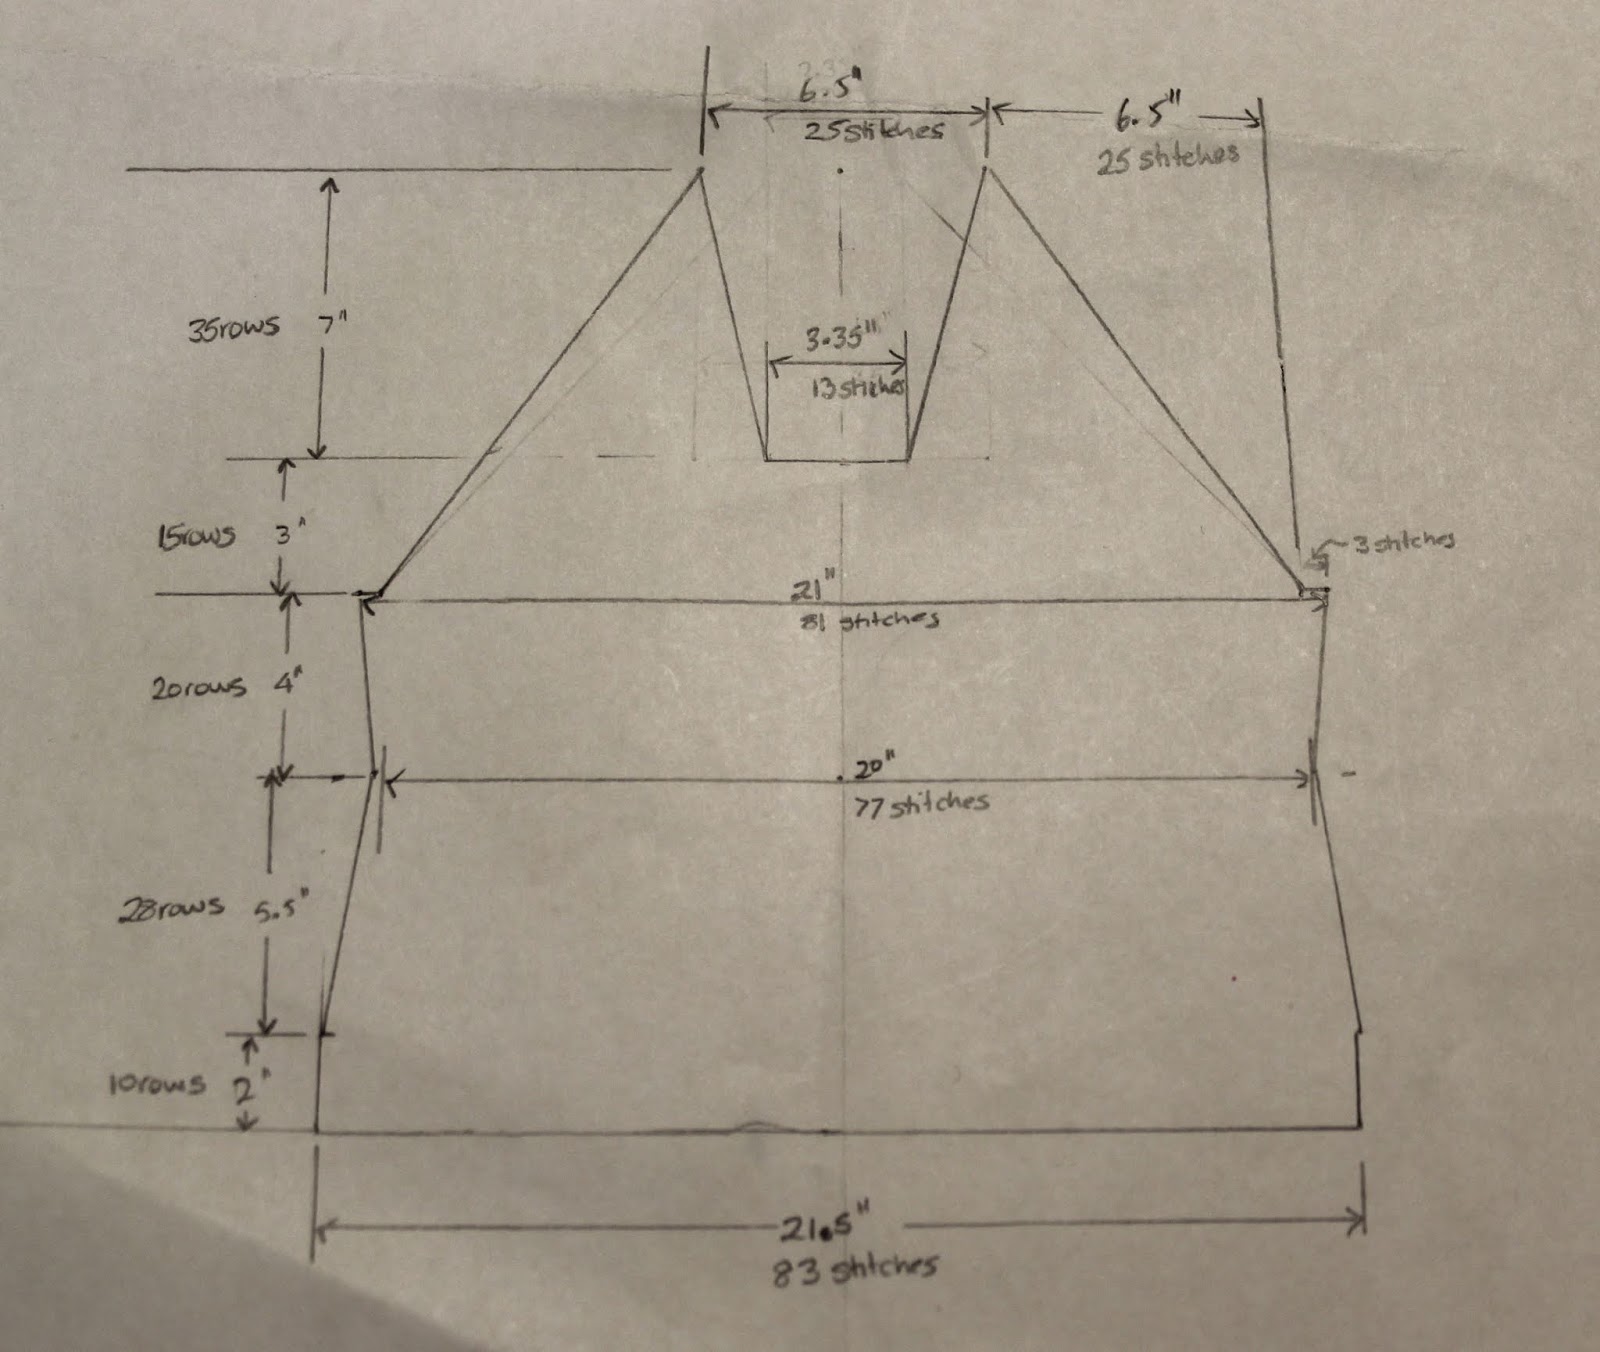
To create the pattern I drew a miniature version of what I wanted with all my dimensions on it and then using the gauge I found from my swatch figured out how many stitches and rows at each point and then just dispersed the increases and decreases evenly between the number of rows and stitches.


I've included a basic version of my pattern at the end for future reference.

I made a few tweaks as I went along - Oh I've done the number of rows specified but it doesn't look quite long enough I'll add another of couple - that sort of thing.

It's all knit in stockinette - which was boring but easy. 

I did run out of yarn when I finished the second sleeve and still had the neckband to go.  However I have a couple of other left over bits of Bendigo Woolen Millis yarns in a slightly lighter 5ply so I used two strands of that together and changed yarns once or twice and worked up the neckband in that.  I had to go down in needle size a bit to get it to match but I'm happy with how it worked out.  I had planned on making a shawl type collar but for it just didn't work so I went back to just a basic ribbed collar instead - It's still pulling at bit at the center but oh well!


When It was all done I decided the length was a bit short so used the same technique as for the neckband to add an extra waistband as well.


I really love this jumper.  It doesn't look great on the inside and the yarn is pilling a bit,  but its so easy to wear and warm and comfortable  and best of all bright! its already on high rotation in my wardrobe.


Pattern:

Yarn - Bendigo Woolen Millis Blooms  My tag says the colour is Jewel but that's not showing up as an option any more.  It looks like Royal to me.
Needles - 6.5 mm circular needle

Gauge
1" = 3.875 st
1" = 5 rows

Front
Cast on 83 stitches
Work 10 rows k4 p1 (I went back and added a further 10 rows at the end for a total of 20 rows)
switch to stockinette
Work 28 rows decreasing  both sides on rows 8, 18 and 28
work 20 rows increasing both sides on rows 3 and 7
Cast off 3 stitches at beginning of next 2 rows.
work 12 rows  decreasing at outer edges on rows 4, 6, 8, 10 and 12
Next row - K25 cast off 13, K25
work 35 rows decreasing at outer (sleeve edge) every 2 rows and at neck edge at row 3 and then every 6th row.
1 stitch remaining at end.  pull end through to finish.

Back
Cast on 83 stitches
Work 10 rows k4 p1  (I went back and added a further 10 rows at the end for a total of 20 rows)
switch to stockinette
Work 28 rows decreasing both sides on rows 8, 18 and 28
work 20 rows increasing on both sides on rows 3 and 7
Cast off 3 stitches at beginning of next 2 rows.
work 13 rows  decreasing at outer edges on rows 4, 6, 8, 10 and 12
work 30 rows decreasing at both sides every second row
work 5 rows decreasing at both sides every row,
Cast off 23 stitches


Sleeves
Cast on 44 stitches
work 9 rows K4 P1
switch to stockinette
work 78 rows increasing both sides at every 8th row. (8, 16, 24, 32, 40, 48, 54, 62, 70) 62 stitches
Cast off 3 stitches at beginning of next 2 rows. 56 stitches
work 2 rows 
work 43 rows decreasing both sides this row and every second row until 12 stitches remain
cast off.

Neckband - using 2 strands of 5 ply yarn and 4mm needles
pick up 27 stitches along front left side of neckband, 12 from sleeve, 23 from back, 12 from sleeve and 28 along front right neck.
K1P1 for 11 rows
Cast off loosely
sew to lower edge of front neckline.

Notes for next time: Add some short rows at bust for extra length - jumper rides up at front.


Sunday, February 3, 2019

Teal and Purple Cable Cardigan

This jumper has been a long time in the making - well over a year.  It began about Dec 2017.  Our local yarn shop was closing down so of course I had to check out the closing down sales.  In doing so I found this wool.  It is some of the most scrumptious wools I've felt.


The wool is Mirasol Qulla.   Its a blend of Merino Wool with Mulberry Silk.  There were only 4 skeins of the colour that I really loved - Ibiza Blue which is really more of a Teal colour.  I grabbed all of them, and then grabbed another 2 skeins of the Violet Hill colour as I figured I would need than more than 4 skeins for whatever I wanted to do.

I had to finish up another project before I could get started and then I had to figure out what I wanted to do.  I grabbed a set of needles and started knitting a swatch to see what different type of stitches looked like in the yarn.  I think I tried about 4 or 5 different stitches before I found one that I loved,  It was a series of interlocking cables.  Each cable was 4 stitches wide and there were about 10 cables.  Now I just had to figure out how to use this. 


I didn't want that to be the whole thing, just an accent so I came up with a design that included a cardigan with a cabled edge running around the bottom edge up both sides of the front and then up and over a hood.  So now I had to test whether I could turn a corner using the cable detailing  - so I picked my swatch back up and tested that. 


Yep that works  Now how am I going to use the purple accents - I came up with the idea of adding a smaller row of cables inside the blue cables, so  had to test that.  Yep I love that - but my swatch is now well over a foot long and still growing!

But for the time being I had my cable idea so I got on with that.  I had recently made the Paprika Patterns Jasper hoodie sewing pattern and really liked the fit on it so I decided to use that as the basis for my new cardigan.  I traced out the pattern and incorporated the side panels into the front and back as well as I could.  I then removed all seam allowances and I had a pattern that I could try and follow.  I measured how wide my cables swatch was and marked that off on my pattern and measured just how long I would have to make my cable.  I started at center back and knitted the cables till I reached the front corner, then turned the corner and knitted up the front of the cardigan.  When I got to the shoulder I measured how long I needed to go around the hood and knitted that, then back down the front of the cardigan, turned again at the lower front and back around to the back.


I think I knitted that cable for a good couple of months - it go quite boring after a while, but finally it was done.

Now I had to figure out what I was going to do for the rest of the sweater inside the cable.  I picked up my swatch again and started trialing things, moss stitch - nope, seed stitch - nope....in the end I decided that I really did like the look of plain stockinette stitch next to the cable.  Once I decided that I still had to decide on what needle size to use.  Size two was too tight, size 4 was too loose - so I had to go out and buy a size three circular needle - yep just right.  Now to actually swatch for gauge.  By the time I finished my swatch was the size of a sweater front and no I'm not kidding - I really wish I had taken a photo of it - it was a work of art in itself.   Unfortunately it had to be sacrificed later.

After a bit of maths to figure out how many stitches, increases, decreases etc I needed, the two front pieces were knitted up during a number of my sons baseball games - I mean it's three hours of sitting in the sun watching 9 year olds try and hit and catch a ball I needed something to do.  They didn't take too long to do, but the back piece when I got to it was a real plodder - have I finished yet?  As I was working I started worrying about how well the sweater would hold it's shape as the stockinette stitch doesn't have a lot of structure to it and so I came up with the idea of knitting another purple cable to run up the side seam and back down the seam of the arm just to provide that little bit of structure needed and I'm glad I did  - it really does make it better.


The sleeves were knitted up slowly over the summer and the side cables started and then we hit a snag.......I ran out of yarn.  I was totally out all yarn and I still had half of a purple side cable, cabled cuffs in blue and purple and the hood to complete.

I went searching on the internet to try and get some more but the best I could do was $50 for two skeins....that's more than I spent on the rest of the yarn....

And so my cardigan sat in the corner of the room for a good couple of months until one day, visiting my local fabric store Fabric Place Basement - I saw a couple of skeins of mirasol yarn in what looked like the right teal colour.  Obviously I didn't have any of my yarn with me to test, but on sale for $14 I couldn't go past it.  The only problem was - they had the teal, but the purple they had was definitely a darker purple than what I used.  I decided to buy it anyway - I figured I could always return it if I didn't use it.

Once I got it home I realised that whilst it was the same brand it wasn't quite the same wool - this was   Mirasol Sulka Legato which has the same merino and silk, but also adds a bit of Alpaca in as well.  But the Teal colour was an almost perfect match to the Ibiza Blue so I decided I would just go with it.  The Plum purple was definitely very different to the violet Hill however but I came up with the idea of using the violet hill on the outer cable band and up the side seams and then use the plum on the sleeve cuffs and the sleeve seam.  Hopefully that way I'll look more deliberate - it's a design feature not a mistake!


I ripped back my side cables to the right length and then started work on the sleeve cables in the plum, which is when I realised that the plum was just a bit thinner than the violet so the cable that it made was a bit smaller - so to compensate instead of using three cables I used 4.

I found out the teal colour was also thinner than the original, so rather than use the new yarn straight away I decided that I would rip out my swatch and reuse the yarn in that.  I managed to do both cuffs and start the hood before I ran out!

I was quite proud of my hood design.  In order to get the curved hood I used lots and lots of short rows.  I knitted the first part straight just angled out at the side seams, then did short rows on either side of the rectangle to shape it into a curve.  From there I did short row wrap and turns to the apex of the hood and then went back and picked them all up creating a beautiful curve to the back of the hood.  Finally I decreased again at each side to get the front curve.  There was definitely some good Maths going on there.


And Finally it was ready to be sewn together.  That took me a good couple of days first sewing the back and front pieces together at the shoulders then setting in the sleeves flat, then I sewed cables down the front side and the sleeve side and then down the other side of the cable down the back of the sleeve and the back of the sweater.  Finally I sewed on the front band, sewed the hood to the back neckline and the cable up around the front of the hood.  long, tedious, but in the end rewarding as my jumper was completed.

I tried it on...the front has a tendency to sag..oh no  I was originally planning on just using a shawl pin or similar to close it up but once I saw it on I knew that I was going to need a zipper up the front.  Hopefully that would stabilise the front and also keep it done up.


After a trip to the fabric store for the right length zipper (and some coral knit fabric for my sewing bee entry) I hand sewed the zipper to the front edges.  I was so tempted to just sew it in with the sewing machine, but in the end I decided that since I'd spent over a year knitting it I could spend the extra hour to so making sure the the zipper was exactly where it was supposed to be hand stitching it in and I'm glad I did because it turned out beautifully. 


When it's done up you can't tell that there is even a zipper there and I was right it does make the front hang better when it's open.

The inside of the zipper doesn't look so great - and one day I might even get around to sewing a facing over the inside of the zip.


But for now it'll just have to live as is as I've spent enough time working on this I want to spend some time enjoying it!