Friday, April 16, 2021

Sewing Bee Round 4 - Goodbye Pandemic Outift

 the 4th and final round of the Pattern Review Sewing Bee - this time they asked us to create an outfit that you would wear to an event or activity that you were looking forward to once the world opens up again.  Here is a cut and paste of my review.

The Event
In many ways I am lucky - the pandemic did not have a huge impact on how I live my life….(you know - apart from never leaving the house part) About 13 years ago my husband, 6 month old daughter and I moved our little family to the other side of the world. In order to keep in contact with all my family and friends back in Australia we started talking regularly on Skype and keeping in contact remotely - I used to joke that I talked to my parents more in the years after we moved than we did in the years before we moved when we lived on opposite sides of the same city! Over the years we’ve found ways to celebrate birthdays’ and Christmas’ and other family orientated events virtually and so when the pandemic hit we already had these routines in place and we just carried on - business as usual.

But whilst catching up virtually is a sad necessity for everyone this year there is nothing like seeing family and friends in person - especially as the kids grow up - its hard to keep up with them virtually. We normally try to get back to Australia for an in person visit every two years or so and thankfully 2019 was a visit year. This means that our next visit is due in June/July 2021. Unfortunately I don’t think that that is going to happen, but hopefully sometime soon we will be able to fly back to Australia…..hopefully….

This leads me to the event that I am looking forward to the most…...a A family reunion weekend at our beach house. Back in the 1950’s when my Dad was a young boy his parents bought some land in Burrill Lake and started building themselves a house - it was a little fibro shack built mostly by my Grandpa and his father with help from my Dad, his brothers and his Uncles - it was a real family affair. Growing up we often went, along with my Grandparents, to this house for long weekends or holidays and I have so many fond memories of this place. The old 1950’s refrigerator, and even older ice chest - now used to store blankets. The old chipped plates and glasses and the toaster that opens from the sides - this house has so many memories stored in it - memories of my great grandparents, grandparents, parents, aunts, uncles, cousins, second cousins, my cousins kids, my cousins kids kids..... they've all left a little of themselves in this house. This is where we have had big family reunions with family members from all over the country coming together to celebrate our joined heritage. It is definitely one of my happy places.

And for me, one of the best things is the short walk across the road to the beach. A beautiful stretch of white sand that squeaks when you walk on it. It’s not the best beach for swimming - too many rips, but it’s a nice walk down the beach to the lake entrance for a quick swim, then back through the caravan park to the road, stop for an ice cream at the little corner store then back home. How many times have I done that route?

Most of my trips back to Australia include a family trip down to our “Holiday House”. I love these times, when we can get my little family, my parents, my sister and her family all crowded into this five room house (with maybe a tent or two on the front lawn as the kids grow up). This is the scenario for which I have created my outfit.

[I played around with photoshop and managed to get photos of my outfits superimposed on pictures of the house at Burrill and the Beach]


For this scenario I needed a bikini and rash vest for our daily trip to the beach, a cover up dress for when we want to pop into town, a hat to keep off the sun whilst we feed the lorikeets at the caravan park and cook dinner on the fire out front and sandals with just enough coverage to protect the soles of the feet, but cool and comfortable enough to wear all day.


Fabric:
As usual I knew that my outfit had to be brightly coloured - colour is what I do best and the world needs more colour at the moment. The colour palette for this outfit started with the fabric for my dress - It’s a cotton double gauze in a white, blue, green and pink plaid. It's a beautiful summer feeling colour scheme plus being double gauze cotton should be nicely absorbent as a beach coverup dress. Next I needed swimsuit fabric to match - I managed to find a poly lycra with a painted design in bright orange and yellows, with pops of blue, green and burgundy, and black “Cheetah like” spots on it. I also bought some plain blue and green poly lycra swimsuit fabric to use as accents.

Design:
Swim Suit:
Since when I’m at Burrill I spend most of the day in my swimsuit - underneath my clothes when not actually swimming - it has to be easy to wear (and easy to use the bathroom in), supportive and comfortable - to me this means a bikini. Now I don’t have what is usually called a bikini body. I’m 40 odd years old, with two kids and all the stretch marks, flab and wrinkles that comes with that - but I refuse to worry what other people think. I believe that anyone can wear anything they want and this is something that I really want to pass onto my kids. A two piece bikini is easy and comfortable and so I will wear it!

But I knew that I wanted to make this bikini special. I’ve always loved the look of strappy, skimpy, string bikini bottoms but whenever I’ve tried to make them in the past I just end up with rolls of fat squidging out between the straps - not the best look - but then I had an idea - why don’t I put the straps over the top of a lining which holds in all the wiggly bits - It worked. I chose to use the blue as the lining material and waistband, green for the straps at the sides and around the leg holes and my main swimsuit fabric front and back.


For the bikini top I wanted to continue with the strappy look so I used my standard bra pattern (to give me the support and comfort I need) but used rouleau loops to make a lattice design to replace the back and also for the straps to make it more bikini less bra. I used the main swimsuit fabric for the outside and fully lined it in the blue fabric. The underbust elastic was encased in a contrasting green swimsuit fabric and two matching snaps were used to close the band at the back.


Rash Vest:
Growing up in Australia I have a healthy respect for the sun. I know way too many people who have had to had skin cancers or potential skin cancers removed for me to be blase about sun safety - so whilst my new bikini is super pretty and will be great for indoor swimming - it’s not sun safe for swimming outside and so I knew I needed to add a rash vest to my outfit. I’ve tried long sleeve rash vests but find them uncomfortable, and I’m happy enough to sun screen up my arms and legs, what I don’t want to have to worry about is my shoulders and back so I wanted a short sleeve, fitted rash vest. A zipper down the front for easy on and off is necessary. I wanted to bring the strap detail from the bikini in and thought about splitting the sleeve in half and adding the strap detail there. I originally dismissed this idea - a rash vest with an open sleeve that doesn’t cover the shoulder is pretty useless - but then I realised I can do the same as the pants, add the blue lining underneath the strap detail.
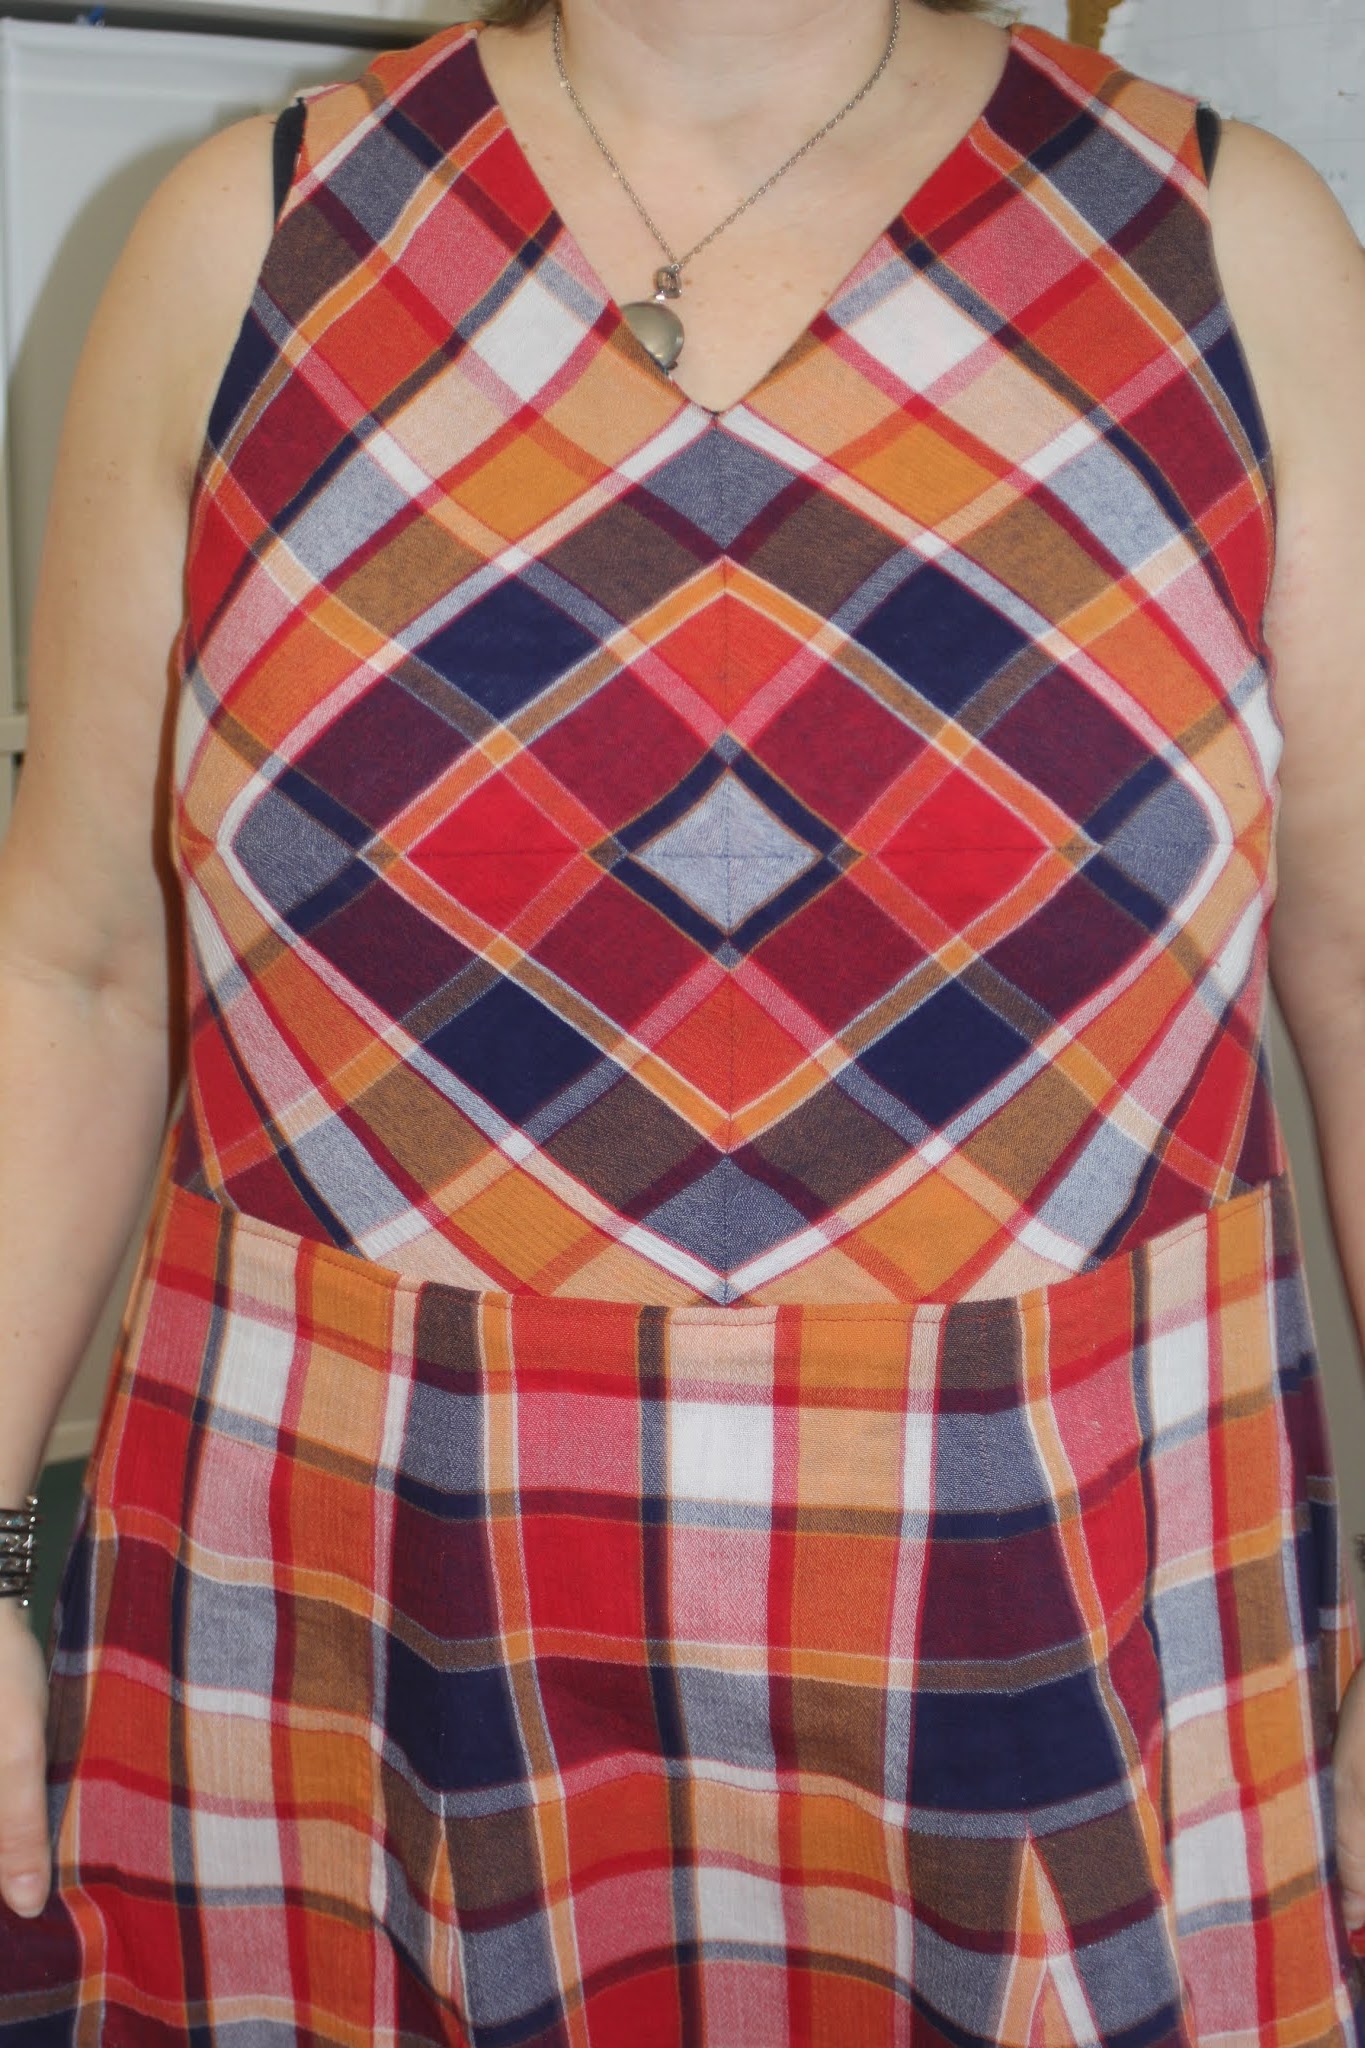


Dress:
Obviously I can’t stand around in my swimsuit all day - so I needed an easy wearing dress to throw on over the top. In keeping with the sun sense theme I wanted to be able to cover my shoulders so I went for a dropped shoulder design with drawstrings in the shoulder that can be pulled tight or loosened depending on how much of my shoulders I want exposed at the time. There is just enough ease (about 1”) added to the bodice and waistband to allow me to slip the dress on and off over my head without any openings or fastenings. I used the blue swimsuit fabric to make shoulder ties and the green swimsuit fabric to make a plaited detail which is hand sewed around the neckline to tie the dress in with the rest of the outfit.


Hat:
I wanted something with a really wide brim for maximum sun protection, but I wanted it to also be something that can get wet as well. Last summer my kids and I put up an outdoor pool in the backyard and spent just about every day in there. I was very good and wore my hat every day, but the problem was I ruined my hat getting it wet every day. This time I wanted a hat that could withstand the constant dunkings, so I made most of the crown out of my blue swimsuit fabric. The top of the crown I used a small amount of the plaid gauze fabric to make it breathable. The brim is made out of two different types of plaid double gauze. The original plaid on the top and a second plaid in the same colour way on the underside. To make the brim stiff enough each layer was stiffened with a heavy weight iron on interfacing, and then two layers of buckram were sandwiched between the layers and super long spiral of stitching was added. To tie the hat into the rest of the outfit I used the green swimsuit fabric to make a plait that is hand sewn around the crown of the hat.


Sandals:
I knew I wanted something strappy to go with the rest of the outfit and so I used rouleau straps made out of the green and blue swimsuit fabric for the vamp. I spent quite some time playing around with different arrangements of straps until I found the one that I was happy with. I used some white leather scraps to make the insole of the sandal and attached my straps to these. The bottom of the sandal is finished with my soft sole fabric and 6mm foam was sandwiched between the two layers to provide structure and support.


Pattern Details
All of these garments were made from self drafted patterns.

Bikini Bottom:
To make the bikini bottoms I used my basic underwear pattern with a few modifications. I added an extra wide waistband (to cover up the worst of the stretch marks) and lowered the waistline at the back and made it a V for a more bikini look. I also added bands around the legs and used these to thread my elastic through.

Bikini Top:
To make the bikini top I used my self drafted bra pattern with a few modifications. This pattern has a two piece cup, bridge, back and strap. I modified the back piece to allow for the addition of the rouleaux loop lattice and replaced the straps with more Rouleau loops.

Rash Vest:
The pattern I used for this was one I drafted a number of years ago - it has raglan sleeves and princess seams and is designed with negative ease for a snug fit. The sleeves, bottom and neckline are all finished with bands for a nice clean finish.

Dress:
The pattern for this dress was drafted during this competition. I started with my sloper, and modified it to include princess seam on a bodice that stops just under the bust, a contrasting waistband and big box pleated knee length skirt (with pockets of course). The bodice is designed with a dropped shoulder that can be worn either down, or gathered up into a strap.

Hat:
For the hat I used my previously drafted pattern that I copied from a ready to wear hat. During construction I tried to change the shape of the crown slightly but none of the other shapes that I tried worked so I ended up right back at the original design. The only modification that I kept in the end was to increase the height of the crown at the back by about an inch, this allows the hat to sit nice and low around my neck. I also added about 1.5" all around the outside of the brim for an ultra wide brimmed sun hat.

Sandals:
To make the sandals I used my basic shoe pattern with the point flattened to a gentle curve at the front. I replaced the vamp with my strap design but otherwise used the pattern as is.

Sewing and Finishing Details:
My outfit features a lot of rouleau loops. These were made by cutting full width strips of fabric about 1.25” wide, using the overlocker to sew the strip into a tube and turning it inside right, these tubes were then cut to the lengths required. These were used on the bikini bra straps and back, the bikini bottom side details, rash vest shoulder details, dress shoulder gathering, to make the plaits around the dress neckline and hat brim and for the straps on my sandals.

Swim Suit and Rash Vest:
One of the biggest challenges making the swim suit and rash vest was pattern placement on my main swim suit fabric. To tie in with my blue and green strap details I wanted a more of the blue green details from the main fabric, but they were few and far apart. Add to that the fact that the pattern was not symmetrical or entirely repeatable and pattern placement was a real struggle. After much trial and error I managed to get the colour flowing fairly evenly across each seam - my main focus was on getting the front panel to flow nicely across the zipper and I think I managed that.


The bikini and rash vest feature a lot of finishing bands; waist band, underbust band, leg and arm bands, neckband etc. these were all sewn on one edge with the overlocker/serger then double turned to enclose all raw edges and top stitched using a twin needle with matching thread to provide the stretch required.

All other seams in the swimsuit and rash vest were sewn as either simple overlocked seams (rash vest) or french seamed. All top stitching was done with the twin needle.

Just as neat inside as out


To install the zipper in the rash vest I used some non woven iron on interfacing along the front edges to deal with the fabric stretch before stitching on the zipper.


Dress:
The bodice princess seams were finished with french seams. The side seams and armholes were finished in one go with bias binding before the bodice was sewn together. The side seams were then sewn and the bias binding was turned to the inside and top stitched. 


The neckline was finished in the same way which was a real head scratcher, trying to figure out how to sew binding to the v-neck in one direction and then turn it under and have it sit flat, but after much trial and error I got it to work.


The shoulder seams were sewn last and were cut to be 1" wide. The seam allowance was turned under and stitched down to create a 3/8" wide channel on either side of the seam through which I could thread straps to add gathers to the shoulder.


For the skirt I took two full widths of the fabric and joined them together at the side seams. I added in-seam pockets into the side seams before sewing the panels together using the same techniques I used in round 2 to make sure the plaids match across the seam. To finish these seams on the inside I did a faux french seam where each side of the seam allowance was turned to the center and the seam allowance was then stitched closed encasing the raw edges inside the seam. The pleats were calculated based on how much fabric was available and where I wanted the pleats placed. I made sure that there was a pleat at each side seam so the pocket sits neatly inside a pleat.


The waistband was finished with an internal facing, machine stitched on one side and then turned under and hand stitched on the other side. A 2.75” deep double turned hem was hand sewn at the bottom of the skirt.


Hat:
I wanted to use the same plaid fabric as the dress, but only had scraps left over so taking a page out of round 2’s book I again pieced my scraps together to get a piece big enough to cut one hat brim. The two internal seams in the hat were finished with a binding made of the blue swimsuit fabric which were then top stitched to the side of the hat. The seam connecting the stretchy poly lycra crown to the ultra stiffened brim was definitely one of the hardest I've sewn - I really struggled to get the stretch fabric to fit nicely without puckering. I'm happy with the final result but it was a real struggle getting there.


Sandals:
Each Rouleau strap was machine basted in place around the leather inner sole piece then the lower sole was sewn upside down onto the top and turned inside out through a gap left in the heel. The foam was inserted through this gap which was then hand stitched closed. This hand stitching was really hard, going between leather on one side and the rubber sole material on the other required a good pair of pliers and a super sharp needle.


I love every piece of this outfit, the bikini fits perfectly as does the rash vest and I love the strap details that I've added - they really take this to the next level.  The dress feels so good to wear yet looks so put together.  The hat....I can't wait to wear the hat.  The only slight problem might be the sandals, they do tend to slide around on the feet a bit, and I don't know how long the foam inner sole is going to last - just wearing them around the house for the day they're already pretty crushed.  Maybe I'll have to add a solid sole once I get some more materials.


Sunday, April 4, 2021

Pattern Matching Madness

And we are onto round 3 of the Sewing Bee for 2021. 

 This time around the challenge was print matching  specifically...

1. Construct a garment or garments, for an adult person, using fabric that has some type of pattern in or on it. The design on the fabric can be part of the fabric weave or can be printed on the surface of the fabric. This includes plaids, florals, or other designs. You can also create your own patterned fabric by printing, appliqueing etc. by modifying flat yardage.

2. Across at least one meeting point, the fabric design should match so that it looks 'seamless'. This match point may be a construction seam, but it may also be something else such as a surface pocket. The matching can be done across as many joins as desired.

I will admit that my original thought was that this would be a fairly easy challenge - boy was I wrong. 

There were so many directions that I could take this....First thing to do was to see what fabrics I had available.  I found about 4 or 5 that would work.  A red, orange, white and navy plaid in a crinkle gauze cotton, a red flannel plaid, a cotton jersey knit plaid in black and red, a rayon with a geometric print in turquoise black and white, a rayon with a  random leaf print, a geometric print cotton fabric in shades of orange and brown or a duck cotton with a world map print.  I sat down and started sketching design designs that would work for each fabric


Then since the competition started on a Friday I got my Friday morning knitting group to weigh in with their opinions.  I want to thank all those wonderful ladies for their time and input - it really does help to talk these things out.

Finally the decision was made that I should go for the red, orange, white and Navy plaid crinkle gauze cotton in a summer dress with a geometric design at the front bodice.  


 I figured this fabric was a good choice not only cause it's pretty, but because it's an uneven plaid - not symmetrical - it would be nice and hard to match - showing skill if I could get it to work, plus the crinkly gauze fabric is a tricky fabric to work with so again good for showcasing skills. The main problem that I could see was the limited yardage.  I had bought a full 3 yards of this fabric which would normally be more than enough for a dress, but print matching takes a lot of extra yardage, plus I had already used a bit of the fabric to make a shirt last summer.  I never liked the final shirt though, so the first thing I did was dig it out and unpick the entire thing to give myself a bit more fabric to play with.

As per usual the first thing to do was to figure out a pattern.  I started with my moulage, cut it off at waist height and rotated the front arm dart to a dart at the bust line.  I then rotated as much as I could of the under bust dart to the bust line as well.  That left the remainder of the under bust dart that nips the pattern in under the bust still in the pattern but there wasn't much I could do about that.  I then split the pattern entirely along the bust line plus removed the fold at the centerline so the bodice is now in four pieces.  


If I cut my fabric on the bias and align all the plaids that should now make a diamond at the center of the chest.  The problem was exactly where on the fabric to center the pattern.

I took a deep breath and started cutting  I was able to get the top two pieces out of the front of the shirt and the two bottom pieces out of the back, sewed/pinned them together and tried it on......and it didn't work.  The diamond (it is there if you look closely enough) was over taken by the dark blue stripes radiating outwards.


I tried again but that wasn't working either


Back to the drawing board.  Finally I managed to find the layout the gave the pattern I was looking for.


But now I had to cut all my pieces again - from my main fabric supply this time - I had better get it right.... 

Next up - do I work on the back, or do I cut off some fabric and keep it aside for a skirt.


I couldn't decide what sort of skirt I wanted so I decided to work on the back.

I wanted to mirror the front diamond on the back, so cut my back pattern piece 12 cm from the bottom -the same as the front pattern piece.  That left a lot of room at the top of the back, so I decided to do another cut where a yoke would normally go - this also allowed me to rotate my neck darts into that seam so there are no more darts in my pattern.

Now to figure out exactly where on my fabric to cut.  In order to make sure I got it right I coloured in my pattern so I could then lay it over the fabric and hopefully get it right first try.


Having learned from my last project, the way I cut my fabric was to lay my pattern piece, with no seam allowance - on my fabric.  I then traced the pattern piece in marker, making sure all my seams would line up, then cut around with a generous seam allowance - not measured out.   Once one piece was cut - I flipped it, laid it over the fabric aligning it perfectly and cut a second piece exactly the same.


To sew the pieces together I followed this process:

1.   I first gave them a good press (the fabric has a crinkle in it, I had to press this out so I could perfectly align my stripes otherwise all the stripes were different sizes). 

Fabric Pressed, seam lines marked.

2.  I then tuned the fabric under at the seam line and pressed again.


3.  This piece was then lined up with the piece it was attaching to and pinned it in place.


4.  Next step was to hand baste the seam in place.  This had to be done very carefully right along the seam line.  I started with a ladder stitch, but this was taking too long so I ended up just doing tiny pick stitches. 


5.  I then flipped the pieces over and was able to machine stitch along the basting line.


5.  I then pressed the seam allowances open, and for the bodice, turned under the extra seam allowance and stitched it under to neaten the edges.


This gave me a neatly aligned seam every time.  There were only a couple of seams that I felt had to be redone - not every stipe aligned perfectly, but most of the time it was close enough for me.


I sewed up the entire bodice and then stepped back to look at it again.....and noticed that at the bottom back seam there were red triangles aligned with orange triangles - how had that happened.  I still don't know.  I thought about leaving it - but this is a competition I figured I better fix it.  So that meant cutting two whole new pieces - I'm rapidly running out of fabric here.  I sewed it together again and finally my bodice was done......the problem was I now did not have enough fabric for a skirt.  I had one small piece about 60-80 cm long of yardage left, and a whole bunch of scraps.

I thought that maybe I could use some of my lightweight denim, paint a pattern on it and then pattern match that fabric as the skirt.


But nope - didn't like that.

Then I looked at the challenge again and really took note of point no. 2   Across at least one meeting point, the fabric design should match so that it looks 'seamless'.  My seams line up nicely, but because they change direction at the meeting points they don't actually look seamless.  Maybe I just need to  use the remaining fabric to lengthen my bodice into a shirt making those seams match seamlessly.  OK lets try that. 


I could do it....but it just wasn't working for me.  It wasn't what I wanted - This was supposed to be a dress.  At this point I decided I needed to take a trip to the fabric store.  Maybe I would get lucky and there would still be some of this fabric there....I doubted it, but I had to try.  I wasn't lucky.....I found another plaid fabric in a double gauze that I loved, but there was only 3 yards of that on the bolt too - I bought it just in case I needed it.  The second fabric store was no better - still nothing to match, and nothing else I wanted to start from scratch on either.  I headed home determined to make my original plan work. 

I thought maybe I could use the scraps of my fabric to make a ragged skirt - urgg  nope.


 I started to clean up and then as I was picking up all my many many pieces of scrap I decided to lay it out to see how much was there..


There's still quite a bit of fabric there - pattern matching really doesn't allow you to cut your fabric out economically.  I started thinking about how in round 2 it was all about repurposing fabric to keep it out of landfill - and now here I was wasting so much fabric - and it go me to thinking - do I have to waste all this fabric - or can I piece together enough to make a skirt?

I carefully laid out all my pieces of left over fabric.  All the pieces I'd cut wrong, the left over pieces from my original shirt and it started coming together.  I reckon I can make a fairly substantial piece of fabric out of these scraps.  I measured it out and it was about 39"x 42" that's not bad - I could work with that.


And so it started.  It was not an easy task. First I had to figure out where each piece would go - and then figure out the best order in which to sew - these pieces were not nicely  shaped - it wasn't like sewing together a bunch of squares.  It was add one little 5 sided piece over here to a triangular piece over there.  Plus of course the fact that every time I had to move it to sew a piece on - it disturbed all the other pieces and then I had to start laying out all over again.  It took two days of meticulous piecing - and of course I had to follow all those steps I laid out above to make sure all the stripes lined up neatly.


But finally I was done.  I had a full piece of fabric again.


It wasn't all that pretty on the back.  I hadn't finished any of the seams as I went along.


But it was together.


And whilst every seam wasn't entirely seamless it was pretty good.  There are about 6 seams in here.


And another 4 or 5 here.


But now I could use this fabric to make a skirt.  My original plan was to make a pleated skirt and so I cut my fabric in half making sure I aligned the top rows of fabrics and pinned it on - and it didn't work.  I didn't like it - so next option was a gored skirt.  I used a pattern that I created for my Mum a couple of years ago to make a 8 paneled skirt.  However since she has a smaller waist than I do I folded the top of the pattern over, based on the length of fabric that I had available.  I used a scrap of muslin I had that was about the same size as my pieced together yardage to make a test run of the skirt.  Cut it out and sewed it up and it was way too  big around the waist.  Now - I could have gone through and taken in each of the seams till I got the right waist diameter, but then I realised that I could just remove one of the panels and it fitted beautifully - That would make it fit on my fabric more easily if I only had to cut 7, plus then I don't have a seam down the front of my skirt so it's really a win win situation.

I tried on my muslin skirt with my bodice and like the way it looked so it was finally time to cut out my skirt.  I cut 6 panels out of my fabric.  3 panels with centered around the white stripe and three with the orange stripe centered - I knew there was always going to be mismatch in the strips down a flared paneled skirt so I didn't think that it would matter much and it fitted much more easily this way.  The 7th panel piece I was planning on cutting from two of the pieces of fabric that I had put aside earlier.  I wasn't sure if this idea for the skirt would work or not so I kept a back up - the four pieces that I needed to make the bodice into the skirt were kept aside just in case.  Before I cut into these I sewed up the six panels of my skirt with the muslin in the back as my 7th piece. 

The skirt shape looked good......but the mismatch of stripes was horrible.  What had I done!  The panels that were centered on the white stripe looked great, the blue stripes then framed the gores nicely  - but the panels centered on the orange stripe were terrible - the blue stripes disappeared and reappeared....oh crap!  I felt so defeated that this point, but I vowed not to let it get me down - I'd pieced this fabric together once - I could do it again....But I had to make a decision - I needed that extra fabric I'd put aside.  Deep Breaths - I decided to go for it.  I took the 4 pieces of fabric I'd originally set aside and joined them together - cut one skirt piece out centered around the white stripe - now I've got 4 good pieces.  I was able to take one of the wrong pieces and add it to a second  one with one seam and then recut it based on the white stripe - that's 5.  The remainder of that piece could be added to the last wrong piece to give me my 6th piece. But now I was struggling - I was back to scraps again and none of them very big.  I think it took at least 12 seams to piece together that last piece of skirt.

Now finally I could get around to actually sewing the skirt together.  To make sure everything matched I took each piece and ironed one edge under by the exact same amount.  I then went around and aligned every single piece on top of its neighbour by the exact same amount, making sure I got everything as symmetrical as possible.  This meant that in some places my seams are a scant 1/4" wide and in some place close to 1" but I wanted everything to look as good as possible with an uneven plaid.  


Again - It's really not pretty inside.


But I was impressed at how seamless at least some of the seams are.  How many seams can you see in this picture?


There are 10 in total.


And now finally I could add my skirt to my bodice.  I would have loved to add a waistband in between but I was really out of scraps now.  This is it - all that is left.


Now something strange is happening.  Despite all my careful measuring and planning the diamond at the back is not the same distance from the seam as the diamond at the front.  At the front the blue diamond finished right at the waistband which is what I wanted - but at the back it disappears..  I have no idea how that happened - but I just had to live with it.  Looking at it now I would move the diamond up on the back and remove the top yoke seam.  But oh well - it's done now.


The last thing I needed to do was figure out the necklines and armholes.  I needed to shape them, finish them off, plus I needed to finish the inside of the skirt, so I decided that the best thing to do was make a full lining. 

What fabric to use?  I wanted something breathable and light as those were the two things I loved most about the original fabric and didn't want to ruin that,  so I decided to use some of my leaf print rayon.  


The lining was so simple - I taped all my pattern pieces back together so I just had one front and one back piece, with two darts at the bust and two at the yoke, and then 7 pieces of skirt.   I was able to sew the whole thing in under half an hour.  I then trimmed and pinned the neckline and armholes to the shape I wanted, transferred those changes to my main bodice (I removed the shoulder seams in order to so all this more easily), then sewed the lining to the dress at the front and back neckline and the two armholes. 

With much fiddling I was able to understitch all of these seams to the lining.


Then I just had to finish the shoulders.  I did this using the method I learned from the Closet Core Sallie Jumpsuit pattern where you turn the front of the shirt inside out over the back of the shirt and then sew the shoulder seams as a tube.  It gives such a great finish.

The final step the hems.  For the lining I did a machine stitched double turned hem at about 5/8".  To keep as much length in the main skirt as possible I did a narrow hem.  First I sewed around as close to the edge as I could get making sure it was even all the way around.  I then turned the fabric along this stitching and sewed at 1/8" or as close to the edge as I could get.  I then trimmed the excess off as close to this seam as possible, turned the fabric under again at just over 1/8" and stitched again as close as I could.  This gives a beautiful narrow hem.


And finally....finally...my dress was finished.

Now don't ask about the styling - I tested out every pair of shoes in my wardrobe and somehow these boots just worked best I think it's a proportion thing - I decided not to question it, but just went with the slightly cowgirl vibes.


I'm really happy with the way the front turned out.  


And the matching across the front dart was actually really nice.....just don't look at the side seams - not a match in sight  It just wasn't possible with the front and back design - believe me I tried.


I'm really happy with the way the skirt turned out with the flared seams coming out of the blue.


The back is not the greatest. 


And despite all my efforts, my bra straps still show - I still don't know how that works since all I did was take 1/2" off the outside shoulder.


Still at least it gives a good twirl.


I will admit, when I first finished sewing this I was a bit over it - I was getting headaches every time I looked at that plaid! But once I got all gussied up for the photos and wore it for a while I was sold.  Now I can't wait till it warms up enough that I can actually wear it.