Thursday, May 9, 2019

Bumble Bee Coat

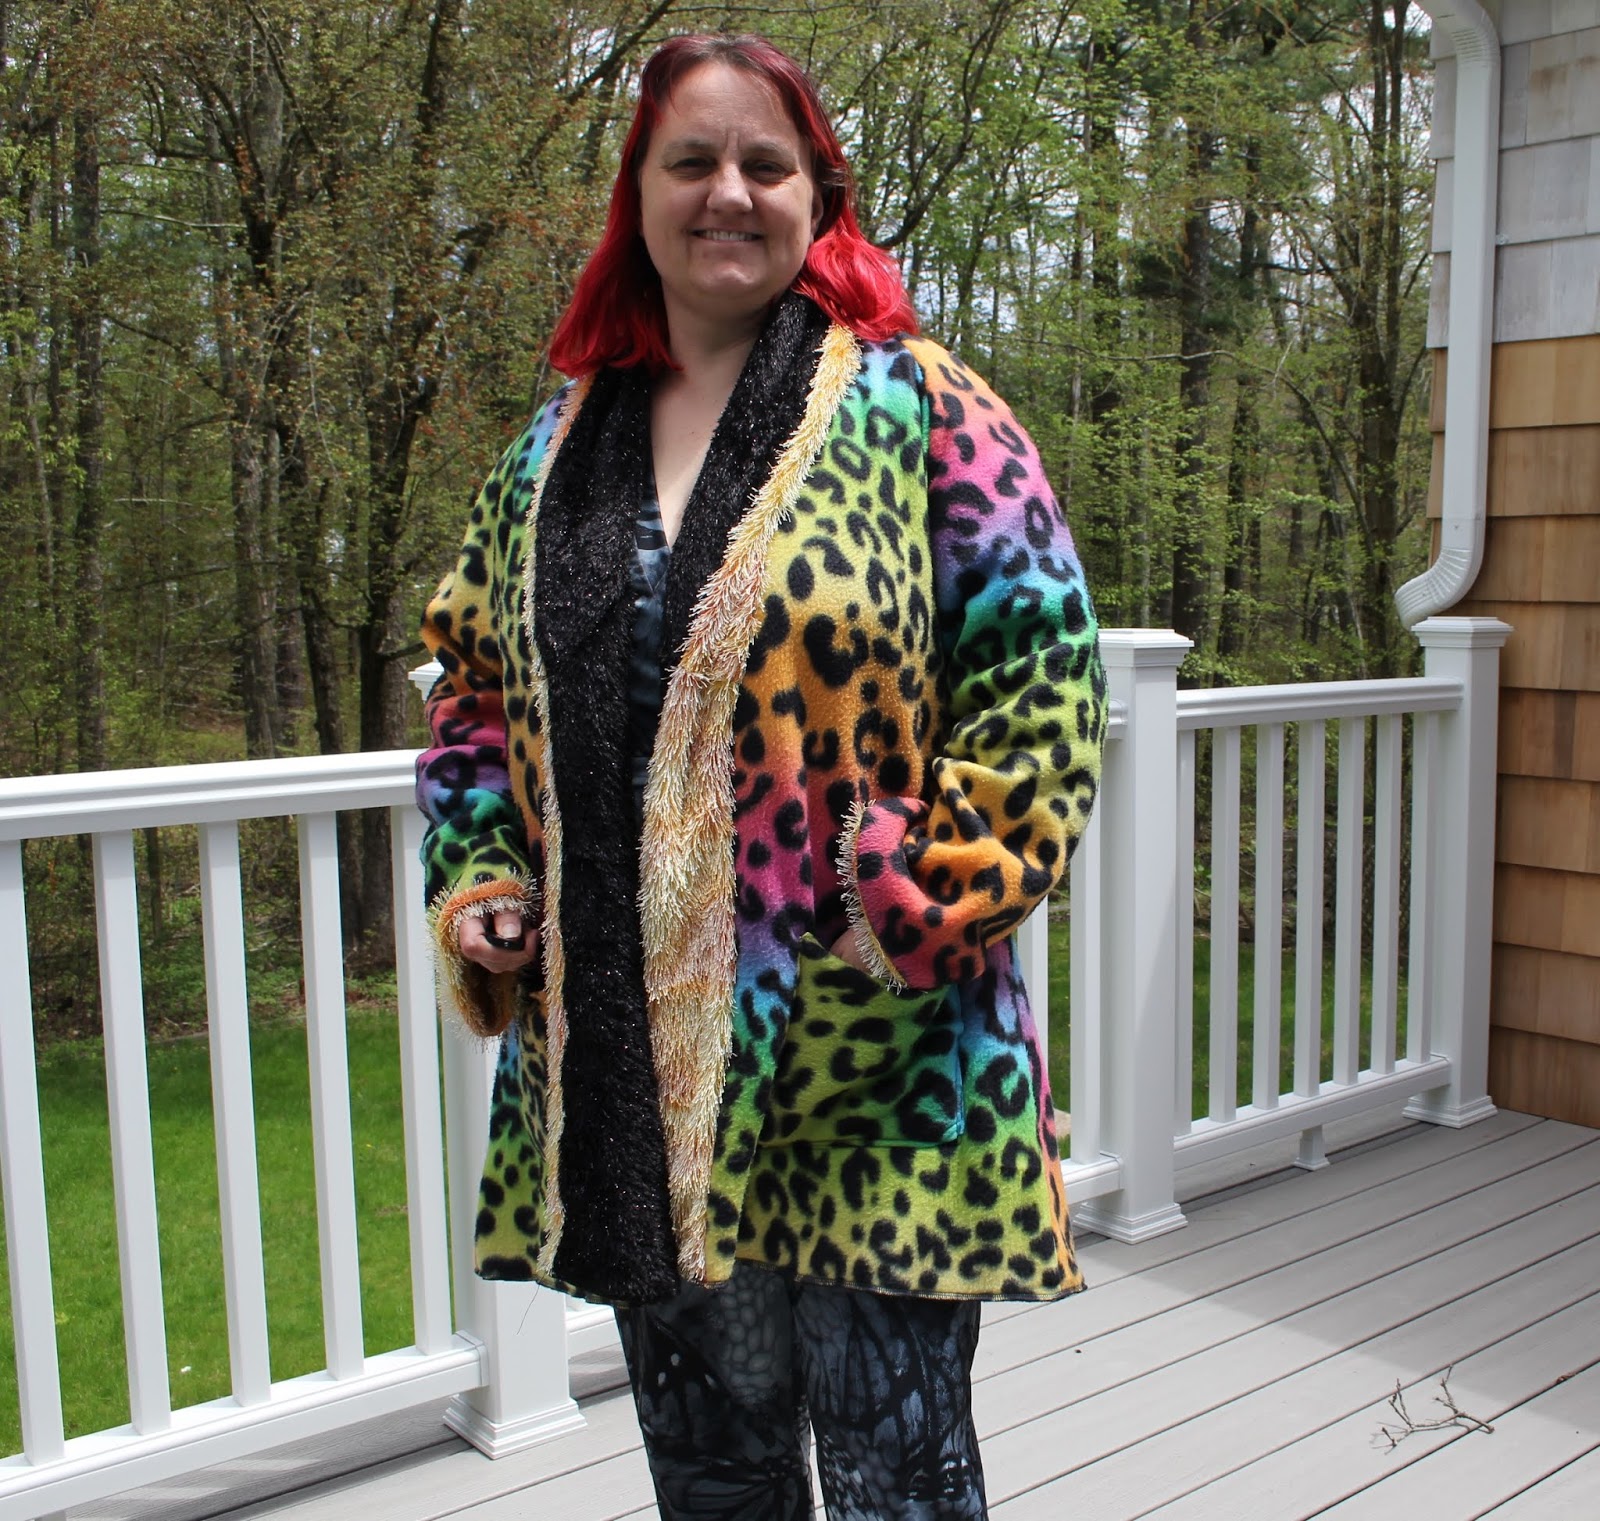
I blame my husband for the name of this coat - the first thing he said when I showed it to him was it looks like a bumble bee.  No issues from me - I'm more than happy to be a bee!


This coat actually came about thanks to one of the lovely ladies in my sewing class.  One class she came in with a couple of pieces of fabric - she'd been cleaning out her stash and knew she was never going to use them and would I be able to use them?   Absolutely yes.  The two fabrics were the black fluffy with flecks of metallic and a yellow/orange fluffy fabric.  As soon as I saw these two fabrics together I knew that they would make a wonderful coat.  I just needed a pattern.

It took me a couple of months before I got around to starting on this.  but during that time I was thinking about how I wanted to make this work.  I went through my pattern stash but couldn't find anything close to what I was thinking of so decided in the end to draft it myself.

I started with the basic coat pattern that I created here, which in turn is based on this Burda Bomber Jacket pattern.  I was pretty much able to just use the coat pattern as is for the sleeves and the back and I just had to do a few adjustments to the front to add the collar on.

To figure out the collar I turned to my favourite coat pattern Simplicity 1732.  The collar is a bit too big but it was good starting point to figure out how a collar like this should go together - I then just modified the shape of it to fit the picture in my head.

Before I cut into my good fabric I decided to use some basic fleece to test the pattern. I had some wild rainbow leopard fleece in my stash and figured that would be fine - I had planned to use it as an interlining, but in the end I loved it so much it became the actual lining.
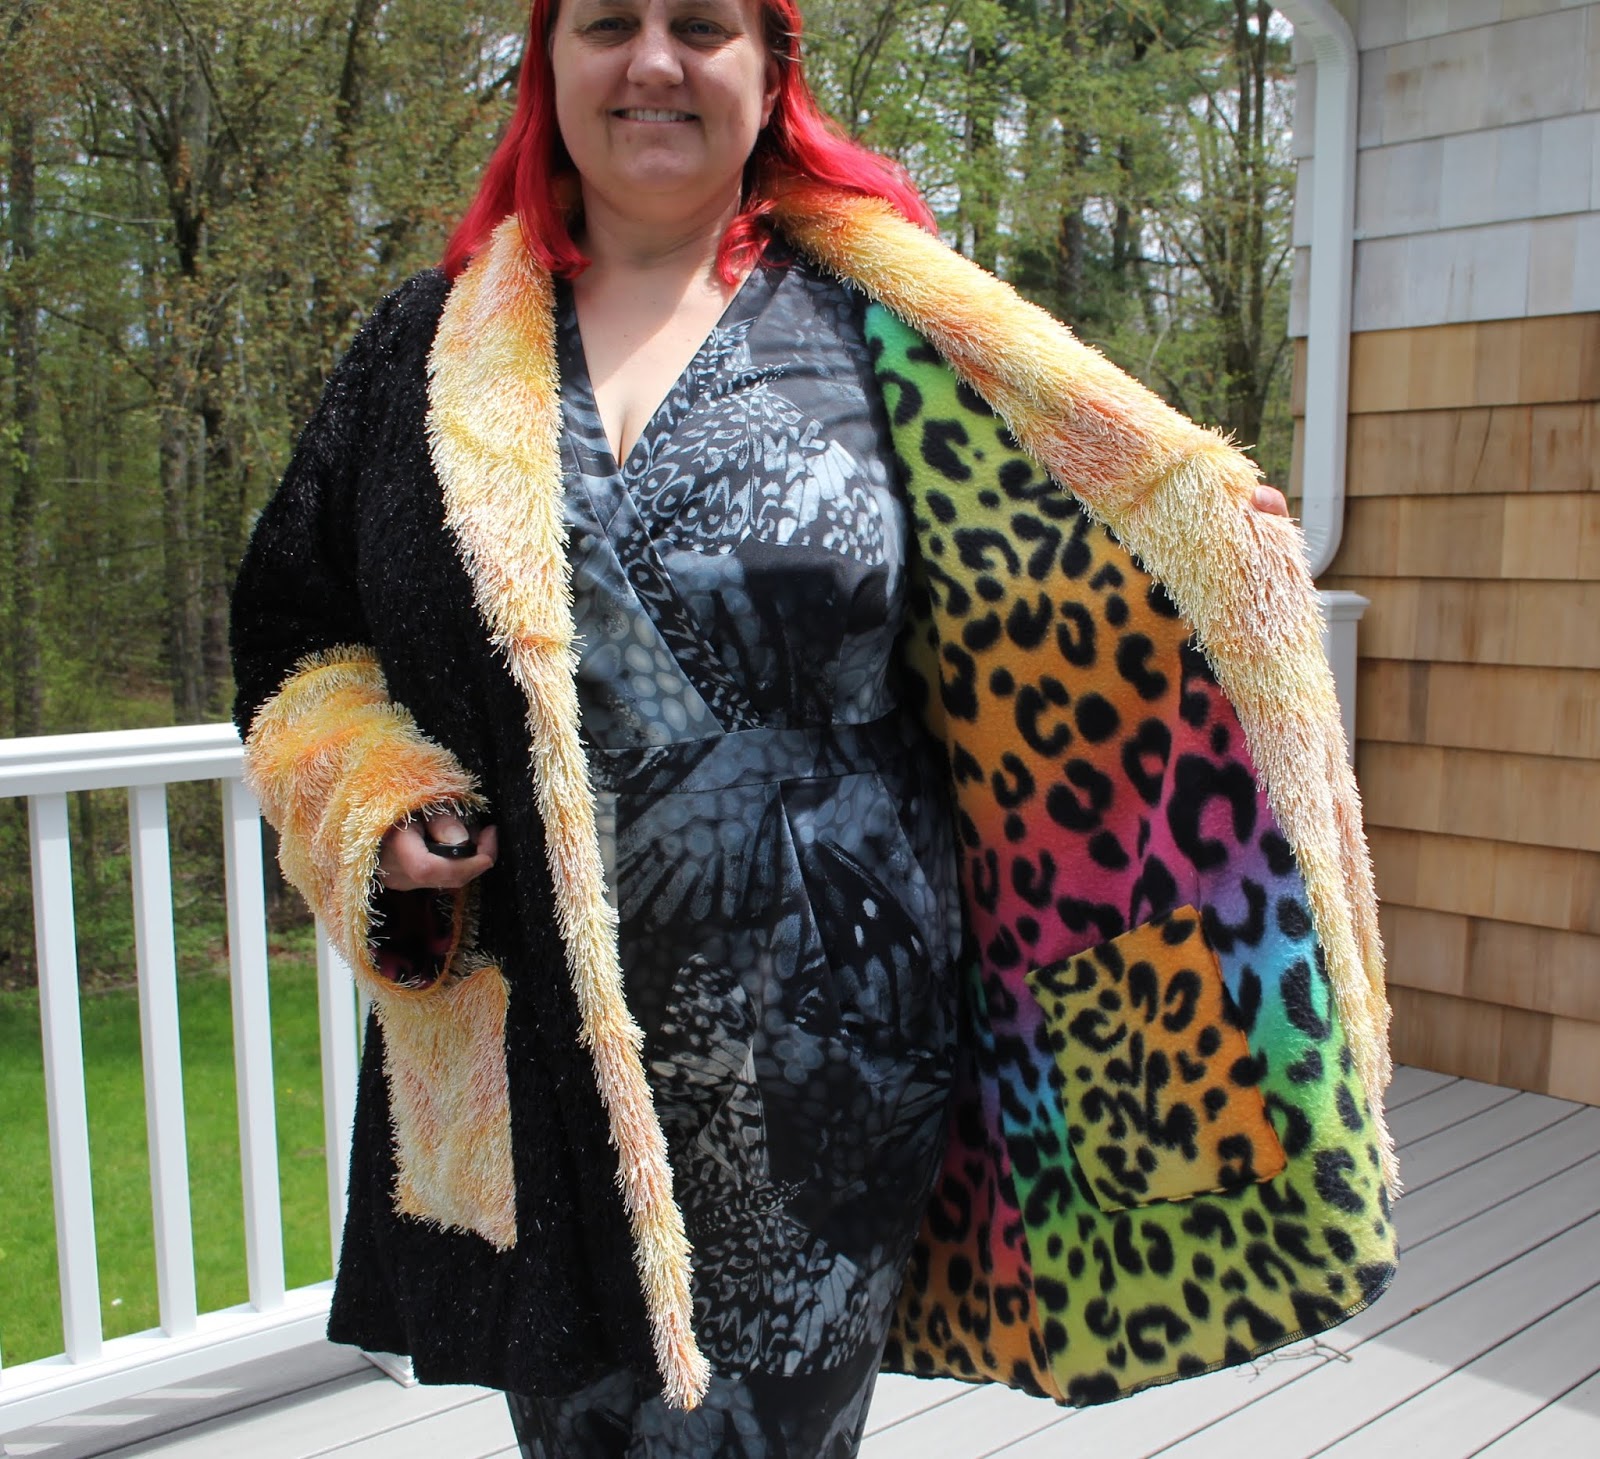


The coat was pretty good, but the collar was still a little too big so I cut it down to what I wanted and then modified my pattern pieces by the same amount.  On the plus side everything lined up beautifully and went together really easily.  If fact I managed to do all the drafting and the muslin in just one school day.

The next day I was ready to get started on the real material.  I decided to use the back for the main body and then make the under collar and facing out of the yellow.   But now I had to figure out how to treat my fluffy fabric.  This fabric - while fluffy is actually not very thick.  The backing is a very open weave knit fabric and there is really not that much fluff on top so its quite light weight.  My original plan had been to underline it with some warm and natural to give it both extra warmth and more body, but in the end I decided to just cut it out and sew it up as is just to see what it was like.  I sewed it with basting stitches only first and tried it on - and actually loved the way it draped.  Ok new plan.  Just use the fluffy stuff as is and the leopard print fleece as a lining. 


Once I decided that the coat came together really fast.  The fluffy stuff was all sewed on the machine and then the seams were overlocked to stop any further shedding which produced a very neat result.  I assumed that I would have to deal with the fluff at the seam lines but this stuff was really a dream to work with and there was really not much more to do than sewing with cotton.


I used some medium weight interfacing on the under collar so that it would behave properly and I was thinking I would have to do it for the facing as well, but since I'd already cut out the "lining" fleece to the full size (not adjusting for the facing) I decided to keep it full size and sewed the lining to the black down the front . I then turned the yellow facing over the lining and hand stitched it in place.  I stitched down the entire facing and under collar by hand to make sure it was all sitting where it was supposed to (and so I didn't have to try and top stitch over the fluffy fabric).


Now the main body of the coat was complete I wanted to think about pockets.  I decided I wanted some big square patch pockets made out to the yellow fluff.  To give the fluff more body I lined the pockets with pieces of scrap cotton.  I thought about hand stitching the pockets in place, but after about 1" was over that idea, instead I decided to use the machine and sew right through the pockets, the body of the coat and the lining, and then decided to add a pocket onto the inside too in the same place stitched down with the same stitching.  It's not my neatest work but it got the job done.


I serged the two layers together around the bottom and then pinned on a yellow band, but didn't love the way it looked.  At the moment I've just left the bottom as is - I'll see after wearing this coat for a while if I want to try anything else down the bottom, maybe a smaller band?

Finally I still need a fastener for this coat. but I can't figure out what sort, especially as I want to be able to wear the coat both ways.  I may just put a simple snap in at some stage, but for now I've been wearing the coat without any fastener.


Thursday, April 11, 2019

Peacock Jeans

After my fitting issues with my last pair of pants I decided I wanted to try again but with a different pattern.


About 6 months ago I started work on a new pants pattern by creating a duct tape double of the bottom half of my body. I then cut my duct tape double down the sides and back trying to keep those lines as straight as possible, and then used these as the basis for my pattern. I created a leggings pattern out of it - but at the same time I also created a slim legged pants pattern. At the time I never got around to making up the resulting pattern, but I figured now was the time to try it out.

I cut the pattern pieces out of a piece of lightweight denim/lycra I had in stash and then the first thing I did was draw vertical and horizontal lines across the back side of my cut out pieces so I could try and get my pattern balanced. 


one of my early basting attempts before I got everything aligned.

I did much pinning, basting, unpicking, re-pinng and re-basting to try and get my pattern just right and I'm pretty happy with how it turned out.


 I still have some wrinkling under the bum, but I need that to be able to move. Everything else seems to be aligned...although if I were to make it again I would move the side seam forward by about 1" Whilst it's nice and straight its a bit too far back at the moment. 


Once I was happy with my pattern (and after transferring all my changes to my paper pattern) I started sewing my pants. All seams are sewn on the machine and then finished on the overlocker before being top stitched in a combination of neon green and blue thread. 


Since I did not cut on a fly I had to learn how to sew on an additional fly piece - I used the Grainline Studios tutorial for this and it turned out OK.

The front pockets were made with a freehand curve 


and the pocket bags extend to the front fly and right down to the thigh - I like a nice deep pocket!


The inside pocket bags are made from cotton batik.

Next up was the back pockets... I was recently introduced to the idea of using the free motion quilting foot on my sewing machine to embroider designs and I was really intrigued. I sketched out a fairly simple peacock design and tried it out of a piece of my denim that I stabilised with a medium weight interfacing. My first attempt was a bit sparse, but by my second attempt I was really impressed with how it all came together and I had the idea of using my design as a back pocket for a pair of jeans. I did a third peacock similar to the second and lined them both with a batik material to create jeans back patch pockets.


The peacock pockets were sewn on the back with a purple top thread so it didn't interfere with the peacock design.  

I really  really love these pockets.


The waistband I cut as my normal 4 piece wasitband.  I sewed th the outer waistband in place and sewed the inner wasitband to the outer along the top edge.  Rather than interfacing any of my waistband pieces, I stabilised it with some 1.5" wide knit elastic. I used a zig zag stitch to attach the elastic to the seam at the top of the wasitband and then top stitched around the top of the waistband stretching it as I went.

I then turned under the bottom of the inner waistband and top stitched it in places as well.  It looks all puckered when I'm not wearing it, but once the pants are on it creates a nice snug clean waistband finish.

Snaps in a matching neon green are used to close the waistband.


The length on this pattern was only just long enough so the bottom of the legs are overlocked and then turned under 1/4" and stitched in place.


I actually don't think the photos do these pants justice. I like these pants a lot more in person than I do the pictures. They seem to stay up a lot better than my last pair of pants and are really comfortable. I'm still not convinced about the slim leg on me - I feel like I need a little bit of flare to balance out my waist/bum/hips, but that'll be easy enough to modify and in the mean time I'll try out a new silhouette for me and enjoy my really cool peacocks.


Tuesday, April 9, 2019

Pretty Purple Pants

I've been feeling very uninspired by my winter wardrobe this year.  Everything is just very blah.  Just about everything I wear is in some shade of blue/grey/black. I need more colour in my life.  So I decided that I would made a new pair of pants in a bright colour.

I took myself off to the fabric store and went looking for pants fabric.  I found 2 that I really liked.  One as a teal green fabric - a stretch cotton sateen type fabric, and the second was a slightly heavier weight twill in purple.  I tossed up which one to make and in the end decided on the purple.  Really purple goes with just about everything in my wardrobe.  Reds, teals, greens, blues, they can all be paired with purple.  So I grabbed 2 yards of the purple twill and got to work.


(I also whipped up a the top shown here - same pattern as last time from poly sweater knit fabric I found on the same shopping expedition)

I went back and pulled out my pattern that I used to make my last true pair of jeans.

I modified the front pocket shape a bit from what I used last time - eliminated the yoke under the pocket and squared it off a bit but that's really the only changes that I made to the flat pattern.

I then got started sewing. I started with some decorative stitching on the back pocket.  I bought a burgundy topstitching thread and  threaded my machine with both that and a gold metallic thread and stitched my design onto the back pockets.  It took a bit to get the thread tension right and it never did turn out perfectly, but after ripping it all out once and sewing it a second time I learned to live with it. 


I then did some more decorative top stitching along the back of the front pocket.


I sewed in the front pockets using french  seams, and did the front fly.


I then  moved onto joining the back pieces. I took my time and taught myself haw to do true flat fell seams.  Not as tricky as I had supposed.  I flat felled the back crotch seam and then sewed on the back yoke using the same flat fell  technique.


 I then basted together the side and inside leg seams to test the fit.

I took the side and inside leg seams in a bit from the hips/crotch down to the knees just to get the shape that I was looking for.  Everything else was good except for the yoke.  There was way too much fabric at the top of the yoke.  I pinched out the excess then transferred that change to my pattern piece and cut out a whole new yoke.  The I had to unpick all the flat fell stitching of the yoke to take the old one off and put the new on.  That was not fun.  And then I ran out of top stitching thread.  I didn't want to wait a week till I could get back to the fabric store so I decided that I would just use normal thread in the same burgundy colour.  But this time instead of adding the gold metallic thread at the same time I did all the stitching in burgundy first and then went back over it on the gold. I liked the look of this a lot better, but not enough to rip out everything I'd done and start over!

I flat felled the inside leg seams (with just burgandy - no metallics) and then just stitched and serged the outside leg seams top stitching in just burgandy down the side seam to the bottom of the pocket for extra stability.

Then I tried on my pants and realised just how scratchy that gold metallic thread was.  It's really not comfortable and there was quite a bit of it through my pants.  At this point I decided that I wanted to line my pants.  That would also make them just a little bit warmer which is never a bad thing in my opinion,  I went through my stash and decided to line them in jersey.  I had scraps of two different blue jerseys that I could use up.  I had to do a bit of piecing to get my pattern to fit but I did it in the end.  In the end I could possibly have skipped some of the piecing - as due to the vertical stretch in the jersey I ended up taking a good three inches off the length of the lining.

 I joined the outer and lining at the waist and then put the waistband on.  I cut both the inner and outer layers of the waistband from the purple fabric. The inner waistband I interfaced with a heavy weight interfacing the the outer with a medium weight interfacing.  I even hand basted the bottom of the waistband down before top stitching to make sure it was a good as I could get it.  I really wanted to using my mettalic top stitching around the waistband too but decided that the scratchyness just wasn't on so the waistband is top stitched in red only.


I used a real jeans button for once and therefore had to make a button hole.  As per ususal my trial button hole worked perfectly, but once i moved onto the real fabric it all fell apart and I ahd to unpick and redo it about 3 times before I said enough is enough and just made it work.

The last tricky bit was getting the lining to fit around the zipper without interfering.  It took a bit of working - and taking the fly shield off and putting it on the opposite side as I realised it was all wrong way around.  It's a bit disappointing in the end I went to a lot of trouble to finish the insides of these pants beautifully and then went and covered it all up with a lining.


These pants felt quite tight when I first put them on.  I realised that the flat sell seams take up more seam allowance than my standard seams so they ended up a bit more snug than I hoped.  But after wearing them for a while they loosened off and feel quite good.  I washed them once and line dried them and they are now quite loose - I may have to throw them in the dryer next time and see how they come out.  I've left the bottom cuff basted on so that if they do shrink lengthways (which is something that I seem to have a problem with with pants) I can let down the cuff for some extra length.

However.....There are a few problem with these pants.  The first you can see in these photos - this fabric is terribly wrinkly. I did in fact iron these pants about 10 mins before taking these photos and you can see just how bad the wrinkles are.  That's not something that I care about in everyday, but I really hate the photos of these pants.


The second problem is that it  seems from the photos that the wrinkles under the bum at the back are back - I don't know why - the last time I made this pattern I didn't have this problem.  But there is definitely an issue with that outer back panel...


And finally the biggest problem is that the minute I start walking they slide down at the back and I have to hitch them back into place.  I wish I could figure out why this happens -  I think it has to have something to do with the back crotch curve but I'm not quite sure what. 


It looks like I'm going to have to do some more fitting work.

But in the mean time I now have a very bright cool new pair of pants. They are warm and snugly thanks to the lining and I really love the colour of these, they are very easy to match with the rest of my wardrobe - Bring on more colour! 

Maybe I can buy a little more of this fabric and turn these into a pair of overalls/bibs - that should keep them from sliding down at the back.


Monday, March 25, 2019

Blooms Knitted Sweater

After finishing my last sweater which was a marathon I wanted something a bit simpler to knit.  I knew what yarn I was going to use.  A beautiful 8 ply wool from Bendigo Woolen Millis called Blooms.  Its a variegated yarn with two colours twisted together, then one of the colour strands changes, then the other one so the colour is constantly changing.

Unfortunately, when I pulled out the yarn and started swatching it I found that the moths had gotten to it and it was all in pieces.  I still wanted to use the yarn though and decided that I would just make a basic raglan sweater.  Something that was comfy and warm but nothing special that wouldn't matter if I had a bunch of joins on the inside.  I only had two balls (200g/400 m each) so it was right on the cusp of having enough for a sweater so I decided to just go for it.


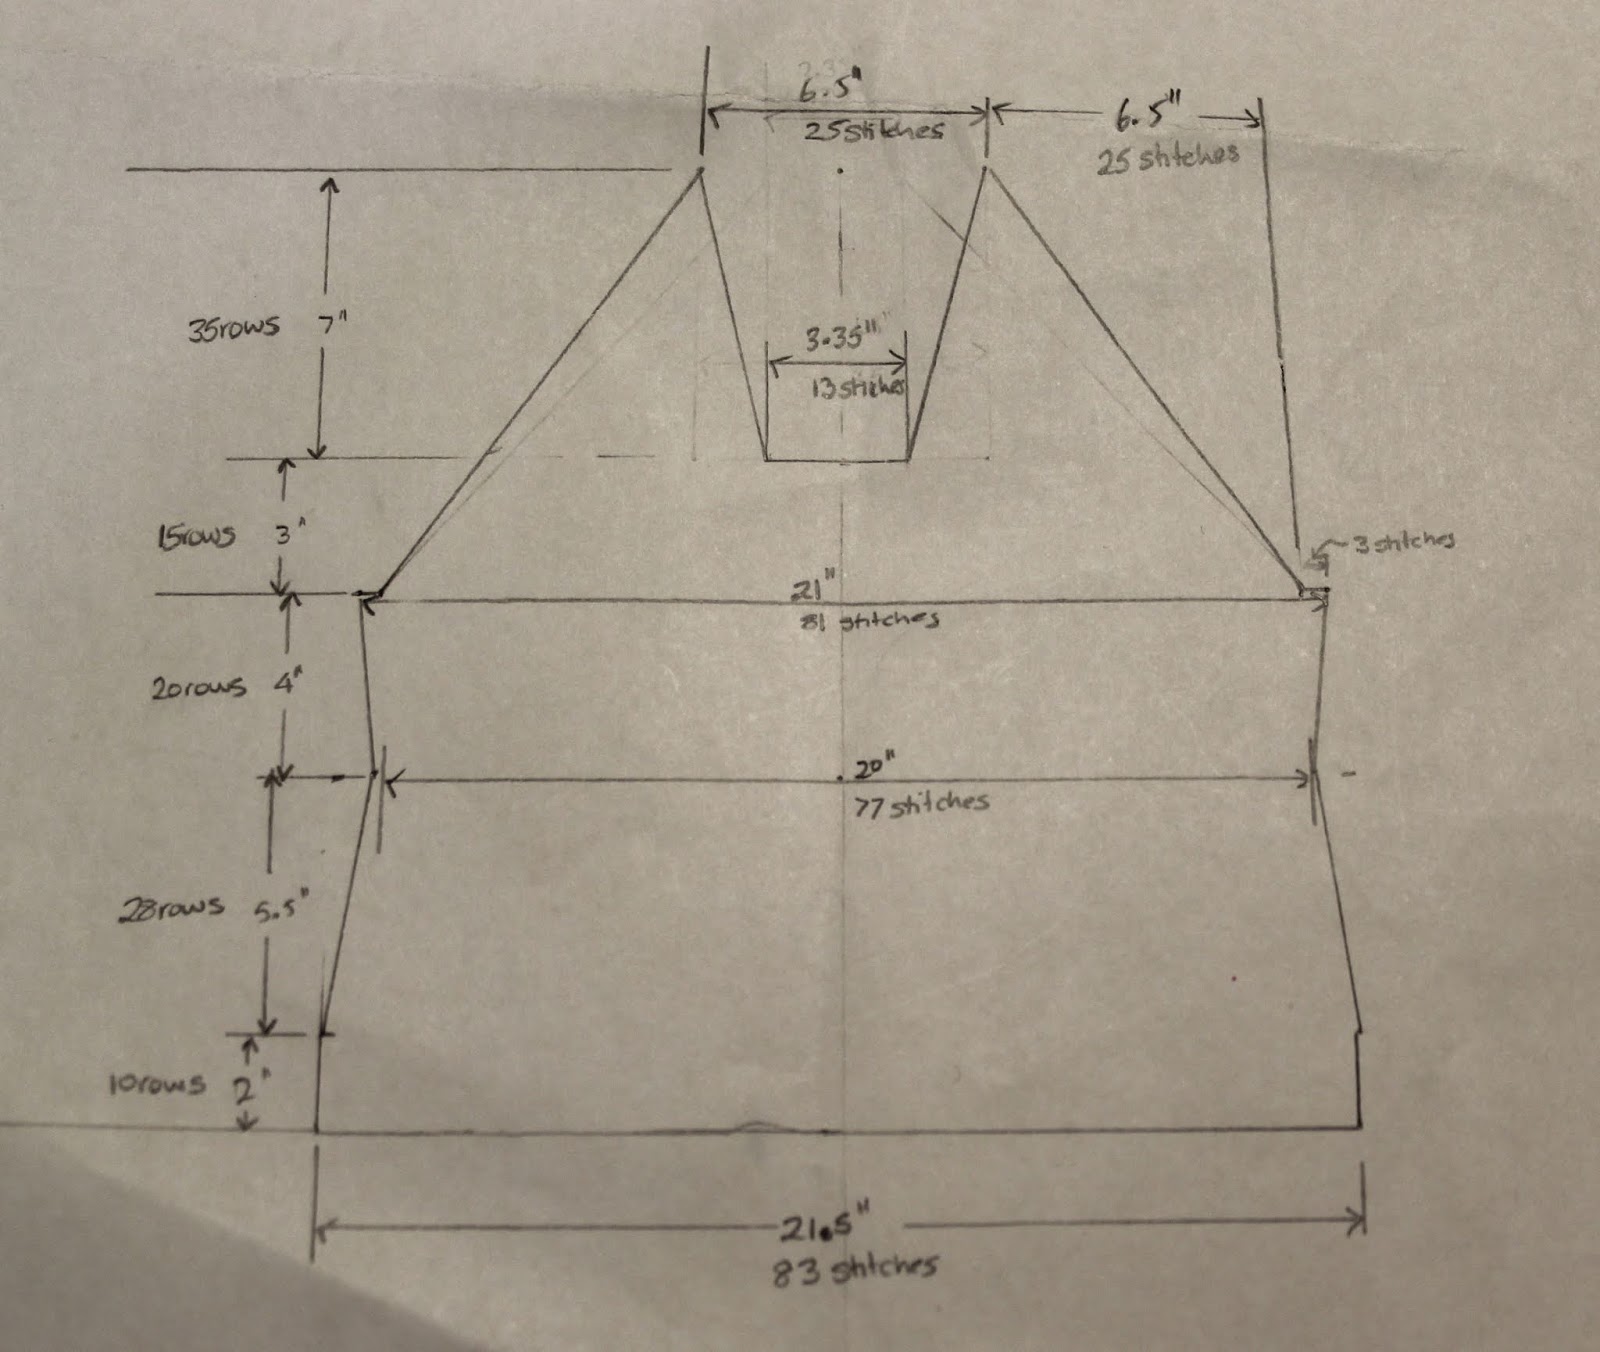
To create the pattern I drew a miniature version of what I wanted with all my dimensions on it and then using the gauge I found from my swatch figured out how many stitches and rows at each point and then just dispersed the increases and decreases evenly between the number of rows and stitches.


I've included a basic version of my pattern at the end for future reference.

I made a few tweaks as I went along - Oh I've done the number of rows specified but it doesn't look quite long enough I'll add another of couple - that sort of thing.

It's all knit in stockinette - which was boring but easy. 

I did run out of yarn when I finished the second sleeve and still had the neckband to go.  However I have a couple of other left over bits of Bendigo Woolen Millis yarns in a slightly lighter 5ply so I used two strands of that together and changed yarns once or twice and worked up the neckband in that.  I had to go down in needle size a bit to get it to match but I'm happy with how it worked out.  I had planned on making a shawl type collar but for it just didn't work so I went back to just a basic ribbed collar instead - It's still pulling at bit at the center but oh well!


When It was all done I decided the length was a bit short so used the same technique as for the neckband to add an extra waistband as well.


I really love this jumper.  It doesn't look great on the inside and the yarn is pilling a bit,  but its so easy to wear and warm and comfortable  and best of all bright! its already on high rotation in my wardrobe.


Pattern:

Yarn - Bendigo Woolen Millis Blooms  My tag says the colour is Jewel but that's not showing up as an option any more.  It looks like Royal to me.
Needles - 6.5 mm circular needle

Gauge
1" = 3.875 st
1" = 5 rows

Front
Cast on 83 stitches
Work 10 rows k4 p1 (I went back and added a further 10 rows at the end for a total of 20 rows)
switch to stockinette
Work 28 rows decreasing  both sides on rows 8, 18 and 28
work 20 rows increasing both sides on rows 3 and 7
Cast off 3 stitches at beginning of next 2 rows.
work 12 rows  decreasing at outer edges on rows 4, 6, 8, 10 and 12
Next row - K25 cast off 13, K25
work 35 rows decreasing at outer (sleeve edge) every 2 rows and at neck edge at row 3 and then every 6th row.
1 stitch remaining at end.  pull end through to finish.

Back
Cast on 83 stitches
Work 10 rows k4 p1  (I went back and added a further 10 rows at the end for a total of 20 rows)
switch to stockinette
Work 28 rows decreasing both sides on rows 8, 18 and 28
work 20 rows increasing on both sides on rows 3 and 7
Cast off 3 stitches at beginning of next 2 rows.
work 13 rows  decreasing at outer edges on rows 4, 6, 8, 10 and 12
work 30 rows decreasing at both sides every second row
work 5 rows decreasing at both sides every row,
Cast off 23 stitches


Sleeves
Cast on 44 stitches
work 9 rows K4 P1
switch to stockinette
work 78 rows increasing both sides at every 8th row. (8, 16, 24, 32, 40, 48, 54, 62, 70) 62 stitches
Cast off 3 stitches at beginning of next 2 rows. 56 stitches
work 2 rows 
work 43 rows decreasing both sides this row and every second row until 12 stitches remain
cast off.

Neckband - using 2 strands of 5 ply yarn and 4mm needles
pick up 27 stitches along front left side of neckband, 12 from sleeve, 23 from back, 12 from sleeve and 28 along front right neck.
K1P1 for 11 rows
Cast off loosely
sew to lower edge of front neckline.

Notes for next time: Add some short rows at bust for extra length - jumper rides up at front.


Saturday, March 23, 2019

More joggers and T shirts

Well the Pattern Review Sewing Bee is over - and once again I didn't win anything!

In the aftermath of disappointment I needed an easy happy make so I could feel good about my sewing again.  No matter how many times I tell myself that it doesn't matter that I didn't win,  I never really listen to myself.

But I needed to move on.  and what I need most right now is some more easy wearing clothes....what I really want is something in a bright print, I feel like my winter wardrobe is just so blah.  However finding fabric that is bright in the warm materials that I want to wear at this time of year is elusive.  And so once again we have black pants and a grey and maroon striped top...


The Pants - This fabric is an offcut that I picked up at Sewfisticated for $1.99/ yard.  It's a beautiful fabric - a black wool with a faint herringbone pattern in blue.  It's quite a heavy weight so I knew it'd be nice and warm, but also just a smidge scratchy so I also knew it would have to be lined.  My biggest problem with the fabric is just the lack of it.  There was just over 1 yard of it  and it was only 45" wide so there was not much fabric to play with.  As the fabric was patterned I had to make sure the pattern was going the right way so I couldn't cut it on the cross grain which is my standard way to make pants out of a small offcut of fabric.

So the first decision was to make slim fitting pants rather than my preferred flares. I  would normally also cut some length off the rise to give the the length I need however this time I decided to add length to the rise.

One of my biggest issues with pants is the fact that I have to constantly hitch them up.  A lot of this comes from the fact that my waist (at belly button) is just about the same circumference as my hips so there's no flare to keep the pants in place they just slide down.  I thought that maybe if I were to make them high enough and bring them right up to my natural waist I could cinch them in more and they might stay in place better.  So I added an extra 2" to the rise of the pants. 


Once all these things were taken into account, to get my pattern cut out of the material I had I had to cut about 3" off the bottom of the pants...I decided to give it a try - I planned to add a cuff to the bottom anyway I'd just make it a longer cuff....


I used the same basic pattern that I had used for the Joggers for the sewing bee just made a minor modification to the pockets and changed the rise. 


Once I had my main fabric cut I rummaged around my scraps pile for some left over rayon - I wanted something light to line these pants and Rayon is my lining of choice.  I found some royal blue with enough yardage and cut out the same pattern but without the pockets.


I then found some black ribbing to use as the cuffs and waistband.  The waistband is a simple elastic band. 1.5" wide ribbing and 1" elastic.


So my final feeling on these pants!  well they are warm and comfortable which is good, but they're a bit too big around the hips and despite the high waist they still slide down.  So not 100% perfect.....and they could definitely do with an extra inch or two in the length.


The Top.  I wanted to use up some more of my stash fabrics so pulled out this beautiful maroon and grey stripe sweater knit.  I decided to use the raglan pattern with the angled side seams that I've used numerous times before and really like the shape of.  I like how it's fitted around the bust but skims over all the bulgy bits beneath!

This was a really easy make.  The only slightly difficult bit was when I decided to line it with another grey jersey fabric.  I like my tops warm and lining is a easy solution.  It just basically meant making the shirt twice in the two different fabrics then joining them together to add the neckband and do the hems. 


The neckband I cut on the cross grain which reduces the amount of stretch, but its enough to get it over my head and that's all that's necessary. The hems are simply double turned and stitched with a small zip zag.  I did contemplate finishing the neckband neatly inside which would have made the shirt reversible but I decided I would never really wear a plain grey tshirt so decided not too (It wasn't lazyness really!)


I really like this shirt - It's warm and comfortable, the colour is a bit more boring than I had hoped but at least it's not plain.  However I learned that I should not make this pattern out of a stripe.  I did attempt to line up my stripes but between the angled raglan sleeves and the angled side seams its just about impossible to match anything, so in the end I just gave up and didn't bother matching anything!