Monday, May 8, 2017

2 pairs of Flared Pants


 I came to the realisation the other day that I have very few (read none) good fitting  pants in my wardrobe anymore.  Time to do something about that.  I went into to my fabric stash and found a piece of corduroy that I bought some time ago.  This corduroy is a great colour.  A sort of turquoise/aqua colour but darker.  I've been meaning to make this into a pair of pants for ages.

I pulled out my old pants pattern, cut it out of the cord fabric (with an extra 1" on each side seam to allow for any growth in girth), basted it together and tried it on.....it felt terrible, the back rise felt way too small, the legs don't seem to sit right, the whole thing seems to creep down my back if I sit down or walk upstairs. Now I'm not sure what's going on here - I used this pattern for my brown cords and I still love the way these feel on so I'm not sure what the problem is?

So I decided to go back to the drawing board.

I pulled out my pattern pieces and re-traced it onto a new piece of paper.  I then went through my pattern stash and pulled out every pant pattern I could find and then - lining them up at the natural waist marks - I traced each pattern piece over my pattern to see how they differed.

The main difference I found was the angle of the back crotch seam.  Mine was angled out a lot further than all of the other patterns.

Whilst I was doing all this investigation I found in my possession a copy of McCalls 9517.


I never realised this before, but view A of this pattern has a seam down the back of the leg.  Now this is one place that I really struggle to fit with pants so I decided that I would make up this pair of pants and see if I could use the seam to get my pants to fit better.  Luckily the copy of this pattern that I have is for a 40" hip.  I have a 42" hip, but based on a comparison of this pattern and my pants pattern I decided that it would be close enough (I've noticed that these old patterns always have a lot of ease in them) and traced out the pattern.

The only changes that I made were:

  • cut 4" off the length of the legs,
  • since I was planning on putting a waistband on I cut 2" off the top of the pattern pieces
  • I split the front pattern piece down the middle to create a seam down the front to match the seam down the back.

Now the problem was that I had already cut out my fabric in my original pants pattern.  I had enough left to cut out new back pieces, but not the front pieces.  So I took my previously cut pattern pieces, pulled out all the stitching and was able to just get the 4 front pieces out of the 4 original pieces of my pants.

I basted the pants together and was pretty impressed with the fit.  I still needed to do a few tweaks though:

  • The first thing I noticed was that the rise was still way too high - with the 2"cut off the top it fitted as it was supposed to by the pattern picture so I decided to just go with it and make a faced finish rather than a waistband. 
  • The pants fitted fairly nicely around the hips but were a bit too big across the front, so I took in each front seam about 3/8" the entire way down.
  • The pants were still a little baggy around the thighs so I shaped both the side seams and the back seams so that they fit snuggly through the thigh and then flared out.  The flare is probably a bit more than I would normally have chosen but I decided to go with it anyway.  
  • I scooped out the crotch curve at the bottom so that it is almost a right angle now.
  • 4" was obviously a bit too much to take off the bottom of the leg, these barely skim the ground un-hemmed so I added about 2" back onto the length of the pants.

I transferred all the changes (except the length) to my new pattern pieces before going ahead and sewing the pants up.

I pretty much went my own way from here rather than following the pattern for finishing.  I added a zip fly to the front (which took me ages to figure out for some reason - I must have spent close to 3 or 4 hours trying to get that fly in).


Unfortunately after wearing the pants for about 2 days the stupid zipper broke - I haven't gotten around to fixing it yet so for the time being I've just sewed the fly closed - I can still get them on and off with a little wriggling.  One day I'll get around to fixing them properly, but until then....

I added back patch pockets with just a simple top stitched design.


And front slash pockets that extend into the fly.   I finished the top of the pants with an interfaced facing piece that is top stitched down around the back but not the front. (It would have interfered with the pockets otherwise).


To deal with the length issue I cut two strips out of my leftover fabric and created a band around the bottom of each leg.


They're still a smidge short, but that was all the fabric I had.

Overall I love the way these turned out,  As I said before they're probably a bit too flared, but hey, everyone needs a bit of flare in their life!


Looking at these pictures I think the front of the leg is a bit too tight - hence the creases - and the corduroy has a real nap which shows up creases really badly, but on the positive side I love the way the back of these pants look.


Once I knew that this pattern worked I got started on my second pair of pants.  I got a job interview and realised that I have no pants that are nice enough to wear so wanted to make a good pair of pants.  I trawled through my stash but I had no material with the yardage I needed so I  took a trip up to my favourite discount fabric store and picked out a beautiful wool material.  Its black with just a hint of a chevron pattern and very faint blue stripes.  I knew this material would need lining so I picked up a beautiful piece of rayon as well that is patterned in blues and butterflies.


I used my new pants pattern and made up the pants in the wool material, this time with just a simple lapped zip and really basic slash pockets at the front.


And then again as a lining in the rayon.  I joined the two pairs of pants together around the waistband and then added a piece of elastic onto the seam allowance as the pants were quite heavy fully lined and I didn't want them falling down.


These pants came together quite easily and I really do love them. They feel so luxurious to wear.

Having worn both pairs of pants for about a month now there are a couple of extra modifications that I think need to be made:

  •  I think I still need to do some tweaking with the front crotch curve as the front doesn't quite sit as I would like.
  • I would like an extra just 1/2"-1"  rise  right at the back seam - it seems to dip just a smidge. 
  • I need about 1" less rise at the front - the rise at the moment is good whilst standing, but when I sit they tend to roll down about 1" so I think eliminating this inch would be a good thing.
Just to round everything out - you may have noticed that the shirt I'm wearing is the same as my lining material for  the black pants - I used my leftovers to create this simple little top.  I used my basic pattern for a top with a seam right under the bust - this allows me to put in two simple bust darts and creates a nice form fitting top.  Unfortunately I forgot that that pattern was drafted for knit fabrics so it ended up way too small.  I managed to salvage it by adding in an 1.25" wide piece under each arm.  Its not perfect but it works.  The front and back V necks are finished with a simple facing and the arm holes are just turned and stitched. I've found myself reaching for this top many times in the last couple of weeks since I made it.




Wednesday, April 12, 2017

Reversible collared shirt


This piece was conceived when I saw this grey jumpsuit by Mimi G.  I have to say I love that look, so much so that I almost bought the pattern,  but then at the last minute I couldn't bring myself to do it.  I knew I'd have issues getting it to fit, and there's always the question of how a form fitting jumpsuit is going to look on MY body as opposed to a model, so in the end I decided to draft it myself.

There were also a couple of changes I wanted to make.

1. I wanted long sleeves.  I have one jumpsuit which is pants length and short sleeve and it never gets worn as, if its warm enough for short sleeves I generally don't want long pants and vice versa...so I need long sleeves.
2.  I wanted it to be warm enough to wear by itself without having to put a jumper over it - obviously this is for practical purposes.  So I wanted to make it double layered.

I started with my basic raglan sleeve, princess seam top pattern, cut the sleeve full length and straight  and cut it out of a black knit fabric that I had in my stash.  I then cut my basic flared pants pattern out of the same fabric put them both on together and pinned them together at my waist line. I had to do a few fitting tweaks, added a center back seam to remove pooling in the small of my back etc. then once I was happy with how it fit I basted it together and trimmed all my seam allowances back.  I then took apart all the seams except that one at the waist and used the material to create the two pattern pieces as per the Mimi G pattern.

I then went looking for a material for the second layer and came out with the beautiful turquoise paisley knit fabric that I used to make L's dress here.  I cut out the pattern pieces up and sewed it up....and that's where the problems started.  I will say here that the jumpsuit fitted perfectly - it was exactly what I wanted......and it looked terrible on me... nope nope nope not going there.

Well what a waste that was.  I folded up the pattern and put it away - I'm not sure why I kept it even.  But then what to do with the half finished jump suit?  I did not want to waste all that beautiful material, so I cut the whole thing in half.  Now I had a shirt and pants.

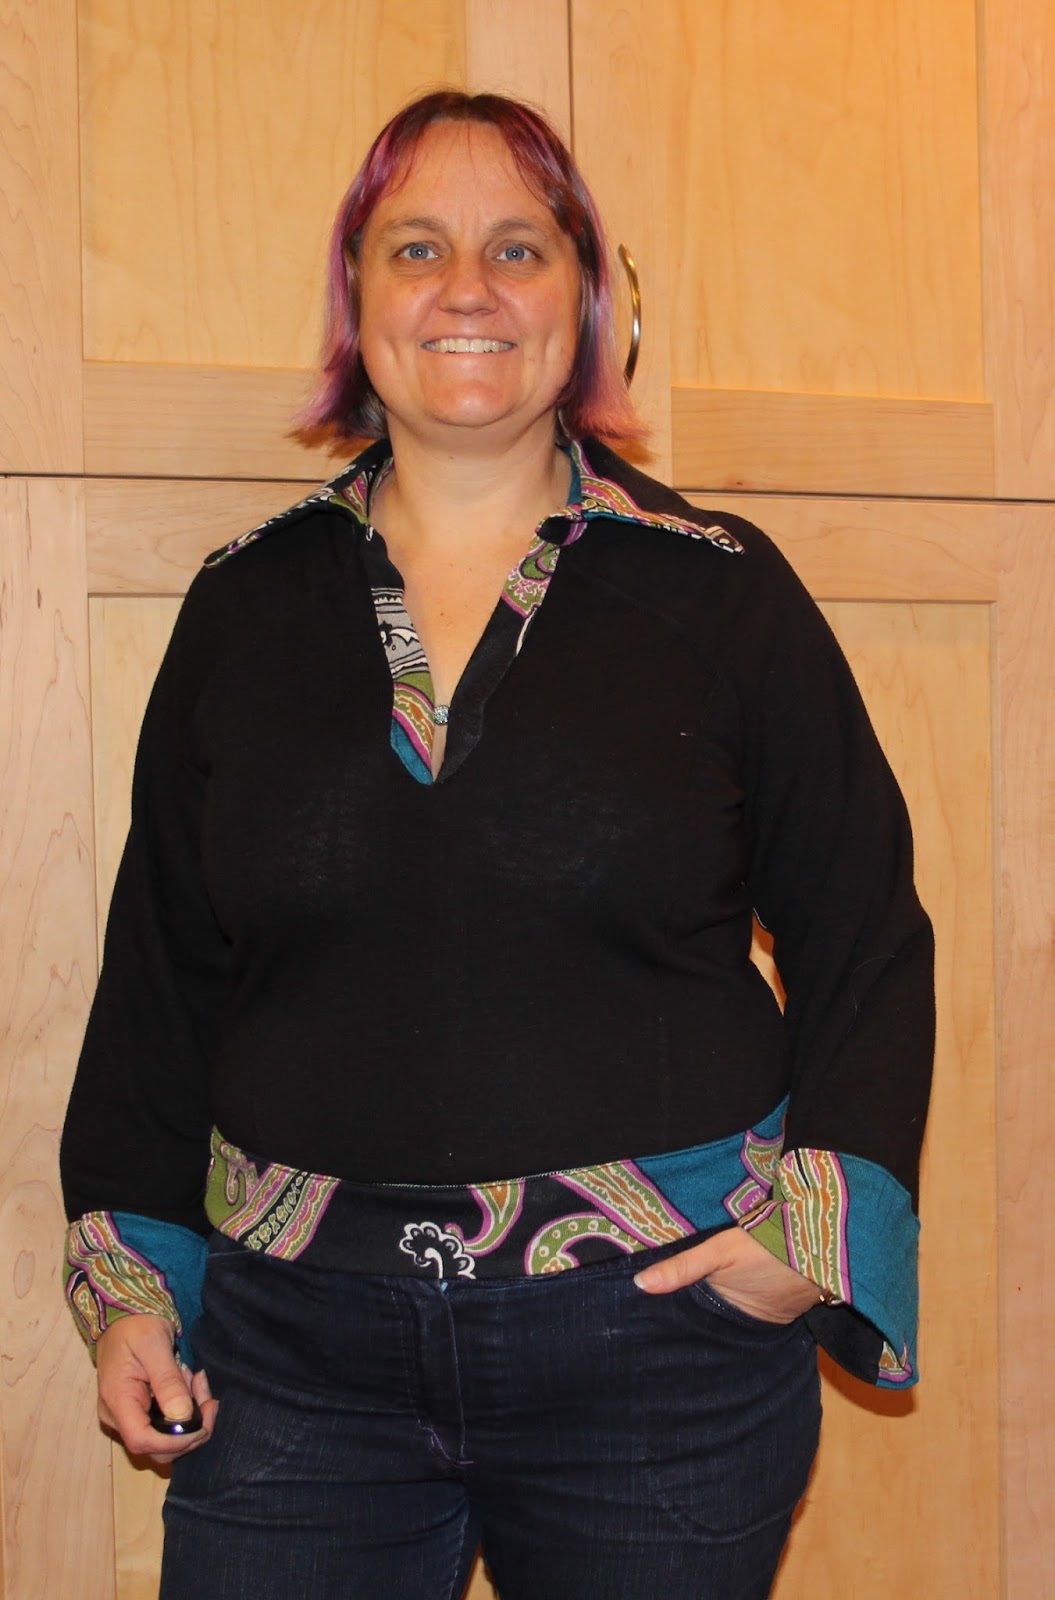
I wanted to finish off the top first.  I went back to my trusty New Look 6704 and used the collar and stand pieces to finish off the neckline.  I used the paisley fabric for all of the collar and placket pieces. Getting the bottom of the placket to look good from both sides wasn't easy and I'm not sure my result was the best possible - I think I need to buy a Henly shirt pattern so I can figure out how to finish off this style of shirt.


The neckline is pretty low cut so I used a bead to hold it together.
I added as wide a band as I possibly could to the bottom as by cutting it off at the waistline the shirt is now pretty short.


I turned the end of the sleeve in the paisley material back onto the black side to create a cuff on the black shirt.  And we now effectively have two shirts - one in the paisley material and one in basic black with collar, bottom band and cuffs in the paisley fabric.


In the end I managed to make a wearable shirt out of this so that's something.  The pants are still sitting in my sewing room.  I'm not sure if I want to make them up for me - or cut them down and give them to L?


Tuesday, March 28, 2017

Assymetrical Funnel Neck Jacket


I was getting dressed one morning recently, and as I did so I realised that every morning in winter I get up, put on one of my nice home made shirts - and then promptly cover it up with a boring fleece jacket.  It's just not warm enough in my house in winter to wear just a shirt (even the fleecy, snuggly ones are not quite warm enough by themselves) and whilst I do have some nice knitted jumpers I can wear, I don't always want to wear them for lounging around the house.  Therefore most days I reach for one of my fleece jackets.  My go to jacket is an old purple store bought fleece, but last winter I did make myself two new fleece jackets - a red one and a green and black one  -  the problem is I'm just so bored of wearing the same style over and over and over...

And so I decided it was time for a new jacket.  I started browsing the internet looking for inspiration.  It needed to be warm, but a bit more stylish than a basic zip up fleece.  What I came back to every time was this pattern from Burda Style.   I absolutely love the neckline on this design.    Now my plan is to make this out of some beautiful wool fabric that I had found during one of my recent forays into the fabric store (and then line it with silk) - But I wasn't about to cut into this fabric without testing the pattern first - so I went through my stash and found a couple of pieces of left over fleece - in teal and black - that would go together to make a nice top.

Sizing - as per usual my sizing is all over the place.  BurdaStyle actually have a really good sizing chart with many different dimensions but, as is standard for me, I ranged from a size 36 (around my neck) to a size 50 (upper arms).  My pattern only came in size 36 to 44.  I decided to start simply by cutting out the entire pattern in a size 44 - but also added extra width to some of the main seams allowances to allow for fitting adjustments to be made.

After basting together the size 44, the first thing that was obvious was that the shoulders were way too wide.  So I re-cut all the yoke pieces back to a size 36 to bring the shoulder and neckline back to where they are supposed to be.  Much better.  Unfortunately, I forgot to cut down the front pieces - and so the shirt ended up feeling really wrong around the front.  In order to combat this I re-cut the front pieces at an angle.  The rest of the jacket fit nicely sewn to the size 44.

The sleeves came next - and I'm sure glad I left the extra room on the seams here because they were way too tight - I ended up adding about 3/4" to each forward seam on the two piece sleeve plus about 3/8" to each side of the back seam - adding over 2" to each sleeve before it fitted as I wanted.

The final step was the facing on the front pieces- somehow I managed to cut them incorrectly so they were sewn in back to front.  I ended up just cutting the lining pieces down to about 2.5" wide all around.  To finish the jacket off I hand catch stitched the back and front facings and the hems all around and used a couple of plastic snaps to hold the jacket closed.


Whilst this jacket is fine for wearing around the house it isn't perfect - that bottom snap is creating some real issues for starters - so I wanted to make a second muslin before cutting into the good fabric.  I had a piece of purple knit fleece in my stash so I decided to use that for my next try.

I went back to the pattern to figure out what had gone wrong, and realised my mistake with the front pieces not being cut down to the size 36.  I re-cut all my pattern pieces making sure everything fitted properly with all the other pieces and grading from the 36 at the shoulder to the 44 at the underarms.  I retained my modifications to the arm pattern pieces, but re-cut the sleeve head to fit with the new graded pattern.

Everything went together super simply once this was done and it only took me a couple of hours to finish off the top entirely - again hand stitching all hems and facings.  I also top stitched all the yoke seams using a red thread to really show off those seam details.

I have to say I love the way this turned out.


I'm not sure that I'll wear it fully done up all that often - it does have a tendency to feel like it's trying to choke you, but I really love the way it looks with the front pieces folded back as well.


So now that I have two jackets in this style, I'm not sure my wardrobe can handle a third.  Do I still want to make this pattern in the blue wool?

Sunday, March 19, 2017

Last minute going out clothes for the kids

Our family lifestyle is such that we really don't have a great need for a lot of going out/nice clothes.  There's just a couple of times a year when we go out to celebrate a birthday dinner that I like the kids to get dressed up.  The problem with that is that when those few dates do come around the kids never have anything to wear.   It's my husbands birthday today and I've booked a table at a slightly nicer restaurant than we normally go out to, but last night someone said something and it got me thinking about what we were going to wear...neither of my kids have anything that fits them that would be considered dressy....so what's a girl to do.  Obviously I whipped each of them up an outfit.


I started with L.  We sat down before she went to bed an talked about what she would like.  Her response was that she wanted something like my two piece maxi dress with a long skirt and a matching top so that it looks like a dress when worn together.  That's great.  I had a beautiful teal and black paisley knit fabric that I had been planning on making something for myself out of, but I selflessly offered it to her and she jumped at it.  So a straight long skirt that's simple, but what about the top.  We wanted it to be long sleeve for warmth, but we didn't want the sleeves dragging in her dinner so I suggested using the split sleeve with elbow cuffs that I used on this shirt (second shirt in post).   She agreed with that.  Next we discussed necklines and she decided she would like a shallow V neck.  OK I had my marching orders - I took all her measurements and sent her to bed and I got to work on her pattern.

I started with the kimono sleeve top pattern that I used when I made her a version of the sallie jumpsuit.  I added about 3/8" to the centerline as shes been growing a bit again lately and I didn't want her to grow out of this too soon.  I really should have added some length as well but I forgot about it at the time.  I brought the neckline in about 1" and raised it by about 2" to get the shallow V that she was looking for, and then for the back piece just cut a gentler curve around the neck rather than the V neck.


To make the sleeves I measured the armholes off the pattern and just cut a rectangle that wide and the length of her arm to the elbow.    I then hemmed the two long edges of the rectangle (the split down the top of the sleeve)  and sewed it into place in the armhole of the kimono top - effectively creating a drop shoulder sleeve. For the elbow cuff piece I cut a second rectangle to snugly fit her forearm, the length of the arm from elbow to wrist, and sewed it into a tube.  I then gathered the top half of the sleeve to fit into the cuff.  I finished the cuff just by turning and stitching with a decorative stitch.


To finished the neckline of the top I created a basic facing and cut it off and sewed it down about 1cm back from the sewn edge.

The skirt is just a basic rectangle sewn up the back and gathered at the top with 1.5" wide elastic.  I used a double turned 2" wide hem on the bottom to give it some weight to make it hang nicely.


For an evening and a few hours work in the morning (I had to wait till she had tried it on before I could finish it off) I'm very happy with this - and most importantly so is she - she hasn't taken it off since I finished it.  And best bit is, the top at least can hopefully be worn again and not just sit in the back of the closet until she outgrows it,


So once L was taken care it it was time to turn my attention to J.  Now J has a couple of store bought shirts that still fit him, but no pants that would go with them.  So I took J down to the fabric stash to see what he could find.  This boy has a very garish taste in clothes - I don't normally have a problem with that - but when he chose a fabric (bright blue corduroy with pink guitars) that totally clashed with the shirt he had chosen (dark blue and black paisley) I decided to step in and say no.  In the end we decided on a back cotton sateen material with some multi coloured scraps to be used as pockets and wasitbands etc.


I used his basic pants pattern with an extra 1" at the rise all around and an extra 2" length.  This worked beautifully.  I added front slash pockets - with a contrast edging along the line of the pocket.


Back patch pockets in a contrasting colour.


And a contrasting waistband. I interfaced the front of the wasitband as I wanted it to stay as flat as possible and just gathered the back of the wasitband with 1" elastic.  I added cuffs to the bottom of the legs to make them a tad more fancy and for a change added 3 belt loops (He got a belt from cub scouts this year but has no pants that have belt loops so he can't wear it - I promised him that this time I'd add the belt loops to he could wear the belt finally.


And in 24 hours we have a skirt, a top and a pair of pants - not a bad days work!  Now what am I going to wear?


Wednesday, March 15, 2017

Stained Glass Quilt/Blanket

This project has been finished for a while now but I didn't want to post about it until it had been given to it's recipient - see this was a wedding present for a good friend of mine.


She got married in the second half of last year and she asked me to be her bridesmaid.  Unfortunately due to her being on the other side of the world, and the timing not working for me to be able to get there, I wasn't able to go - so I at least wanted to give her a special wedding present.

Thinking back to my wedding (wow, where have the last 13 years gone), one of the presents that is most used and loved is a blanket that was made for me by my cousin.   The front of this blanket is made from a fabric that looks like it's been pieced together (but it's actually just the print on the fabric), which is then surrounded by a satin border.  The whole thing is then backed in fleece.  This blanket sits on my lounge year round and is just about always in use by someone or another.

 And so a plan emerged to make a similar blanket for my friend.  However for this blanket I wanted the front piece to actually be pieced together, so I started searching for a pattern - something not too fussy  - and came across the idea for a stained glass window look.  Inspiration 1, inspiration 2.  I loved the look of the batik type fabric in the second link, but the different sized panels from the first link.  I decided that neither was perfect and resorted to paint to try and create the exact pattern I wanted.  I created a basic block consisting of 5 panels

I coloured in each square in one of four basic colours, using a black line to separate each panel.  Once this basic block was done I then replicated it till I had 6 columns of blocks and 3 rows.  I changed the orientation of each block so that there was a slight variation throughout.  Looking it over once it was done I decided I needed a few extra colours and for every second block I varied 2 of the 5 colours making 2 sets of slightly different basic block alternating.


Next decision was what fabric to use.  I really liked the idea of using batik so with that in mind I headed to the fabric store.  After much browsing I found a couple of different batik type fabrics that had some gold embossing on them.  There was one that shaded from bright green to bright blue to , bright purple with black and gold designs printed on it, one that was dark green with red patches with batik markings  and and a third that shaded from bright yellow to orange to pink with black and gold tiki markings.  


I found a beautiful black cotton  sateen fabric for the strips between the pieces.  The next decision was what colour to use for the satin edging and fleece backing.  I was originally thinking of a gold colour  - neutral but not boring, but the fleece gold colour was not what I was hoping for.  I instead found a beautiful dark teal colour that had matching satin and fleece.  I decided that this would be a good decision, not too girly, but still bright and beautiful.


To cut out the fabric I created templates out of 1/4" thick ridged cardboard.  To cut out all the squares (and rectangles) I did some calculations  to figure out how many of each shaped I needed in each colour and the just sat myself down in  front of the TV one night and cut out each piece one by one placing the template on the fabric over the colour I wanted and using my rotary cutter to cut each piece out.  Tedious but still the easiest way to get it just right.

The black strips to create each block were all cut out using similar templates.  Then it was time to start putting the blacks together.  My son even got in on the action helping me press each seam after I sewed it.  15 blocks later and it was time to start putting them together.  This is where things started getting slightly out of alignment so it started getting harder.  I tried my best to get it as perfect as possible, taking my time rather than rushing through, but it still wasn't perfect.  But that's OK it was close enough. Once all the blocks were together it was time to get to work on the satin edging.  I made a major mistake here.  I thought that it would be easier if I just cut the piece to the outer dimensions I needed, then cut out the inside square - leaving just enough for the seam.  It seemed like a great idea - but it failed - I could not get those corners to work properly,  I know my calculations were all correct, it just wouldn't work neatly.   Oh well it got done as well as possible.


Now I had a decision to make....do I or do I not interface the satin.  I went back to my inspiration blanket and the satin on that had been interfaced so I decided to go ahead - if nothing else it'd make sewing the backing on a lot easier.  So I started interfacing the satin, and ended up interfacing the entire front face of the quilt - it just made it sit so much nicer - problem was I ran out of interfacing before I could finish - and as there was a storm going on outside I couldn't go out and buy more.  so did I put it away till later - of course not.  Instead I rummaged through my entire stash and found at the back another piece or two of interfacing - slightly different weights but with some judicial cutting and placing I made it work.

The final step was to sew on the fleece backing, turn it inside right and hand sew the last little bit. I then top stitched about 1cm in from the edge around the whole thing and we were finally done.

I am so happy with how it turned out.  I got to give it to my friend and her new husband in person during my recent trip back to Australia and they both seemed to like it so I'm happy!