Tuesday, March 20, 2018

Blue 50s Style Winter Coat

The last time I saw my best friend (it's a real pain when your best friend lives on another continent), she mentioned the fact that she's never been able to find a really nice winter coat that was just what she was looking for - brightly coloured, single breasted - not too heavy  for an Australian winter - you know - perfect.  So since she had a milestone birthday coming up this year I offered to make her one.


It wasn't going to be easy - again that living on different continents problem - But I figured we could make it work.  Before she left I took a lot of measurements - every single one I could think of - and the rest was done via Facebook messenger and Skype.

The first thing to do was decide on a pattern.  She found McCalls 7478 which she really liked the look of - except for the pockets - and it happened to be on sale at my local fabric store so I grabbed that and got to work.  I decided to just make it exactly to pattern to start with - I figured once I got size worked out then I could play around with any design changes required.

I laid out the pattern and compared all the pattern measurements with her measurements.  I decided in the end to go with the size 22 - with a 2" FBA and remove the front and back darts.(seriously why do you need darts in a princess seamed pattern?)

After doing the FBA I cut all the pieces out of scrap material - some white cotton and some red batik and sewed up the dress.  I had a muslin - now to see if it would fit.

The first thing I did was to modify my dress form to her measurements.  I let the neck and shoulders out to the correct measurements and then used batting to pad out the rest of the form holding everything in place with a tight old tank top.


Then I was able to try the coat on her.


Not too bad - if you can look past the lab coat aspect.  The one thing I really didn't like though was the way the front pockets gaped.  They were so bad in fact that I went back and sewed the pockets closed so I could get a better idea of how the skirt would hang.

Then I packed up my muslin and sent it to Australia.  Once it arrived we did a final fitting over skype.  She wanted about 1" off the length of the arms - there was some gaping in the top of the front princess seam and about 1-2" too much room in the back waist - other than that it was pretty good.

I made those changes to the pattern pieces and then it was time to find the real fabric.  She wanted a royal blue colour.  I looked in every fabric store I could find locally and found nothing - except a beautiful piece of velvet - but we were a bit afraid that if we made it out of velvet it might end up looking like a dressing gown.  In the end she was able to find a Telio Melton wool blend at Fabric.com  It seemed to be the right sort of colour, the right weight (only 55% wool so hopefully not too heavy).  I crossed my fingers and ordered it then waited very impatiently for it to arrive...A couple of days later a big package arrived on my doorstep - can I just say 5.5 yards of wool is heavy - very heavy.

It only took me a day to cut out the main fabric and another to sew it together.  Then I had to figure out new pockets since I had eliminated the pockets during my muslin.  I knew I wanted to put in welt pockets but I had to figure out how big, where etc.

I tried many different options.


In the end we decided on photo #2.  Then I had to actually sew them in.  I spent a full 6 hours figuring out placement - doing practice welts etc before I was willing to do the actual thing.  But I'm really glad I took my time because - if I do have to say so myself - they turned out fabulously!  these are the best welt pockets I've ever done.


Next step was to figure out the lining and a contrast material to use around the collar.  We had discussed using a velvet on the collar, but just about every velvet I looked at was too glossy and shiny which made the matte wool look quite dull.


Not what we were looking for.  Just as I had given up I found a cotton velvet in black that was a perfect match.


Then to figure out the lining.  I knew I wanted something really bright and I also knew I wanted silk.  This coat - despite being a winter coat will spend most of its life in Canberra Australia and I  knew that if I put a poly lining in it would trap in any heat that was generated and make it all sweaty. I'm hoping that a silk lining will allow the coat to breath a bit more.  Anyway I went though every silk in my local discount fabric shop (the only place I could afford silk for this project) and found the best match for my colour.  It's not something I would normally go for, but I think works really well.  It certainly makes a statement.


I added store bought piping between the front black velvet panel and the lining material.  Not that you can really see it.


As I didn't want any top stitching to show on the velvet I hand stitched down all the seams with the piping so that it couldn't flip around.  I also under stitched the front velvet area where the coat is sewn to the facing and lining by hand.  The cuffs and hems were all finished with hand stitching too which makes this coat one of the most  time consuming things I've ever made.

I had a bit of an issue with the shoulders, I found that the pattern for this coat was quite light on finishing instructions and when we got to the shoulders all it said was sew shoulder pads in place.  Looking at my coat I decided that as well as shoulder pads it also needed a sleeve head, plus I extended the shoulder pads down into the front of the chest to fill out that area that often caves in.  I used a foam bra that I had bought for the underwires etc and cut it up to make the sleeve head and shoulder/chest pads.

Finally we came down to the finishing touches.  Buttons and cuffs.  Black or blue buttons?


black or plain cuffs?

To make the cuffs I just sewed some of the velvet into a tube that was just slighly shorter than the circumference of the cuffs so that they sit around the cuff and and held in place with friction.  In the end we decided to go with removable cuffs and we went with the black buttons and we had a complete coat.


Just in time for me to meet up with it's owner in New York so I was able to give it to her - and get a few shots of it on the real model.


 Give as a twirl!


Yep it's really good for twirling in!


The wind just wanted to show off the pretty lining.


I am in love with this coat - and hopefully so is it's owner!  And of course now I'm thinking about making one for myself.  I wonder what fabric I could use?

Thursday, March 15, 2018

Cathedral Quilt Bag

Last summer my friend and I took a road trip and one of the places we visited was Dutch Country in Pennsylvania.  Of course for us that meant many trips to quilt stores and fabric stores.

One of the quilts that I was really taken with was the cathedral quilt.  Most of the ones made by the Amish use muslin as the main fabric which I didn't love the look of - but I knew that in a better colour that style would be fabulous - so much so that I went ahead and bought the pattern.


I knew I was never going to make a whole Cathedral Quilt, but I figured that once I figured out how it was done I could used the technique to make other things.

So November rolls around, and after telling myself for months that I wasn't going to make anything for Christmas this year, I decided that I did want to make some things - and then I stupidly decided to make a bunch of bags using the cathedral quilt pattern.....smart....not.....  These bags are very time consuming.

I managed to get three bags made in time to get them sent to Australia before Christmas, but not without some marathon sewing sessions.  By the time I finished I was all cathedraled out...and as per usual I forgot to take photos of them before I sent them on.  Thankfully my sister did take a photo so I have this at least.


Well after a couple of months hiatus I finally felt ready to tackle a bag for myself and I'm so glad I did because it turned out beautifully.


I started by making two mini cathedral quilts.  One was 3 x 2 squares for the front of the bag:


And one 3 x 4 squares for the back and flap.


I will admit here that I cheated outrageously.  The original quilt pattern calls for everything to be hand sewn.  I did no hand sewing whatsoever.  I was able to modify every step of the pattern so I could sew it all using my machine.  It's probably no where near as beautiful as a hand sewn one would be but that's all I'm willing to do!

The backing is  plain black cotton material with a really beautiful sheen to it.  and the window panes are a blue/turquoise quilting cotton with a vague peacock feather design through it.  The black backing really makes the blue fabric stand out. 

Once the two quilt blocks were made I cut a base out of the black cotton and interfaced it until it was of a similar stiffness to the quilt blocks and then two sides that extended up into the handles.


To finish the inside of the bag I used the rest of the peacock quilting fabric and made another bag the same dimensions as the first.  I made a zipper pocket that I used to divide the main part of the bag into two sections.  Its just sewn into the bottom and side edges of the lining with the zipper finishing the upper edges.


The inside of the pocket is finished with more of the black cotton.


Finally I used a button from my stash and a small piece of elastic cord to hold the bag closed. The other bags I made I used a magnetic closure but I didn't have one on hand and wanted to finish the bag so went with the button instead.


This bag is great.  A bit too big for everyday, but perfect for when I need to carry around a couple of extra things.  It has a nice wide strap so it's comfortable and the strap is the perfect length for carrying cross shoulder. 

Last week I took a trip to New York and this was the perfect bag to use on the trip.  Big enough to fit what I needed and comfortable enough to carry for long periods of time.


Tuesday, March 6, 2018

Precious Fabric Stash busting - Part 2 - Knit Red Velvet

So whilst I was on a precious fabric stash busting kick I decided to pull out my piece of knit red velvet that I've had lying around for over 10 years.  I know that I bought this fabric back in Australia - And I haven't lived there for 10 years now - so this fabric is deep stash!


I knew that I wanted this fabric to be a shirt of some sort - I wanted it to be something that I could wear everyday - but still be really nice and after loving my zebra wrap top this year I decided to use this pattern again.

I made a few modifications to the pattern when I made the Zebra version, but never noted them on the actual pattern, so rather than going straight for my precious fabric I decided to muslin first.

I figured it may as well be wearable so used this multi coloured knit farbic that I originally bought to make pants for my daughter - oh well its mine now!

I pulled out my zebra top and the blog post to figure out what changes I'd made and updated the pattern accordingly, then cut out and sewed up my muslin.


Looking at these pictures I think I made the hem a bit too deep - I could do a bit more length in the shirt.  I added cuffs to the sleeves as I found with my last shirt that the sleeves were a touch too short.  I like them at this length.


I went ahead and cut out the red velvet.    I only had a limited amount of the fabric - probably only 1 meter - and since it's velvet I had to cut everything in one direction to account for the nap so I struggled to get all the pieces cut.  I ended up having to cut  the sleeves slightly shorter than the pattern called for, but made the cuffs longer to account for this.

I did make one change when cutting out the velvet - it has less stretch than my other materials so I added 3/8" at each side seam.


It's definitely a bit tighter than my other version but it seems to work fairly well.

Having worn these two shirts for a while now I've finally figured out the one thing that was annoying me about this pattern - the back is cut a smidge too small - it needs to have just an extra 1/2" inch added to the center line to stop the whole top from pulling in too much at the back - I find I have to keep tugging the sleeves down on my existing top.


Saturday, February 24, 2018

Winter Wonders - Flannel Lined Jeans

OK I admit it - I'm a frog - I'm forever cold and in this country (north east USA) at this time of year, I often feel like I'm never going to be warm again.

This has a definitely impact on my sewing - during summer I love to use beautiful fabrics - bright prints, different type of fabrics etc, but in the winter all my sewing is based around how warm any given fabric is - which makes my wardrobe a lot more drab than I would like.  I try and make nice tops out of beautiful knit fabrics, but just end up covering them up with fleece sweaters etc.

When it comes to pants - I'd happily spend all winter in fleece tracksuit pants - but sometimes I want to look a little more put together.  I've got one pair of woolen pants that are lined with rayon - they're not bad, but sometimes I just want to wear jeans, but then I freeze when I do.

So what's a girl to do but make herself a pair of flannel line, elastic waist jeans. Comfortable, warm and not too mumsy/dowdy.


To make these I used the same pattern I've been using for all my pants lately - the one with the extra seams up the front and the back of the leg for more fitting help.  To create a waistband I cut 2" off the top  of the pattern pieces used those to piece together a 2 part waistband with just a little bit of shaping.  I also increased the rise at center back by 3/4" and lowered the front rise by about 1/2" - just tweaking the fit.

I removed a little bit of the flare from the bottom of the leg, but probably not quite enough - these are very 70's


I added a bit of extra width to this version of the pattern 1/4" at each seam from the waistband to the hips,  since the pattern tends to be a bit tight when made in a fabric with no stretch - as was the flannel.  I cut out and sewed up the flannel first to get the fit right - I wanted it to be fitted through the thigh down to the knee, but not so much I couldn't sit down and lounge in them.  Once I had the pattern right I then cut it out of the denim.


I added pockets in between the center front seam and the side seam and top stitched about 7 rows parallel to the pocket with top stitching thread.


There is no fly and the waistband is threaded with elastic so they're not really jeans as such - but they're close enough for me!

I did a pretty basic design topstitched onto the back pockets as well.


I was in such a hurry to be able to wear them that I didn't bother hemming them before throwing them on - and I've since been told that the whole frayed hem thing is in at the moment - so since I'm lazy these pants are going to be left un hemmed.


Overall I love love love these pants.  They're warm, and they're comfortable enough that I don't have to change out of them when I'm lounging around at home, what more could a girl want?

Thursday, February 15, 2018

Precious Stash Fabric Sewing - Part 1. Purple Velvet

Back in September 2015 I found an absolutely beautiful piece of fabric at my local fabric store.


A purple satin velvet overlayed with an iridescent floral/ paisley pattern in metallic.  I did some research at the time and found out that it is a Manuel Canovas fabric and is supposedly a home decor fabric but since when has that stopped me using it for clothes.  I originally planned to make it into either a beautiful dress, or a coat, but instead it languished in my stash for 2.5 years because I was too afraid to cut into it.

This month I decided enough is enough and pulled it out.  I thought again about making it into a coat, but it's not quite the right weight so I shelved that idea.  Obviously a dress was the next option, but I just don't wear dresses in winter and it's not really a summer sort of fabric, so I decided in the end to make a two piece - top and skirt that could be worn together as a dress if an occasion should ever occur, or be worn separately.


I sketched out a number of ideas before deciding on a cropped wrap top and pleated skirt.


To make the top I started with the Pattern Review Clair wrap dress, that I had already fitted in a woven fabric when making my red plaid dress.  I omitted the collar, incorporated the yoke into the back pattern piece and incorporated the neckband into in the front piece.  With the sleeves I did a wide bicep adjustment, since they were a smidge too tight in the red plaid dress and flared out the cuff a small amount.


I cut the modified pattern out of a plain black fleece fabric first to make sure it worked, then once I was sure that I had the pattern correct went to work on the purple velvet.  This fabric was not that great to work with.  The different thicknesses between the metallic overlay and the velvet were quite noticeable and made it really difficult.


I used the black fleece to line the top bagging the whole top and hand stitching the sleeve edges together.  I also added a bit of elastic to the front neck edge to eliminate any gaping.  There is definitely some of the black fleece that shows along the neck edge, but I tried top stitching it so that it didn't roll out and it ended up looking terrible.

I only made one strap as I wasn't sure just how much material I had and wanted to make sure I could get the skirt made as well.

Next up was the skirt.  I decided this time to try out a Lekala pattern.  I've wanted to try one of these for quite some time and decided that now was the time.  I went with #S3047A Line Skirt with pleats in the front.


The front pattern pieces turned out to be a perfect fit - but I had to take 4cm off each side of the center back seam so I'm not sure what that was about!  It wasn't just ease because the side seams hit in the right place in front - all the extra was at the back.  I don't know if maybe there was supposed to be darts in the back, but the pattern didn't show anything (and it doesn't come with instructions).

I again made it up in fleece before committing to the real fabric, and used the fleece yoke to face the final skirt.  I did a lapped zipper in the center back seam and finished off the yoke and hem by hand.


The only other thing about the pattern was that I specified no seam allowance but it came with it anyway - that's not a problem, but they had a 1" hem allowance on the front of the skirt, but 3/8" hem allowance on the back of the skirt.


Looking at the photos I'm thinking that I might want to take the length of the skirt up a smidge.  I think it needs to be just a touch shorter.

The first time that I tried the two pieces on together my daughter asked me if it was a bathrobe or a dress, so I'm not sure about wearing the two pieces together anymore.


And I'm not sure how much wear I'll get out of the skirt - I can't remember the last time I wore a skirt..But having said that this skirt is definitely comfortable and I really like this style.

I'm hoping that the top will get worn a bit more though.  I've shown it here with my black pants, but I think teamed with jeans might even work better.      The fleece lining makes it quite comfortable.  Since it's quite cropped I have a feeling that I may spend the entire time wearing it tugging it down.  I'll have to see how it goes...I wonder how much I have left in scraps?  enough to make another tie?  that might help with the length issue/cover up any gaping.


Monday, February 12, 2018

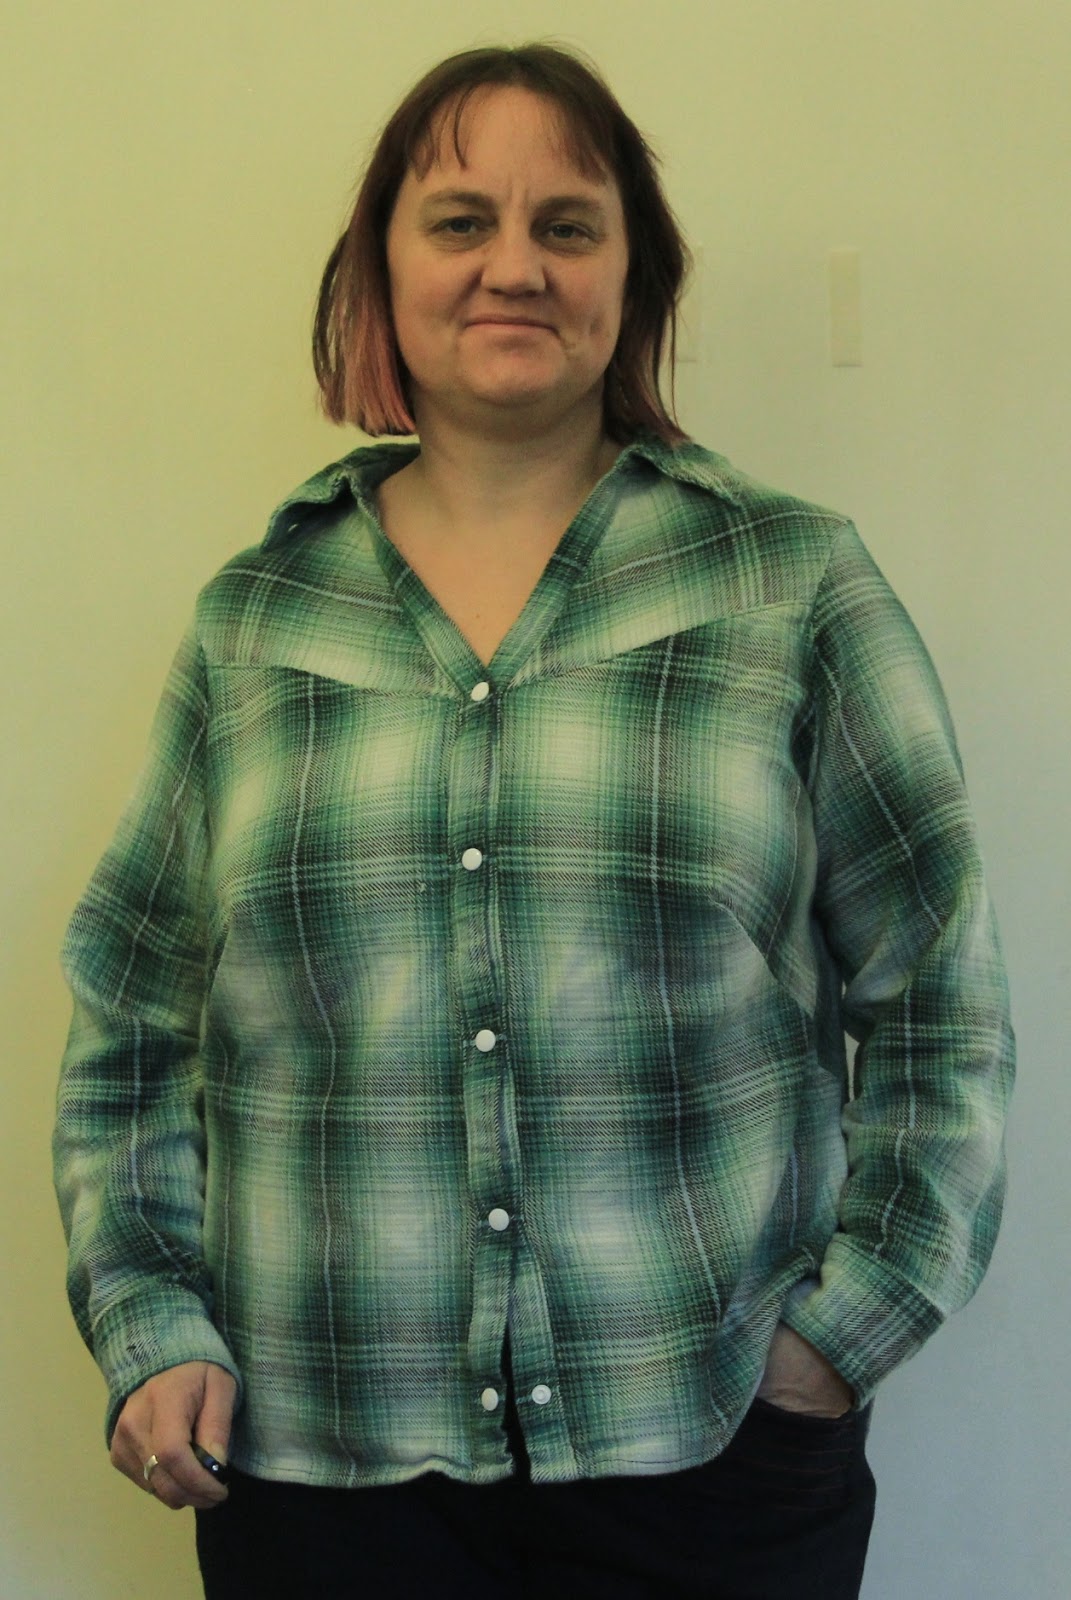
Flannel Shirt

This post is a bit late, but better late than never.  (I apologise in advance for the terrible pictures, but its just too cold to go outside at the moment so washed out inside shots are all I've got!)


I started working on this shirt back in December of last year.  I used the pattern that I created to make this red plaid shirt.  And then modified to make my silk pajamas in November last year.

Once I was finished with my pajamas I decided that I wanted a basic flannel shirt - like the ones I used to wear as a kid (though those were generally tied around my waist rather than on my back).

I modified the pattern once again to include both a back and a front yoke but other wise kept everything else the same.

The material I used is a green flannel material that is a beautiful weight. It's nice and fuzzy and warm on the inside, but much more smooth on the outside so it doesn't look too pajama like.


I cut the yokes with the plaid on the bias.


I also added an inverted box pleat at center back for some extra ease.  I'm not sure that I really like this and would probably remove it next time I use the pattern.


My pattern matching through this project was OK, but not great,  the plaid pattern was totally off grain so I did the best I could,  with what I had.

I used white press studs instead of buttons down the front - they're just so much easier to both install and do up/undo.


I really didn't need that last stud though - I never do it up.

The bottom of the shirt is finished with a narrow hem and I did full cuffs and plackets on the sleeve - again with press studs.


This shirt is really nothing special but it really fills a gap in my wardrobe - its comfortable and warm and what more could you want. For some reason I do't like the neckline on this one - I don't know if it's the plaid placement or what, but it's not enough to stop me form wearing it!