Sunday, February 28, 2021

Nightgown

I'm a bit late posting this make. I made it way back in early January but I think I'm all caught up with blogging for a while now.  


Whilst I've needed new nightwear for a while I never seem to get around to making it, but then my Sewing Guild group decided to have a zoom pajama party.  The idea was to make some night wear and show it off at our next zoom meeting.  Sounds like a good time to finally get around to it.. Of course I went and made this, and then totally forgot on the night of the meeting and missed my chance to show it off......isn't that right!   Oh well it was a good push to get it made.

Fabric: I used a piece of white and red flannel that I had in stash.

Pattern:  To make this nightgown, I started with my moulage block. 

Front: I extended the length from the low hip line down 16".  I moved the underarm point down 2cm and out 1 cm., then tapered the side seam out from this point so that it was about 1" wider than the block at the low hip line and 2" wider at the hem.  I added in the arm hole dart backing it away from the bust point by about 1.5" and ignored the under bust dart.   I then removed 1.25" from the neckline for the collar before adding 1/2" seam allowances added all around. 


Back: I  again added 16" in length, moved the underarm point down 2cm and out 1 cm, then tapered the side seam out from this point so that it was about 1/2" wider than the block at the low hip line and 1.25" wider at the hem.  I created a back yoke by splitting the pattern about halfway down the back arm hole.  The bottom half of the pattern I added 1" to the center back line and then cut on a fold to create a pleat at center back.   The back darts were ignored.  


For the back yoke I added a center back seam so I can cut it on the bias and rotated the neckline darts to the yoke seam. I then removed 1.25" from the neckline for the collar before adding 1/2" seam allowances added all around. 


The sleeve pattern was created from my moulage based on a bicep diameter of 14.5" and wrist of 11.5" with a cap height of 5" and arm length of  22".    It's a fairly narrow sleeve and I finished them with 3" wide rib knit cuffs - I only had black and purple rib on hand and I decided to go with something different to the plain black I usually use and chose the purple. 

For the neckline I created a 1.25" wide flat collar with a placket opening at center front.  To do this I attached the 1.25" wide pieces I'd cut off the front and back necklines together at the shoulder seam and added a fold line at the center back so that the collar can be cut in one piece (I cut both my inner and outer collar pieces on the bias so I didn't need to try and pattern matching).  I added about 1.25" extra at the center front to account for the placket, then added 1/2" seam allowances all around.


For the opening I cut a slit 6" long in the center front of the  nightgown.  I then created a placket piece based on a basic sleeve tower placket with one side 1.25" wide and the underside 3/4"  wide.

I'm quite impressed with the pattern matching I managed to get on the placket.  It's not perfect, but it's pretty good.

The collar and the placket are interfaced with medium weight iron on interfacing.  

After finishing my nightgown I decided that I needed a pocket, so pieced together some of the left over scraps to make a kangaroo patch pocket on the front.  The pocket is not as large as I would have liked but that was all the fabric I had that I could pattern match. 

To finish the bottom I made a double turned split hem  2.5" deep at the front and 2" at the back making the back about 1/2" longer than the front.

I really like the way this turned out - simple yet with a few details I really love! 


Tuesday, February 23, 2021

Plaid Fleece Jumper

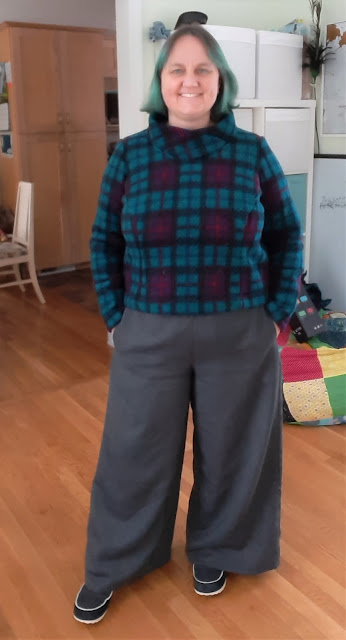
 I've found that I definitely have a new dressing style this winter.  I've wanted to avoid the living in a tracksuit look that would be so easy to slip into during this pandemic and since I've found and loved the Cashmerette Calder pants that's all I want to wear.  Thankfully I now have three pairs so I can pretty much wear them full time.  However I have found that I prefer a more cropped top to go with this style.  I feel like the longer hip length jumpers don't showcase that beautiful flat front on the pants that I think is one of my favourite details of these pants.  And so I have been slowly accumulating shorter cropped shirts and sweaters that I can wear.  This is my latest addition.


This fleece is absolutely beautiful.  It is much thicker than most of the other fleece fabrics that I've found but still has a good stretch in one direction, and I love the colour combination of greens and purples (Though I could not get a good photo showing the green colour correctly)


For this pattern I started once again with my basic muslin.  This time I split the front pattern piece into two by cutting through the pattern at the bust point creating a princess seam originating at the arm hole (the armhole dart) and running through the under bust dart.  I kept the seams right at the dart line for the arm hole dart, but added about 1/4" ease at the bottom of the underbust dart tapering to 1/2" at the underbust point and back to nothing at the bust point.  I then moved the lower armhole point 2.2cm down and 1/2" out and tapered the side seam from this point to 1/4" out at the high hip point.  At the neckline I lowered the center point by 7cm and drew in a new neckline that finishes 4.8cm in from the neck point along the shoulder seam. 

For the back I used the same standard adjustment lowering the armhole 2.2cm and widening 1/2" then tapering the side seam to a 1/4" at the high hip line for ease (whilst ignoring the back darts).  I kept the neck darts in place, then removed about 1" depth at the center back neckline curving out to a point 4.8cm in from the neckline at the shoulder seam.

The sleeve pattern is my basic sleeve pattern, slightly adjusted for the armscyth for this pattern.

The final pattern piece for this was the neck band.  I sketched out my design on my croquis and played around with a number of different looks and decided to go with this one.  A folded cowl the crosses over at the front to make a slight V.  I was slightly basing this collar on the Paprika Pattterns Jasper cowl collar so I started with that pattern piece.  Adjusted the height to what I wanted (about 2") , then used the differences between the front neckline on my design and the front neckline on the Jasper to get the right dip to the front of the collar piece.  As I wanted the collar to cross over at the front and create a V I added that line onto my pattern, but now the top edge of my collar was no longer straight, which is what I wanted so I could fold it over.  I therefore had the change the angle of my pattern piece.  I wasn't sure I had gotten it right, so I tried cutting it out of a piece of scrap fleece and pinning it to my dress form and it seemed to work so I went with it.

Now I was ready to cut out.  I tried to keep all my pattern pieces aligned on the pattern so that the stripes of the checks at least were all lined up.  I ended up having to cut the outer front pieces separately just to make sure I got it all right, pinning each piece to my dressform as I went to check my alignment.  I'm pretty happy with how it turned out. 

 I cut the collar piece on the bias for some extra interest (and so I didn't have to worry about aligning checks there).  Then it was a simple case of sewing everything together.  I didn't do any seam finishing on the main seams other than clipping the curves of the front princess seams.  For the sleeve and bottom hem I simply turned the edge under once and stitched using a 5mm long stitch in two rows around the edge of the hem then trimming and excess off.  For the neckline I sewed the collar piece to the neckline, graded all the many layers of fleece, the folded the outer layer over all the others and stitch just under 1/4" away from the seam to enclose all the raw edges.


I contemplated putting pockets into this but decided against it.  I find with the Calder pants, which is what I plan to wear this with most of the time, I use the pockets in my pants when I need them so I didn't feel like it was necessary to have a pocket in this as well.

I really like how this turned out.  The length is perfect.  The neckline is a smidge wider than I probably wanted.  I think next time I would bring the sides of the neckline in a bit and lower the front a bit more. But otherwise this is great.


Monday, February 22, 2021

Slippers!

A couple of years ago now I got a fantastic pair of ugg boot type slippers for Christmas.  They're Doctor Who inspired Tardis slippers and have been worn basically everyday since I got them.   I love those boots soo much.....however after being worn for two years straight they are starting to smell, and not just a little, and the fluff has all worn off the inside of the boot.  I tried throwing them in the washing machine but even that didn't entirely eliminate the smell, plus it meant I was without slippers for a good week or more whilst they dried out again.

And so I decided it was time to make myself a new pair of slippers.  And into my inbox one day popped this tutorial for sewing a pair of slippers.

I printed out their pattern, used some scraps of fleece I had lying around, and quickly made up just a single slipper to see how it fit.  Unfortunately the answer was not very well.  The problem is that I have a foot that is very short but very broad across the ball, so the seams along the side were slipping under my foot at the ball, but it was really pouchy around the instep.

So I decided to take the basic idea but modify it to get exactly what I wanted.


The first thing that I did was to compare the pattern with the pattern for my ballet flat shoes. The obvious difference for the sole was that it is much wider across the ball and thinner across the instep.  For the vamp piece my piece is shorter but wider at the bottom.  


I traced both the slipper pattern and my pattern on top of each other on a new piece of paper and came up with new pattern pieces which I then tested on some scrap fleece and was happy with.  My new pattern has a right and a left foot, unlike the original slipper pattern, but otherwise it's just a few minor variations in widths.

The new pattern is on the right. 

Now that I had the basic pattern I wanted to make these slippers really wearable.  The original pattern just used fleece for the soles and then some glue stuff to make it non slip, I decided that I would use my sole material that I use for all my soft soled shoes, that way if I need to run out to the bins or letter box or what not I can without having to change into shoes.  Plus, non slip and hard wearing.  I also decided that I wanted these nice and super snuggly so used a double layer of fleece for the vamp rather than just a single layer.  The final change was to the binding around the inner edge.  I wasn't sure how well the slippers would stay on with just a binding around the top edge, plus it provides no ankle warmth, so I decided to use a ribbed cuff instead. 

Now I was ready to cut out.  I decided to use the left overs from my latest fleece sweater (not on the blog yet - still need to get photos of it).  It's a really nice think fleece so will make nice warm slippers, plus its a great use for the small piece of left over fabric I have.  for each foot (right and left) I cut an inner sole piece, plus 2 vamp pieces out of fleece, an outer sole piece out of my sole material.  And a cuff out of black rib knit.  The cuffs are 10" long x 5" wide.  The final step was to cut an insole out of 6mm thick craft foam to use between the outer and inner sole pieces to provide extra warmth and comfort.

The makings for one slipper

To put the slippers together I started by attaching one long edge of the ribbed cuff to the inner cut out of the vamp.  I sewed this with a lightning stitch for a little extra stretch.  I then sewed the other long edge of the cuff to the second vamp piece.   


I then sewed the back seam starting at the outer edge of one vamp, going right along the cuff and ending at the outer edge of the other vamp.


Now when I fold the cuff in half lengthwise and match the two vamps together all seams are nicely tucked away inside.  


I placed my vamp piece right sides together with my outer sole material matching the notches at toe and heel and sewed the two pieces together with a 3/8" seam allowance.

The inner sole piece was then sewed, right side down, over the top of the vamp, leaving a hole on the straight side to turn everything inside right. 


 Once everything is turned inside right, I (not very easily) stuffed the insole into the gap and hand sewed the gap closed.


Then turned the vamp up over the sole.


Simple, but effective.  I love these slippers.  They're so comfy, so warm, so easy to slip on and off.  Everything you could want in a slipper - and all in under 3 hours!