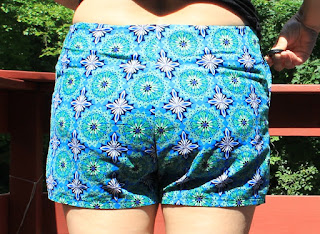
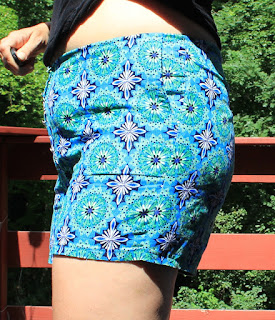
Unfortunately I still only have a couple of pairs of shorts that fit me this year - the pair I made here plus the sort of wearable muslin - so up next on my sewing list was more shorts.
First off the press was a yoked, pleated pair in black eyelet lace. The inspiration for this pattern was the Paprika Patterns amber trousers. I really love the yoke on those pants and wanted to try something similar. I took my basic pants pattern and retraced it and incorporated the waistband into the main pattern pieces. I then drew a V from each of the side seams down to points at the front and back and cut the pattern along these lines creating a yoke pattern. The remainder of the pattern pieces I slashed down the middle and added 2.5" to add a pleat into the shorts. I wasn't sure if I wanted pleats at both the front and back - or just at the back, but in the end I went with both.
As far as material goes I was actually inspired by a recent trip to LL Bean. It's been an awfully long time since I last went clothes shopping but when my in-laws were here last month they wanted to go to LL Bean so I took them for a trip to our local store. Whilst they were doing their thing I had a bit of a browse around the store - now LL Bean is really not my style of clothing so there wasn't really a lot there that interested me, but one thing that did catch my eye was a little blouse made from eyelet lace. I went over to have a look and found next to it a pair of shorts made from the same material. I've always loved eyelet lace but I never wear it since I don't do blouses so the idea of using it for shorts really caught my attention, so the next time I was at the fabric store, when I saw the eyelet lace in black I knew I had to have it. Of course a material with holes all over it is not great to use by itself for shorts so I went through my stash and found a piece of plain blue cotton that I could line it with - this way you get little pops of blue at each of the holes. I cut all the pattern pieces out of both fabrics and then basted the two pieces of each pattern together to form a single fabric and sewed the shorts up from there.
I decided to go for a side zipper in these shorts as I didn't want to ruin the line of the yoke. I had a zipper in the same colour as my blue under pieces so inserted that on the right hand side of my shorts. I did have plans to put pockets in the shorts but with the side zipper and the angled yoke it just ended up being way too hard. I'm sure I could have figured it out if I really wanted to, but by the time I got around to it I was sick of sewing and just decided to leave them out and finish them up so I had something wearable.
To finish off the yoke I cut extra pieces of the yoke pattern in the black eyelet material and sewed it on at the top edge. I then sewed clear elastic into this seam to make sure the shorts do in fact stay up (that the biggest problem with having a waist the same size as your hips - keeping your pants on without creating a muffin top look). The lower edge of the inner yoke was turned under 1/4" and then top stitched in place for a clean finish inside.
I ended up cutting about 2 inches off the length of the shorts as I found that with the pleats in front and back it just looked too voluminous when they were longer but I'm happy with how they turned out. They're a totally different shape to what I normally wear and I'm not sure how flattering they really are, but they're cute and comfortable so to me they are a win.
The second pair of shorts I made were made from a pattern that I've had in my stash for quite some time. I actually took it from my mum's pattern stash. The pattern is a Hot Ones by McCall's pattern 2800 Its a 1970's pair of hot shorts.
I've always loved the look of that pattern, and I've seen photos of mum wearing shorts she made from this pattern back in the day and she looked way cool, but I've always been put off by the sizing. The pattern I have is for a 25.5" waist and a 35" hip. That's a good 6" too small around the hips and 10 inches too small around the waist. Still I decided to give it a try.
I laid the pattern pieces on a sheet of paper and traced around them. I then put my shorts pattern over the top, lining up the inner crotch point and found that the crotch curve and inner leg seams very nearly matched and the side seam was a very similar shape, just 1" wider. I so redrew the side seam 1" out from the original pattern, cut the pieces out and basted them together. I ignored the darts from the original pattern as I don't need much waist shaping - and it was actually a pretty good fit. I did have to redraft the waistband facing to account for the extra width and the removed darts but I tried to keep everything else the same.
I even went so far as to make my own sew in interfacing that the pattern called for. I thought about just interfacing the inner waistband facing piece, but I decided I wanted to stay as true to the pattern as possible so I ironed interfacing onto an old thin cotton sheet and then used that as the sew in interfacing and it worked perfectly.
I had some major problems following the instructions for the installation of the zipper in the front, and in the end I just ignored the instructions and made it up as I went along. I then took the pearl look buttons that I removed from my Beatles shirt when I refashioned it and used those as the buttons on the front of the shorts - I think they go perfectly.
The material that I used for these shorts is a Robert Kaufman corduroy fabric that I picked up during my first Pattern Review Meetup at Quilters Way. I only just had enough material for the shorts after using a lot of it to make a pair of shorts for L. There is now just one tiny piece left which I'm hoping is big enough to make a new pair of shoes out of!
I decided early on that I did want pockets in these shorts so drafted a pocket pattern to fit in the side seams. But I really don't like how it turned out. They have a bad tendency to gape at the sides and it really ruins the look of these shorts, but I'm probably too lazy to take them out now.
Even though I basted all the pieces together and tried them on to make sure the fit was OK before sewing the shorts properly, I still had to do a few fitting adjustments once the shorts were finished I ended up having to take the lower outside leg seam in about 5/8" and the center back seam about 1/2" at the top.
My other issue with these shorts is the length - I love the look of this length but they have a bad tendency to ride up between the thighs when you walk so I spend a lot of time tugging them back down. So unfortunately all in all this is not my favourite pair of shorts - I'm sure they'll get worn occasionally though as the material is just so beautiful I can't resist it.
And finally just a quick word about the hat. I think I've tried crocheting a hat every year for the past 3-4 years and never get it quite right. This years trial is the best I've done so far. I crocheted this hat using this pattern as a basis. I originally found this pattern and planned on following it properly, but then I decided that I wanted to use some black nylon yarn that I had in my stash. Unfortunately this yarn was a lot thinner than that specified by the pattern and required a much smaller crochet hook than specified as well so I had to make a few modifications as I went along. I followed the pattern to make the star on top of the hat. By the time you finish the star the pattern has you start working on the band and then moving onto the brim, but when I finished my star the hat was still quite small. So I continued working in a similar pattern until the crown of the hat fit nicely on my head. I then picked up the pattern again and followed along, though I had a lot more stitches than required by now. The rest of the hat followed the pattern pretty closely, with just the occasional extra row here and there when I thought it was necessary. To get the brim to sit out nicely I took a basic piece of wire that I had lying around the garage and twisted the ends together - using duct tape over the ends to they didn't stick out and then crocheted the last round around the wire. I've worn the hat a number of times this summer and it's stayed on my head beautifully, and is still nice and cool to wear so I call it a success.


