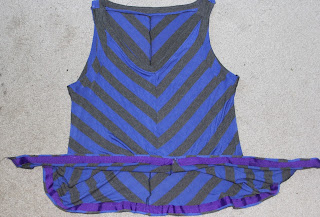
I had the perfect material in my stash, a blue and grey stripe knit with a very nice drape to it.
The plan for this top was for a loose flowing tank top with straps made from the arm binding and neck binding joining together at the shoulder.
Once again I started with my basic sloper. Since the stripes on the material were 1" wide I decided to make all the bindings 1" wide as well which means the shoulder needed to be trimmed down to two inches wide (1" for neck binding, 1" for arm hole binding). After the teal and grey top ended up with the arm scythe too low I raised that by about 1/2" and then graded between the underarm point and the shoulder. The neckline was squared off across the back and brought down to a V in the front.
The only other change I made to the basic pattern was to flare the top out from the underarm to the hips.
The front and back pattern pieces were cut on the bias making sure I aligned the stripes at center back and front. The neckline binding pieces were all cut out centered along grey stripes, but by the time I got to cutting out the armholes I'd had enough pattern matching and I just cut them out where ever I had space - trying at least to keep the symmetrical on both sides of the body. The front armholes ended up matching the body pretty well - a total fluke!
I realised the convenience of using a store bought pattern when I went to put the top together. My choice of construction order when sewing together the front was not good and I created quite a few issues for myself that I would never have had if I were just following a pattern. I learnt from the front and the back went together a lot more smoothly. But by the time I had the top pieced together with all the bindings in place I was not in a good frame of mind. I had lots of plans for how I was to finish the top but in the end I just wanted to get it done so the binding on the neckline is just top stitched in place inside ad the shoulder seams are just serged together which does not sit great.
I found without the tape at the hemline it clung a bit too much for my liking - I still don't love the way this top turned out, but it's not terrible and it will get worn.


The front chevron looks pretty good!
ReplyDelete