


So since I need pants in my wardrobe more than coats at this point in time, plus I needed a garment that would allow for the use of numerous different types of pockets I decided to make a pair of cargo pants.
Luckily I've been working on my pants pattern lately so I already had the basic pattern down pat - I would use the pattern that I was working on in my black french terry lined denim pants.
Now to figure out fabric. I went to my stash to see what I could find. There were numerous denim fabrics, but I was worried about how easy they would be to photograph for the Bee so I ruled them out. I knew it had to be a heavy weight fabric to support all the weight of the pockets so that ruled out most of my stash, but I did find a piece of beautiful grey wool. This had been in one of the boxes of fabric that had been left at the town hall and that had been offered to me for use in my sewing classes. Now I couldn't really use this wool in my sewing classes but it'd be perfect for these pants!
Now lying right next to this fabric was some off-cuts from my latest coat and these two fabric matched beautifully which gave me the idea of using this fabric to make a feature of my pockets.
I sat down and started sketching out designs. There was much browsing of the internet to get inspiration but in the end I came up with a design that I thought was good.
So I grabbed my grey wool and laid it out for cutting........and realised that there wasn't enough.
Now what......
I knew there was nothing similar in my stash and I really had my sights sets on those grey pants so I knew a trip to the fabric store was going to be in order....the problem was I couldn't get there that day. So rather than waste the entire day I grabbed some cottons that I had on hand and started making some trial pockets. I tested a curved piped welt pocket, figured out how to do get a double sided pleats to do my pleated pocket and worked out how big to do my 3D darted zipper pocket so at least I felt like I was doing something.
Finally on Friday I had some time to get to the fabric store. Of course there was nothing exactly like my grey wool fabric, but after searching the entire store I did find a really heavy weight grey twill fabric that was the right colour. It was a bit heavier than I really wanted, with no stretch at all, but I figured that it was the best I would get. I then raided the plain cottons and found three different blue/aqua colours that went well together: A light blue, a royal blue and a teal blue - as well as a grey to match the pants - and I was good to go. The fabric weight straight into the washing machine as soon as we got home, then as soon as the dryer finished I had my fabric on the table and was cutting out.
I cut my pants out and basted them all together. Since there was no stretch to the material I cut the pants out with and extra 1/2" down each side seam so I could adjust accordingly. Strangely enough in the end I didn't need any of the extra room and took it all off again. I also needed to do some minor tweaking around the crotch curve, taking some length off the extension and then curving the back crotch curve back to where it needed to be.
Now to put it together. I started with the front seam. Since the fabric has no stretch I knew I needed to do a front fly. I used the tutorial for the Closet Case Ginger Jeans fly front and did the fly with just one minor unpick and resew. I only did one row of top stitching in a grey thread as I didn't really want the fly to be a big focus.

On Saturday morning I started on the pockets. I decided to start with one of my back pocket welts. My plan was to make back patch pockets but then put tri-coloured welts into the front of them. I had originally thought of just doing the welts, but when I sketched it out the proportions looked all wrong so I decided to do a full patch pocket and put the welt into the pocket.
The one that I started on was three curves on each side meeting and overlapping in the middle. I'd made a trial and it had worked ok, but when I tried it in the good fabric I struggled - I tried a number of different ways, with different types of interfacing and it never sat really nicely. I spent 5 hours trying to make that welt and I got it done in the end after three tries but I was never happy with it.

I finally said enough is enough and moved onto another pocket - this time the triangular origami welt - I'd been worried about how this one would work but it went together easily and was fully done within an hour. The biggest issue I had with this pocket was figuring out how to sew the front of the pocket bag on over the welt opening so that I could still open the pocket. I had to leave one of the edges of one of my triangles unstitched, so I finished that edge before I started assembling the welt.

After finishing all my other pockets, I decided to go back and redo the original pocket - I just didn't think it was good enough. This time I came up with a simpler design that used the three colours in a tulip type design.

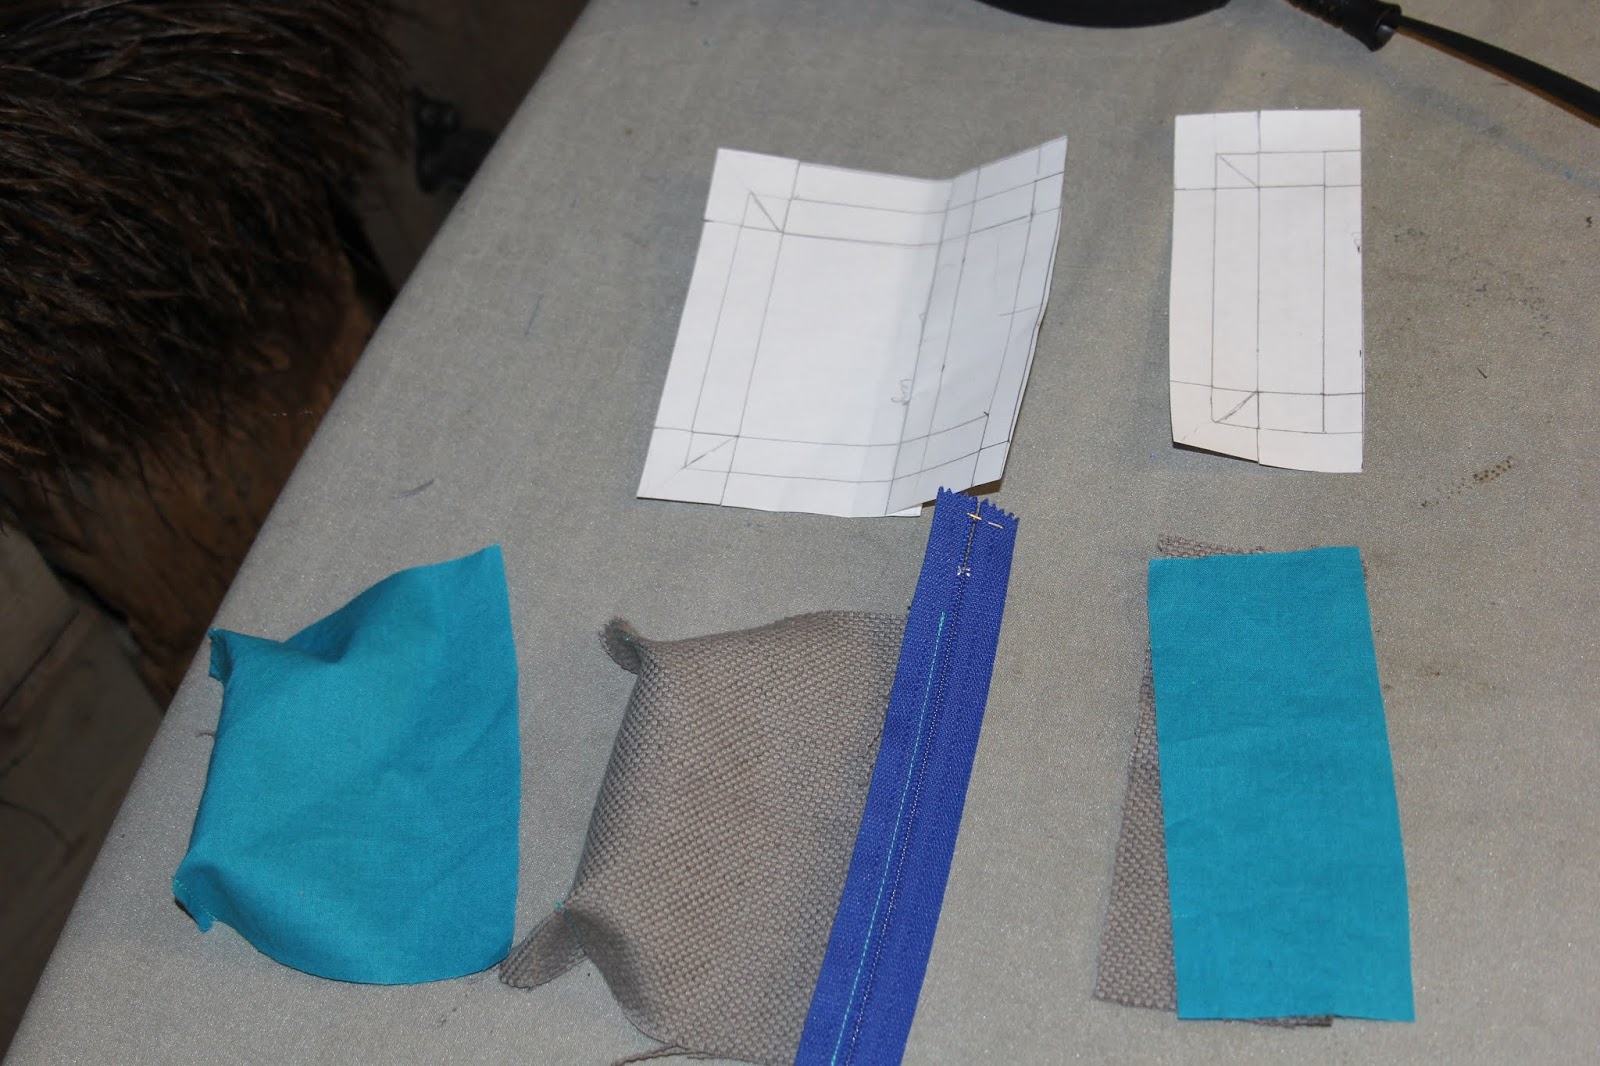
The following photos show the progression of the welt pockets.
 |
| Make the tri coloured welt and cut out a similar shape but 1/4"inset on the main fabric and the inside pocket bag |
 |
| Interface the back of the main fabric and run a line of stitching around the stitching line.. |
 |
| Sew the two layers together along the top edge with the lining on the right side of the main fabric. |
 |
| Along top edge clip curves and turn the lining fabric to back side. For other three edges turn under along stitching line and wondertape the tri coloured welt in place. |
 |
| Sew the welt in place |
 |
| Sew the lining fabric to the other three sides. |
 |
| Add another piece of lining fabric to the welt pocket and sew around all 4 edges. |
 |
| Add another piece of backing fabric to the patch pocket and sew leaving a small gap in one side to turn pocket right side out. |
 |
| Pocket is now ready to be topsticthed onto pants. |


Next up was the front pockets. I used the front pattern piece and sketched out what I was thinking, a simple curved pocket in the embroidered coat fabric with an oval porthole pocket behind it looking onto a light blue backing.

After making some patterns I started work on the porthole. I cut out a piece of the pants fabric the same size as the main pocket, two pieces of the light blue as the backing of the porthole. One piece of the light blue fabric was laid over the main fabric and the oval traced on top. I then stitched around the oval, trimmed away all the fabric inside the oval and turned the blue fabric back behind. I thought about top stitching but liked the look of the clean lines.

I then sewed the second piece of light blue fabric to the first around the edges to make the pocket bag. Unfortunately I forgot to interface my fabric before I did the porthole pocket, but thankfully it sits nicely anyway. I did go back and iron some interfacing onto the back of the pocket bag - I don't know if it does much, but it's done now!
Next up the front curved pocket. I cut out the embroidered coat pocket and a piece of the light blue cotton as a backing. I then added some piping and sewed it together along the top curve. I then sewed the cotton backing onto the coat fabric of the porthole pocket making a second pocket behind the embroidered fabric.


To insert the pocket into my pants I traced the double pocket assembly onto the front pants piece, added seam allowance and cut out the front of the pants, it was then a simple job of sewing the bottom edge of the embroidered fabric onto the front pants piece.

The back and front pieces were then sewed together down the side seams. Again these seams were serged and top stitched in grey. Now I could add my side pockets.
I started with my right side pockets.v First, the small darted zipper pocket. I decided that unlike my trial where I just turned the edges inside and attached the pocket I wanted to add a lining.
Unfortunately I hadn't actually trialed this and my first attempt didn't go well. I sewed seams early that needed to be open later etc. In the end I recut the entire thing, unpicked my zipper and redid the entire pocket. Thankfully it worked well the second time and with the use of wonder tape to hold things in place as I topstitched around the entire pocket, I managed to get the pocket finished. I then took the front of the gusset pocket onto which this pocket would be placed and hand sewed the pocket in place.


I them made up the rest of the gusseted pocket. The sides are made from the dark blue cotton (interfaced) which tapers from 1.5"wide in the top to nothing at the bottom. The back of the pocket was made from a plain grey cotton and then the pocket was lined in cotton. I made a pocket flap in a similar shape out of the same fabrics. The final touch for this pocket was a button and button hole. I made a machine button hole in the pocket flap and then added a "pocket watch" button. The whole pocket and pocket flap were top stitched to the side of the leg using a dark blue thread.


Onto the left leg. I wanted a pocket with some dimension to match my gusset pocket, but without repeating the same pocket. To do this I decided to play around with some fabric manipulation . I created a 6” wide strip of fabric by sewing the teal and the royal blue fabric in strips. The teal strips were 1.5”wide and the blue strips 1”wide.

I then pleated this fabric so that one side of each pleat was teal and the opposite side blue.

I added teal piping along the top of the fabric and added a backing fabric, attached along the top edge and turned back. Finally I then ran three lines of top stitching over the pleats. The two outer rows of stitches sewed the pleats down so that the teal fabric was showing, but down the center I sewed the pleats up so that the blue side was shown creating a wave effect.

The resulting piece of fabric was then sewn to an oval of the pants fabric leaving the top piped edge free to create a patch pocket.

To continue the pocket on pocket theme I wanted to add another pocket onto the oval and decided on a curved piped double welt. I drew my desired curve onto the top half of the oval patch. I trimmed the edging of two pieces of piping to the width of the piping and sewed them in place using my zipper foot. I then sewed a teal backing fabric over the top. I cut along my drawn curve, making little triangles at each end and turned everything to the inside and stitched along the triangles. Another piece of backing fabric was added to the back, sewn to the edge of the existing backing to make the pocket bag.

Finally I added piping around the entire oval of pants fabric and then sewed a piece of grey cotton onto the patch right sides facing and then turned it to enclose all the seams. The resulting patch was sewn onto the pants with a teal topstitching stitch, in the ditch of the piping.

Finally I sewed the inseam of the pants and again serged the seam, but I wasn't able to top stitch this seam.
Since this fabric is not the softest, I decided that I wanted to line my pants. I used some beautiful rayon fabric that was salvaged from another pair of pants. I took the existing lining apart, recut the pieces to match my new pattern (Thankfully the pants that the lining came from were flares so had lots of extra fabric) then sewed them up as per my main pants leaving the front seam open.

I basted the lining to the pants along the waistband and then at the front seam turned the edges under and hand stitched the lining to the zipper and zipper fly.
I used a curved 4 piece waistband. The outside of the waistband is in the main fabric interfaced with lightweight interfacing, the inside of the waistband is the light blue cotton interfaced with medium weight interfacing. I added belt loops made from interfaced grey cotton fabric. The outer waistband was sewn onto the pants with the belt loops caught between the pants and the waistband, the inner waistband was then sewn onto the outer waistband along the top edge again catching the belt loops in the seam. Finally the lower edge of the inner waistband was turned under and I stitched in the ditch from the front side of the fabric to secure this edge.
I added 1.5”wide elastic to the waistband as well as I have a problem with pants falling down even with a fitted waistband.This was threaded through the waistband and caught in each end as it was sewn.I finished the waistband with two snaps. I used scraps of the main fabric to cover the outside of the two front snaps.

The bottom of the pants was finished with a 3” hem double turned at 1.5”. The lining was caught inside the hem to keep it in place.


Fitting wise these are pretty good. There's some minor puckering at the back just under the waistband. I think I need to take some extra fabric out there but otherwise these are really good.
No comments:
Post a Comment