Sunday, January 31, 2021

Stained Glass Shirt

Pattern Reviews contests are always a great source of inspiration for me.  They push me to make things that I otherwise might not make.  They force me to step outside my comfort zone and try new things rather than just making the same things over and over.  So when I saw the Zoom outfit contest I knew that I wanted to enter.


So what is a Zoom outfit? - obviously it's anything that you would wear on a zoom call but that's really wide open to interpretation.  There was plenty of discussion online about what photographs best, choose plain bright colours, V necklines  etc - I read through it all and then thought - you know what - I don't really care.  I'm going to go for what I want to see in a zoom call, and what I want is something with a lot of visual interest in the shoulder region - something that is eye catching and colourful.


My original thought was to use all my blue/teal french terry scraps patchworked together. I tried a number of different combinations - even just sewing all my little scraps together.....and ended up hating the resulting fabrics.  OK scratch Idea #1.


Onto Idea #2  - I made this stained glass window quilt for one of my friends' weddings and really love the contrast between the black and the bright batik fabrics - maybe I could make a shirt using this technique.

I sketched out something like I was imagining and then got to work.  I used my woven moulage, lowered the underarms by 22 mm and extended the lower point out by 5 mm then added an additional 1/2" down the outside seam (sorry about the mixing of units - that's how I work these days).

I rotated the majority of the armhole dart to the side seam at bust level, then started drawing in my black lines. I cut my pattern along each of the lines to give myself basic pattern pieces without any seam allowances.

Fabric:  I wanted to use one of my batik fabrics.    The base fabric is tie dyed in blue greens and purples and then over the top are stamped grids of gold metallic patterns - It's a beautiful fabric.  

For the black I found an offcut of a really light weight wool - since it was so lightweight I interfaced the entire fabric with black iron on interfacing before cutting anything out.

I cut out all my pieces for my front, sewed them together and pinned it on my dress form.....and hated it!  well not quite I loved the top part around the shoulders and neckline, but hated the lower parts, so I ripped the bottom half off, pinned some more batik fabric on the dress form and then started using the black stripes to find a new arrangement of stripes and colour that I did like.  I played around with many options - 1 is shown below, before deciding on my final layout.


Once I came up with an arrangement I liked (not the above one - though I wish now that I did go with that option), I started again with my pattern.  This time, instead of cutting up my pattern I drew my lines on, then traced each separate piece off, allowing me to add seam allowances to each pattern piece as well.

Once I was happy with my front piece I  did it all over again for the back, and then once again for the sleeves.  It was a very slow process, taking me a couple of days to come up with just what I wanted.


Finishing details:  I think this is the first time in forever that I sewn something with no real finishing techniques used inside - I just wasn't sure I liked it enough to spend any more time finishing it off all the little seams.  But the edges did need to be finished.  The sleeves were easy - I just added black ribbed cuffs.  The bottom edge is just turned up 1/2" once and stitched - I tested out a black ribbed band but didn't like it.  The neckline I had a bit of a problem with.  My original plan was to have the black strips as my neck edge, but when I tried on the shirt it ended up being quite low cut and showed off quite a bit of cleavage.  If there is one thing you don't want in a Zoom outfit it's lots of cleavage, so I ended up adding another couple of triangular batik pieces to fill the area in a bit, I then cut seconds of these pieces, interfaced them, and cut seconds of the back black bands, sewed them to the neckline and turned it inside, then top stitched in the ditch to hold the facings down.  Looks neat from the outside.


For the strip on the arm I tried to align it with the strip on the bodice.  I also aligned all my black stripes at the side seams, but then I had to take in the side seams and everything lost alignment - Oh well - I'd prefer fitted to aligned.


So final results - I like it, I'm just not sure I love it.  Ahh well it's always good to try something new.  It's probably a bit too lightweight for winter, but will be good when I want a light weight long sleeve top in Summer.  Only time will tell if it ever actually gets worn.  

On the plus side it does make a statement in a zoom setting.


Tuesday, January 19, 2021

More Calders

Not a lot to say about my latest sewing project  - I made another pair of the Cashmerette Calders.  I am loving these pants for lounging around the house - they look totally put together but are super comfortable and warm.


This pair are made from some really beautiful grey wool with a tiny black diamond pattern woven into it - It feels super luxurious, not at all scratchy, but definitely smells like wool when washed or ironed.  Despite how good it feels I still wanted the pants lined and chose some woven rayon which I love as a lining - plus I love the pop of colour inside.


The pattern I used is the modified version I created for my last pair with one more minor change - I do find the black pair are just a smidge hard to get over the hips so I increased the outer seam of the back pattern piece by about a half inch - and the back waistband the same.  So basically this pair are now almost a straight size 14 with 1.5" length removed in the rise and 1.5" off the length.

I hemmed this pair to be a bit longer than my last two pairs, which is nice around the house, but I took them out into the wild today (yes that's right I left my house for the first time in months) and they did drag on the beach a bit.


I do still have plans for another pair of these - I found some metallic flecked denim at the store the other day and thought that a pair of Calders would be fantastic....we shall see!


Sunday, January 10, 2021

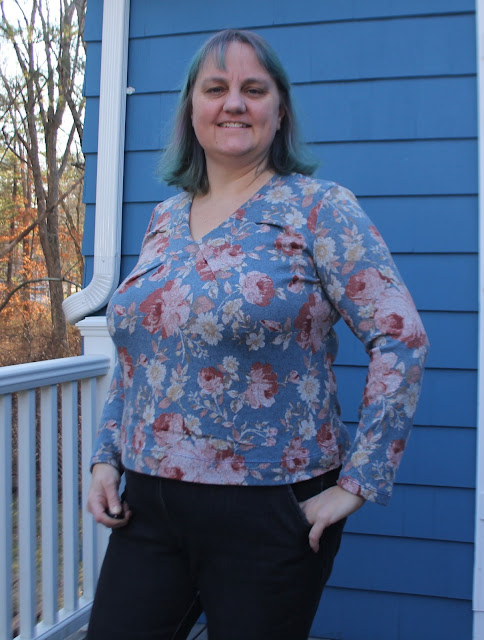
Blue Floral Shirt with neckline pleats

More playing around with my pattern.  This shirt actually came about thanks to the Great British Sewing Bee (again).  They did an episode where one challenge was to drape a garment on a dress form and I thought, now that I have my dress form looking like me, maybe I should try doing that too. 

However I didn't want to cut into my good fabric so I took the entire length of fabric and just started draping.  My first attempt was actually quite interesting.


I really liked the way those darts/pleats worked as so I decided to go ahead and try and draft a pattern with this arrangement of darts.

I started with my woven sloper, traced it out again and then started doing the modifications needed to make it a knit sloper.

On the back this was easy, I just moved the back darts out to the side seams, removed 1/4" from the side seam to allow for stretch and took 1/4" off the outside edge of the shoulder seam. The final change was to raise the underarm by 1/2" and redraw the back armhole between the two new points.

For the front pattern piece it was a bit harder.  Again I brought in the shoulder point by 1/4"and raised the underarm by 1/2".  I took 1/4" off the side seams.  I then had to try and remove some of the under bust dart.  

Originally the under bust dart tapered from 0 at the bust point to 6cm at the underbust, then back to 5 cm at the waist and 2.5cm at hip (Shown by a dashed line in the picture below).  I started by just moving 2.5 cm out to the side seam from the underbust right down through the waist and high hip but that creates a really steep angle between the bust and underbust.  So instead I moved the 2.5cm out to the side seam at the hip line and waist lines, but at the underbust line,  I only took 1.5 cm off the front side seam, and then took 1cm off the back side seam as well - It just gave a more balanced pattern.  This still leaves a 3cm dart at the underbust and a 2cm dart at the waist, but if I take out any more it ends up really warped.


I then lowered the center front point 3" and created a V neck, then rotated the armhole dart around to the center front point.  This created the lower of the two pleats (or technically they are released darts) at the neckline.  To create the second pleat/dart I just drew a line from a point about 1.25" above the center front point on the neckline, out to the armhole and spread my pattern piece around that point.  I opened the second dart the same amount as the first.


For the sleeve pattern piece I again raised the underarm point on both the front and back by 1/2" and slimmed down the sides of the sleeve by 1/4".

And now my pattern was just about complete.  I cut the pattern out of my fabric  - a sweater knit that is grey on the back and printed in blue with red flowers on the front, and basted it all together and tried it on - I was quite pleased with it.  I had to unpick my pleats/darts a bit to get the right look I was going for but otherwise the fit was really good so I took it apart and serged it all together properly.


The final piece of the puzzle was how to finish the neckline.  I didn't want anything to detract from the dart/pleats so I decided on a facing.  I cut front and back facing pieces, serged them together at the shoulder line and stitched them onto the neckline with a straight stitch so that it wouldn't stretch out.  I under-stitched the facing , turned under and stitched the free edge of the facing and then hand stitched the facing down with a catch stitch.


The sleeve and bottom hems were double turned and then stitched with a twin needle for a really nice finish.

I really like this pattern  - something slightly different to my normal tops - fairly fitted but not too tight. There is only one small issues at the back sleeve - I feel like the seam line should be moved in just a touch so I've drawn this onto the pattern to try for next time, and there will be a next time with this pattern - though maybe next time I'll make three smaller darts at the front instead of the two larger ones.  So many options!


Friday, January 8, 2021

Raglan Sleeve Shirt with Neckline darts

Having spent quite a bit of time creating a new sloper I decided I would like to try modifying it into a raglan sleeve sloper as well.

I looked for some tutorials to figure out how to do this but couldn't really find exactly what I wanted so I just made it up as I went along.

After tracing out my pattern pieces again, I took my front and back pattern pieces and drew on them where I thought the raglan lines would go.  I got it right on the front, but the back didn't end up perfect, probably because I was trying to incorporate the raglan line into the back neck dart.  I would like, on next attempt, to move that back seam across by about and inch. 
I cut my pattern along the raglan lines, then I had to figure out how to add the shoulder pieces to the sleeve piece.  The back piece was actually really easy and I was almost able to stick it directly onto the top of the sleeve, but it took a bit of playing to get the front piece at the right angle.

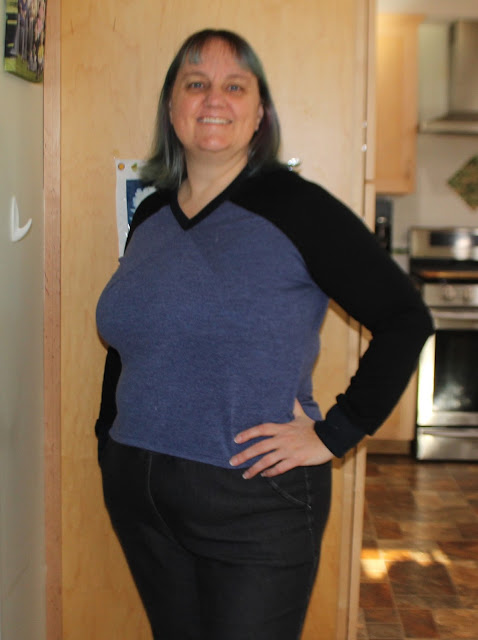
The final pattern modification I did was to lower the center front point by 3" and create a V neck, then rotate the arm hole dart around to the center neckline - just for something a bit different.  The dart starts right at the V point. 

 Again I ignored the under bust dart for a knit shirt and just added some extra shaping to the side seams after basting it all together, just to get a slightly nicer fit. 


I then made a bit of a blunder.  As I was using a woven sloper but wanted to use a knit fabric I decided that as a short cut to removing width for the knit, then adding seam allowance I would just use the pattern as is.  I forgot that with the raglan sleeves this takes out vertical length as well as width, especially across the shoulders.  Next time I make this I need to go back and add the seam allowance to the raglan seams to get a better fit.
                                  

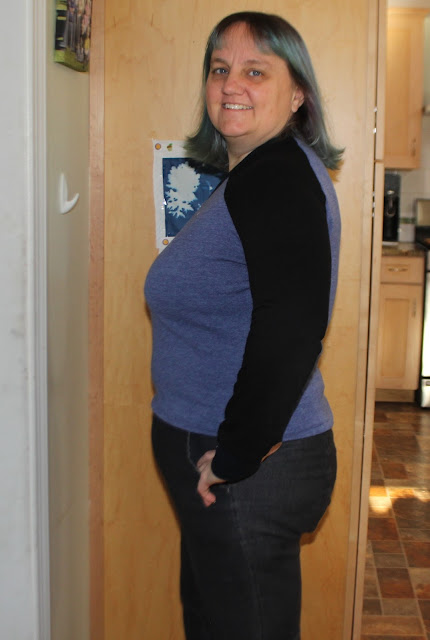
Now to make up the pattern and test it out.  I didn't want to waste any good fabric so I used up the remainder of the denim blue sweater knit from my last funnel neck shirt.  I didn't quite have enough for the entire shirt so went through my scraps drawers and found a black sweater knit that I could use as the sleeves.  Probably not the best choice as it didn't have enough stretch compared to the blue fabric and with the blunder with the seam allowances this makes this shirt really quite tight  across the shoulders.


I finished the neckline of the shirt with a black ribbed neck band.  When I tried on the shirt without the neckband the front neckline seemed really open so I cut the neckband a smidge shorter than I would normally, but I think I got it a bit too short as the neckline is now really high.


Overall - not my best make.  Slightly tight across the shoulder and around the neckline, but still entirely wearable. Just need to make a few modifications to the pattern for next time.

1.  Move the back raglan seams in by about 1" at the neckline tapering back to the armhole.

2. Add seam allowances to the raglan seams

3. Cut neckband a bit longer

But otherwise I think it will be a good pattern.


Thursday, January 7, 2021

A Blue Silk Bra

I've been watching lots of reruns of the Great British Sewing Bee lately - currently up to Season 5 episode 3. I got inspired the other day by Lingerie week to make myself a new bra. I was thinking that it'd be nice to use up some of my lace to make a slightly nicer bra but as I was rummaging through my stash looking for my lace I found the offcut of some jersey silk that I used 2.5 years ago to make my Mum a top as a birthday present.  There wasn't much of the fabric left over, certainly not enough for another top, but I figured there'd be enough for a nice bra and undies set.


For the Bra - I used my standard bra pattern but modified the back piece once again - I'm still trying to find that perfect amount of coverage that is covered enough, but still easy to get on.  I think we are getting closer!


Cutting out:  I cut out two lots of each pattern piece - one with the maximum stretch running up and down and one with the stretch running across.  I feel like this gives a good combination of support and comfort.

Four straps were cut from black cotton sateen and interfaced with medium weight interfacing before being stitch together and turned inside right.

Construction:  The cups were sewn with a straight stitch, then top stitched and the seams trimmed, the cups were inserted into the bridge in the same way.  I then stitched the two back layers together using the lightning stitch and then turned inside right.  The two front layers were stitched together in the same way and clear elastic was added to the neckline seam with a three step zig zag, stretching the elastic as I go.  The straps were inserted into the front section between the two layers and stitched in place and then it was turned inside right.  The front and back were joined together at the side seams then the straps inserted into the back piece and top stitched in place.  All the seams were then top stitched with a three step zig zag so that they sit beautifully flat.

The final step was to add the bottom elastic.  I made one modification to the bridge piece when I cut everything out and that was to curve the bridge up between the breasts so I now started my elastic at that center front at an angle, basted it in place and brought it right around the bra and back to the center where I joined the two ends of the elastic at an angle.  


Once I was happy with it I took the elastic back off, sewed up that center seam and then reapplied the elastic with a zig zag stitch, turned and top stitch with zig zag as well.  My plan was to then cut the elastic at the back and tighten it to the desired length but at the moment its just being worn as is - it's a bit loose at the back but it still seems to be pretty supportive so I may leave it as is.

Overall the bra turned out pretty good.  I like the modifications I made, but the cups  may be just a smidge to small - hopefully that will be rectified now that Christmas is over and I can go back to eating normally!


I then made a pair of undies to go with my new bra. Problem is that I only had scraps left and when I was checking for maximum stretch I made a mistake and cut the pants so that the stretch was up and down and not around.  They fit, though they are quite snug - they actually hold the tummy in quite nicely, but the problem is around the crotch where it's a bit skimpy.  They tend to ride up the bum a bit.  They are wearable, but probably only on occasions when I want a really nice lingerie set.