When I finished my Triple L Tweed top i was at a bit of a loss as to what to knit next. I've had this ball of pure merino super wash in my stash for quite some time but I was never sure what to make with it.
The yarn is a HPKY (Hand Painted Knitting Yarns) Regina Louise DK weight wool in forest green . When I bought the wool I was thinking of making socks, however after making one pair of socks out of this wool and having them last less than a month before getting holes I figured another pair was out of the question. So what else could I do with one single ball?
....another tank top, this time I wanted to go for a thinner strap look. I decided on a very simple pattern. A lower band of 2 by 2 rib was knit in the round from the bottom up. Once again my gauge didn't work very well for some reason and the top ended up being looser than I wanted so once I changed to stockinette stitch I started decreasing every couple of rows till I got to the right number of stitches I wanted.
I continued knitting in the round till I got to the length I wanted to the underarm (I wanted it as long as possible but did only have the one ball of yarn) then I split my ball of wool. I split the front stitches into two and decreased at both the armhole and neck edge creating two triangles. I did the same for the back stitches.
Unfortunately I ran out of wool about 3/4 of the way up the back two triangles. There wasn't enough of the project left to buy another ball of wool, (especially at $29 a ball) so I went through my stash and found the closest match. An Icelandic Plötulopi in forest green that I picked up at a grocery store while touring around Iceland. The texture of the two wools couldn't be more different but I decided I didn't really care and used it anyway.
Once my triangles were down to 9 stitches I changed to double pointed needles and made the remaining stitches into an i cord. A three needle bind off joined front and back and the top was finished.
Its a bit see through in some lights and could have done with some shaping in the front to account for my boobs - but otherwise I love it. It's light and airy and feels beautiful to wear.
Tuesday, July 5, 2016
Tuesday, June 28, 2016
Swimsuits all around
It's that time of year. The local pool opened on Saturday. In order to get ready I made each of the kids a new swim suit.
For J I wanted to make a pair of what I've seen called "Euro Style" swim trunks. I hate the board shorts that reach down past the knees that seem to be all you can buy for boys around here - I mean that can't be comfortable wearing something that big and baggy in the water. I've tried cutting a store bought pair off to the length I want but they still didn't work so I wanted to make a pair of shorts out of swimsuit material - not necessarily skin tight, but fitted.
I went for a strong colour block look - took J's shorts sloper and took it back to no added ease or seam allowance. I cut out front and back pieces in bright green and then cut two stripes of blue down the sides and then a waistband out of black. I'm not happy with the waistband - especially the 1" elastic inside it, and I could have made then a smidge tighter but otherwise they're a cute simple pair of boys swimmers.
I definitely want to try these again and get them fitting a bit better. I think I need to take the front rise down a bit he has a tendency to pull them down to sit below his belly- and I definitely need to make the waistband tighter.
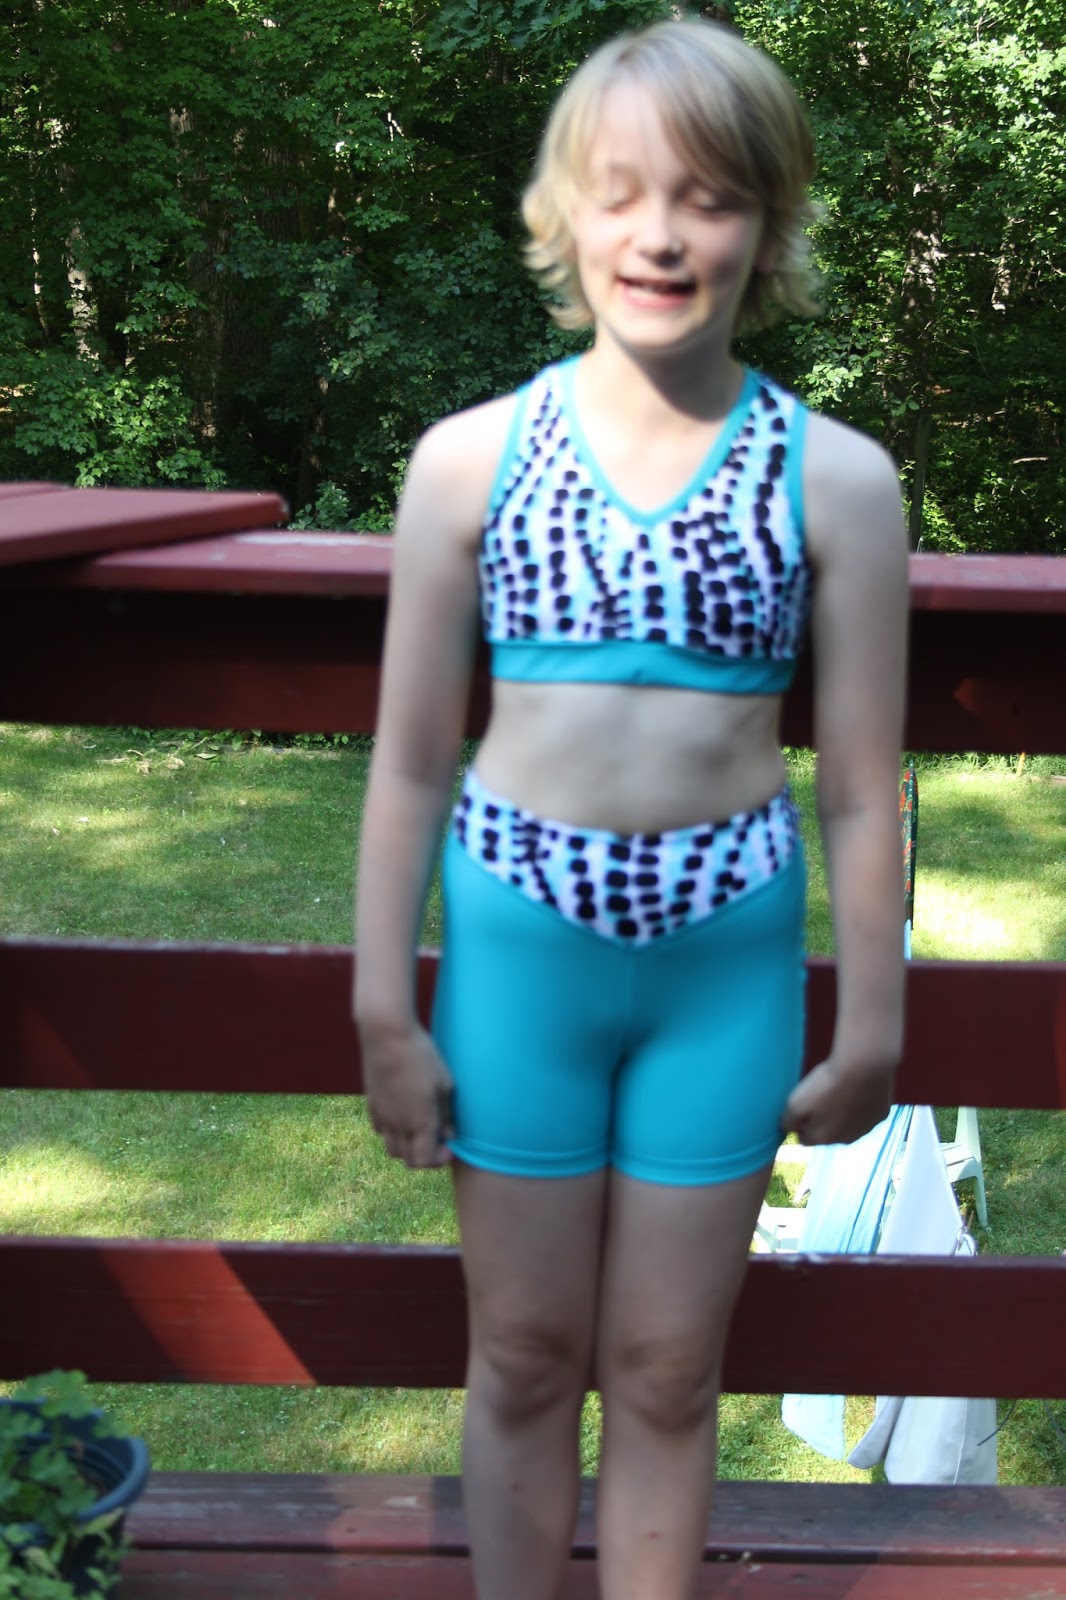
I then did the same for L - however for her I left out the separate colour down the side and made the waistband angle to a V in the front and back. The wasitband is done in a patterned fabric and the rest of the shorts in a plain turquoise. I then had to figure out what sort of top I wanted for her. In the end we decided on a sort of crop top. I took her tank top pattern that is a bit too small, took about 3/8" out of the center front and back seams and cut it off at mid torso. The arm holes I scooped in quite a bit at the back and the neck I did in a V front and back. I added 1" elastic inside the bottom band to keep everything in place.
The main part of the top I did in the patterned fabric and used the plain turquoise for bindings/band.
I managed to finish both pairs of swimmer in 1 day - The kids wanted to wear then the next day so let me keep sewing till I finished them.
I also started working on a new pair of swimmer for myself. I love my new one piece I made, but really two piece swimmers are really so much more practical. At the end of last summer I made myself a two piece swim suit.
Not the most flattering and I was never totally happy with the pants for these. (though for a first attempt at swimsuit its really not that bad
When I went searching for my swimsuit material this year I found a half made pair of pants that I had obviously started last year but never got around to finishing and decided I would use them as a muslin for the new swimsuit that I wanted to make. I took apart what I had and recut them in the pattern that I wanted to try out and ended up with this.
The sides can be rushed up or left down as shown. These are a lot more comfortable than the original pair so I think I'll stick with this pattern - Now to remake the top so it can be taken off more easily when its wet - its such a strange sensation having to ask your kids for help with undressing! I have done one iteration of top but it was a total failure so I need to rethink this again.
For J I wanted to make a pair of what I've seen called "Euro Style" swim trunks. I hate the board shorts that reach down past the knees that seem to be all you can buy for boys around here - I mean that can't be comfortable wearing something that big and baggy in the water. I've tried cutting a store bought pair off to the length I want but they still didn't work so I wanted to make a pair of shorts out of swimsuit material - not necessarily skin tight, but fitted.
I went for a strong colour block look - took J's shorts sloper and took it back to no added ease or seam allowance. I cut out front and back pieces in bright green and then cut two stripes of blue down the sides and then a waistband out of black. I'm not happy with the waistband - especially the 1" elastic inside it, and I could have made then a smidge tighter but otherwise they're a cute simple pair of boys swimmers.
I then did the same for L - however for her I left out the separate colour down the side and made the waistband angle to a V in the front and back. The wasitband is done in a patterned fabric and the rest of the shorts in a plain turquoise. I then had to figure out what sort of top I wanted for her. In the end we decided on a sort of crop top. I took her tank top pattern that is a bit too small, took about 3/8" out of the center front and back seams and cut it off at mid torso. The arm holes I scooped in quite a bit at the back and the neck I did in a V front and back. I added 1" elastic inside the bottom band to keep everything in place.
The main part of the top I did in the patterned fabric and used the plain turquoise for bindings/band.
I managed to finish both pairs of swimmer in 1 day - The kids wanted to wear then the next day so let me keep sewing till I finished them.
I also started working on a new pair of swimmer for myself. I love my new one piece I made, but really two piece swimmers are really so much more practical. At the end of last summer I made myself a two piece swim suit.
When I went searching for my swimsuit material this year I found a half made pair of pants that I had obviously started last year but never got around to finishing and decided I would use them as a muslin for the new swimsuit that I wanted to make. I took apart what I had and recut them in the pattern that I wanted to try out and ended up with this.
The sides can be rushed up or left down as shown. These are a lot more comfortable than the original pair so I think I'll stick with this pattern - Now to remake the top so it can be taken off more easily when its wet - its such a strange sensation having to ask your kids for help with undressing! I have done one iteration of top but it was a total failure so I need to rethink this again.
Thursday, June 23, 2016
Blue and Grey Chevron Tank
At the beginning of spring I sat down and sketched a couple of tops that I wanted to make this summer. I've since made two of these tops - the Marfy inspired top and the teal and grey wrap top. The next one I wanted to try was a bias cut chevron top.
I had the perfect material in my stash, a blue and grey stripe knit with a very nice drape to it.
The plan for this top was for a loose flowing tank top with straps made from the arm binding and neck binding joining together at the shoulder.
Once again I started with my basic sloper. Since the stripes on the material were 1" wide I decided to make all the bindings 1" wide as well which means the shoulder needed to be trimmed down to two inches wide (1" for neck binding, 1" for arm hole binding). After the teal and grey top ended up with the arm scythe too low I raised that by about 1/2" and then graded between the underarm point and the shoulder. The neckline was squared off across the back and brought down to a V in the front.
The only other change I made to the basic pattern was to flare the top out from the underarm to the hips.
The front and back pattern pieces were cut on the bias making sure I aligned the stripes at center back and front. The neckline binding pieces were all cut out centered along grey stripes, but by the time I got to cutting out the armholes I'd had enough pattern matching and I just cut them out where ever I had space - trying at least to keep the symmetrical on both sides of the body. The front armholes ended up matching the body pretty well - a total fluke!
I realised the convenience of using a store bought pattern when I went to put the top together. My choice of construction order when sewing together the front was not good and I created quite a few issues for myself that I would never have had if I were just following a pattern. I learnt from the front and the back went together a lot more smoothly. But by the time I had the top pieced together with all the bindings in place I was not in a good frame of mind. I had lots of plans for how I was to finish the top but in the end I just wanted to get it done so the binding on the neckline is just top stitched in place inside ad the shoulder seams are just serged together which does not sit great.
The final question was how to finish the bottom. I changed my mind on this so many times looking for a way to make the top sit nicely. In the end I went with the front angled down to the sides, cut straight across the back and reinforced with a twill tape along the hem line.
I found without the tape at the hemline it clung a bit too much for my liking - I still don't love the way this top turned out, but it's not terrible and it will get worn.
I had the perfect material in my stash, a blue and grey stripe knit with a very nice drape to it.
The plan for this top was for a loose flowing tank top with straps made from the arm binding and neck binding joining together at the shoulder.
Once again I started with my basic sloper. Since the stripes on the material were 1" wide I decided to make all the bindings 1" wide as well which means the shoulder needed to be trimmed down to two inches wide (1" for neck binding, 1" for arm hole binding). After the teal and grey top ended up with the arm scythe too low I raised that by about 1/2" and then graded between the underarm point and the shoulder. The neckline was squared off across the back and brought down to a V in the front.
The only other change I made to the basic pattern was to flare the top out from the underarm to the hips.
The front and back pattern pieces were cut on the bias making sure I aligned the stripes at center back and front. The neckline binding pieces were all cut out centered along grey stripes, but by the time I got to cutting out the armholes I'd had enough pattern matching and I just cut them out where ever I had space - trying at least to keep the symmetrical on both sides of the body. The front armholes ended up matching the body pretty well - a total fluke!
I realised the convenience of using a store bought pattern when I went to put the top together. My choice of construction order when sewing together the front was not good and I created quite a few issues for myself that I would never have had if I were just following a pattern. I learnt from the front and the back went together a lot more smoothly. But by the time I had the top pieced together with all the bindings in place I was not in a good frame of mind. I had lots of plans for how I was to finish the top but in the end I just wanted to get it done so the binding on the neckline is just top stitched in place inside ad the shoulder seams are just serged together which does not sit great.
I found without the tape at the hemline it clung a bit too much for my liking - I still don't love the way this top turned out, but it's not terrible and it will get worn.
Triple L Knitted tank
I finished my last knitted sweater just as the weather started to warm up so I didn't really feel like starting work on a new sweater. Browsing my local knitting shop In the Loop during one of my regular Friday Sit and Knit groups I found some beautiful cotton yarn with a beautiful feel and a really lovely luster to it. I decided that this would be my next project. I pulled out a couple of skeins of the same dye lot Purple, plus the last two skeins of Green and then decided to throw in a skein of black as well.
The only problem was that this stitch uses up a lot more yarn than just a straight stitch so the yardage I had wasn't going to be enough. I went back and got a second ball of the black and I also got another ball of purple - though from a different dye lot. I figured that using this stitch you wont be able to see the difference in purples so that wouldn't be a problem.
The band is a simple 2 x 2 rib worked in purple, then I went straight into the Triple L Tweed stich. Some shaping was done through the waist and the bust by adding and removing stitiches at the side seams. At the under arm I split each ball of yarn into 2 and worked up each side shaping the armhole and creating a V neckline. I ran out of the first skein of green halfway up to the shoulder and didn't want to use any of the second ball that I would need for the back, so I modified the pattern to be a two colour repeat. Then I ran out of black as well so finished up the front with just purple.
Then I started on the back. As I didn't need as much shaping for the bust at the back I managed to do the entire piece in the three colours.
I sewed the two pieces together at shoulder and side seams and tried it on - I really stuffed something up - It was way too wide - and when I say way to wide I really mean it. I stuffed it back into its bag.
A couple of days later I decided that I couldn't give up on it. Apart from taking it all apart and remaking it - which I really didn't want to do - the only think I could think of was steeking it.
I've never tried steeking anything before so I got on the internet and started researching and after procrastinating or a while decided I just had to go for it.
I put on the walking food and using the longest stitch possible ran a seam down the sides,,,,it worked so I went back and re sewed the seams with a much smaller stitch a couple of time just to make sure. I then went and ran a line of stitch down each side of the seam allowance about 5/8" out where I planned on cutting the fabric, and went over it again and again. I was hoping that I could use my serger to finish off the seams but the serger wasn't cooperating so I just cut it by hand and used an overlock stitch on my machine over and over again. It seems to be holding.
To finish off the shirt I crocheted around the armhole and the neckline with two rows of single crochet.
I quick steam block and a couple of washes later and its still doing OK.
Wednesday, June 22, 2016
A sewing Dare
I have Gillian over at She Crafts a Rainbow to thank for this garment. She's currently hosting something that she calls Sewing Dares where anyone who is interested can write in and ask for a dare. She then goes through your blog and chooses a dare specifically for you based on your previous works. All I can say is that the work she has done to go through and make up dares for all those people is amazing - so I just wanted to start by saying a big thank you to her for organising this.
Once I heard about this concept I knew I wanted to join in, so I sent in my request and was given this dare.
You’ve sewn so many things before that it’s hard to think of a new challenge for you! So instead, I dare you to dig out a pattern you’ve made before and loved, but never remade. It’s time for another version of an old fav!
Interesting - I don't know that I've ever made a pattern twice so I have plenty to chose from....so what should I remake?
I went through a number of different options in my head but in the end I decided on this top.
I originally made this top when I was back in my early 20's - The pattern says 2002 so that's probably when I made it. I only wore it a couple of times for a number of reasons, but it's still, to this day, sitting in my closet. Every time I go through my wardrobe to throw stuff out I look at this top, maybe try it on ,and decided I can't part with it. This top makes me feel fabulous and isn't that really what it's all about after all. So it stays, but never gets worn.
I wanted to remake this pattern into something that still makes me feel fabulous, but that I will actually wear more than once a decade.
Onto the details. The pattern is for this shirt is New Look 6153
Now I needed to figure out why I never wear this top - That's easy.
1. The fabric. Don't get me wrong I love the fabric - it's a slinky black knit fabric with red sparkles. Made into this top it makes for a very glam look - the sort of thing I'd wear out to a club. Now my present lifestyle doesn't lend itself to much clubbing - no I take that back - It doesn't lend itself to ANY clubbing hence the shirt goes unworn.
2. The halter neck - I love the look of halter necks, but they just don't work for me. To wear this top I would need to wear a strapless bra. I do have one but it is the most uncomfortable thing ever so I never touch that either and I'm happy to keep it that way. So in order to be able to wear this top I need to find a way to wear a basic bra with it.
Both these things were easy enough to fix.
Rather than doing the halter neck again, this time I chose to sew view B with the shoulder straps. I then modified the pattern to widen the straps so that they somewhat cover my bra straps, Now this top can be worn with a normal bra.
The fabric I chose for my new top is a teal green knit with a very subtle silver sparkle - I know I'm trying to get away from the sparkle but you got to have some sparkle in your life and this one is an everyday sort of sparkle not a special occasion sparkle.
From the markings on the pattern I deduced that I originally made this shirt in a size 14 (even though all the dimensions I'd circled on the back of the packet - which are pretty much the same as my dimensions today - put me squarely in a size 16). I tried on the original top and it seemed like it was a good fit so I decided to do that again and cut out a straight size 14. Unfortunately the teal fabric that I used has a little less stretch than I assumed (I've run into this same problem using this fabric before) so when I tried the new top on it was a bit tight. I let the side seams out as much as I could - but I should probably have used the size 16.
This was a very easy top to sew, only took about 2 hours from start to finish - so whats the final verdict?
I'm not sure. I wore the shirt out today and spent most of my time pulling the shirt down at the back as it rode up, or pulling the shoulder straps back onto the shoulders. I do love the look of it - though it could do with a smidge more drape in the front, but it's not the most comfortable shirt in my wardrobe. Still It will get a lot more wear than the original so I think that's a win.
Tuesday, June 14, 2016
Sallie Mini Skirt Hack
As I posted about here, I actually bought myself a new pattern then other day - The Sallie Jumpsuit by Closet Case File. I made up the jumpsuit as per the pattern and whilst it's OK it's not a "wow I need to wear this all the time" piece - I knew I could make it just a little better.
I love the shape of the kimono top, with a few modifications to get it to fit a little better of course. I used the size 16 to start then took about 1/2 inch off the center line. I also took the neckline up 1/4" higher - for this dress I didn't need to be able to get it on and off over my hips, so I wanted to bring the width of the neckline in just enough that I didn't need the tie to keep the neckline on my shoulders. I think this is just right. I also added 1.5" to the bottom edge of the top as I found the original length of the shirt too short.
The pants are the bit of this pattern that I'm not 100% sure of. Of course the pattern comes with a maxi skirt version but I didn't want a long skirt I wanted it short. I could have printed off the the skirt pattern and cut it off to the length I wanted, but I couldn't be bothered printing off all those pages so I just went back to the pants pattern and created a short skirt pattern based on those. There is a very slight flare to the skirt but with the negative ease in the pattern it doesn't really look like it in the final product.
To find the material I wanted to use I went, not to my fabric stash, but to my pile of old clothes that I put aside to be re purposed. I pulled out a paisley maxi dress that I bought at Walmart at the end of last Summer. I saw this dress and fell in love with the material, but the style wasn't that great. There was a really heavy crocheted yoke on the dress that I hated but for the price I decided to buy it anyway with the intention of re purposing the fabric - and this was the perfect project,
I laid out the skirt pattern at the bottom of the maxi skirt making use of the bottom hem for the bottom hem of my new skirt. The top pieces were then laid out on the remaining material of the skirt. I ended up having to take the sleeves in just a smidge at the top to get the pattern to fit around the existing seams, but that I think was fortuitous - I really like the top I ended up with. The material in the top of the dress was just enough to get the back pieces of the pockets out of, though I did need to put a seam in the middle of one of the pocket pieces.
For a lining I found another old shirt that my husband got from a conference. This time in a more subdued yellow that matched some of the yellow in the paisley pattern on the main material. This was used to line the top and the inside of the pocket.
The dress was sewn up following the original instructions, though I left out all the elastic at neckline and pockets. This was not a problem at the neckline, but I think I should have added it in on the pockets as they do gape a little without it.
I used 1/2" elastic in the waist band - I considered taking a little bit of the extra 1.5" off the bottom of the shirt, but decided in the end that I like this length and that the skirt would be a bit too short if I took any further length off. Plus I like the fact I can move the waistband up and allow the shirt to blouse out a bit.
I love this dress. this is definitely a keeper (and so much better than the original dress). The comfort factor is very high.
I love the shape of the kimono top, with a few modifications to get it to fit a little better of course. I used the size 16 to start then took about 1/2 inch off the center line. I also took the neckline up 1/4" higher - for this dress I didn't need to be able to get it on and off over my hips, so I wanted to bring the width of the neckline in just enough that I didn't need the tie to keep the neckline on my shoulders. I think this is just right. I also added 1.5" to the bottom edge of the top as I found the original length of the shirt too short.
The pants are the bit of this pattern that I'm not 100% sure of. Of course the pattern comes with a maxi skirt version but I didn't want a long skirt I wanted it short. I could have printed off the the skirt pattern and cut it off to the length I wanted, but I couldn't be bothered printing off all those pages so I just went back to the pants pattern and created a short skirt pattern based on those. There is a very slight flare to the skirt but with the negative ease in the pattern it doesn't really look like it in the final product.
To find the material I wanted to use I went, not to my fabric stash, but to my pile of old clothes that I put aside to be re purposed. I pulled out a paisley maxi dress that I bought at Walmart at the end of last Summer. I saw this dress and fell in love with the material, but the style wasn't that great. There was a really heavy crocheted yoke on the dress that I hated but for the price I decided to buy it anyway with the intention of re purposing the fabric - and this was the perfect project,
I laid out the skirt pattern at the bottom of the maxi skirt making use of the bottom hem for the bottom hem of my new skirt. The top pieces were then laid out on the remaining material of the skirt. I ended up having to take the sleeves in just a smidge at the top to get the pattern to fit around the existing seams, but that I think was fortuitous - I really like the top I ended up with. The material in the top of the dress was just enough to get the back pieces of the pockets out of, though I did need to put a seam in the middle of one of the pocket pieces.
For a lining I found another old shirt that my husband got from a conference. This time in a more subdued yellow that matched some of the yellow in the paisley pattern on the main material. This was used to line the top and the inside of the pocket.
| You can just see the yellow lining at neckline and sleeve |
The dress was sewn up following the original instructions, though I left out all the elastic at neckline and pockets. This was not a problem at the neckline, but I think I should have added it in on the pockets as they do gape a little without it.
I used 1/2" elastic in the waist band - I considered taking a little bit of the extra 1.5" off the bottom of the shirt, but decided in the end that I like this length and that the skirt would be a bit too short if I took any further length off. Plus I like the fact I can move the waistband up and allow the shirt to blouse out a bit.
I love this dress. this is definitely a keeper (and so much better than the original dress). The comfort factor is very high.
Subscribe to:
Posts (Atom)