And we are onto round 3 of the Sewing Bee for 2021.

This time around the challenge was print matching specifically...
1. Construct a garment or garments, for an adult person, using fabric that has some type of pattern in or on it. The design on the fabric can be part of the fabric weave or can be printed on the surface of the fabric. This includes plaids, florals, or other designs. You can also create your own patterned fabric by printing, appliqueing etc. by modifying flat yardage.
2. Across at least one meeting point, the fabric design should match so that it looks 'seamless'. This match point may be a construction seam, but it may also be something else such as a surface pocket. The matching can be done across as many joins as desired.
I will admit that my original thought was that this would be a fairly easy challenge - boy was I wrong.
There were so many directions that I could take this....First thing to do was to see what fabrics I had available. I found about 4 or 5 that would work. A red, orange, white and navy plaid in a crinkle gauze cotton, a red flannel plaid, a cotton jersey knit plaid in black and red, a rayon with a geometric print in turquoise black and white, a rayon with a random leaf print, a geometric print cotton fabric in shades of orange and brown or a duck cotton with a world map print. I sat down and started sketching design designs that would work for each fabric
Then since the competition started on a Friday I got my Friday morning knitting group to weigh in with their opinions. I want to thank all those wonderful ladies for their time and input - it really does help to talk these things out.
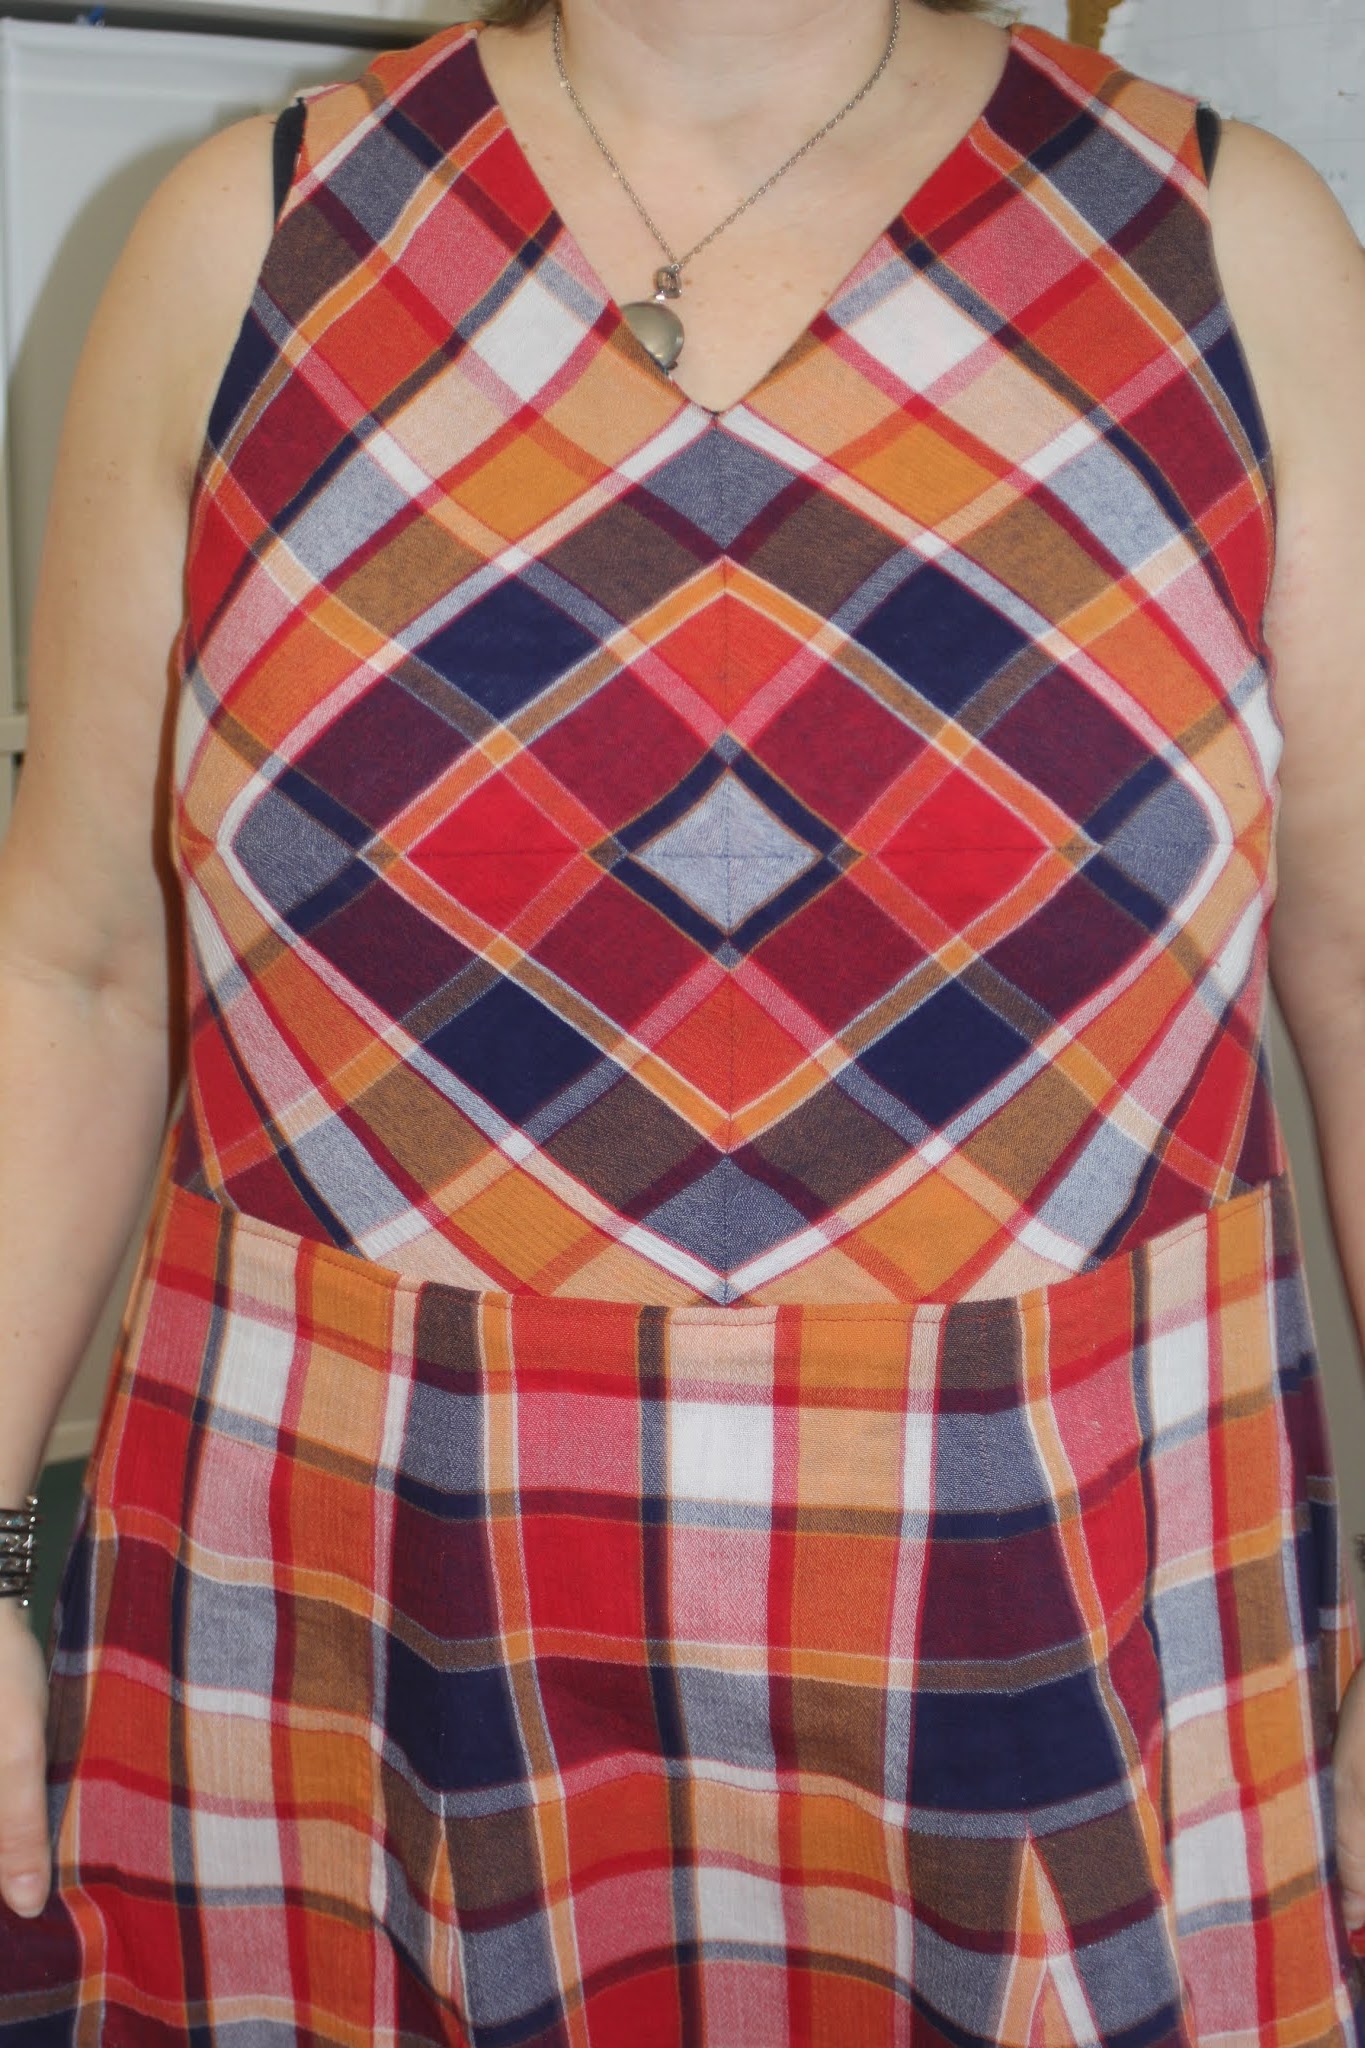
Finally the decision was made that I should go for the red, orange, white and Navy plaid crinkle gauze cotton in a summer dress with a geometric design at the front bodice.
I figured this fabric was a good choice not only cause it's pretty, but because it's an uneven plaid - not symmetrical - it would be nice and hard to match - showing skill if I could get it to work, plus the crinkly gauze fabric is a tricky fabric to work with so again good for showcasing skills. The main problem that I could see was the limited yardage. I had bought a full 3 yards of this fabric which would normally be more than enough for a dress, but print matching takes a lot of extra yardage, plus I had already used a bit of the fabric to make a shirt last summer. I never liked the final shirt though, so the first thing I did was dig it out and unpick the entire thing to give myself a bit more fabric to play with.
As per usual the first thing to do was to figure out a pattern. I started with my moulage, cut it off at waist height and rotated the front arm dart to a dart at the bust line. I then rotated as much as I could of the under bust dart to the bust line as well. That left the remainder of the under bust dart that nips the pattern in under the bust still in the pattern but there wasn't much I could do about that. I then split the pattern entirely along the bust line plus removed the fold at the centerline so the bodice is now in four pieces.
If I cut my fabric on the bias and align all the plaids that should now make a diamond at the center of the chest. The problem was exactly where on the fabric to center the pattern.
I took a deep breath and started cutting I was able to get the top two pieces out of the front of the shirt and the two bottom pieces out of the back, sewed/pinned them together and tried it on......and it didn't work. The diamond (it is there if you look closely enough) was over taken by the dark blue stripes radiating outwards.
I tried again but that wasn't working either
Back to the drawing board. Finally I managed to find the layout the gave the pattern I was looking for.
But now I had to cut all my pieces again - from my main fabric supply this time - I had better get it right....
Next up - do I work on the back, or do I cut off some fabric and keep it aside for a skirt.


I couldn't decide what sort of skirt I wanted so I decided to work on the back.
I wanted to mirror the front diamond on the back, so cut my back pattern piece 12 cm from the bottom -the same as the front pattern piece. That left a lot of room at the top of the back, so I decided to do another cut where a yoke would normally go - this also allowed me to rotate my neck darts into that seam so there are no more darts in my pattern.
Now to figure out exactly where on my fabric to cut. In order to make sure I got it right I coloured in my pattern so I could then lay it over the fabric and hopefully get it right first try.
Having learned from my last project, the way I cut my fabric was to lay my pattern piece, with no seam allowance - on my fabric. I then traced the pattern piece in marker, making sure all my seams would line up, then cut around with a generous seam allowance - not measured out. Once one piece was cut - I flipped it, laid it over the fabric aligning it perfectly and cut a second piece exactly the same.
To sew the pieces together I followed this process:
1. I first gave them a good press (the fabric has a crinkle in it, I had to press this out so I could perfectly align my stripes otherwise all the stripes were different sizes).
 |
| Fabric Pressed, seam lines marked. |
2. I then tuned the fabric under at the seam line and pressed again.
3. This piece was then lined up with the piece it was attaching to and pinned it in place.
4. Next step was to hand baste the seam in place. This had to be done very carefully right along the seam line. I started with a ladder stitch, but this was taking too long so I ended up just doing tiny pick stitches.
5. I then flipped the pieces over and was able to machine stitch along the basting line.
5. I then pressed the seam allowances open, and for the bodice, turned under the extra seam allowance and stitched it under to neaten the edges.
This gave me a neatly aligned seam every time. There were only a couple of seams that I felt had to be redone - not every stipe aligned perfectly, but most of the time it was close enough for me.
I sewed up the entire bodice and then stepped back to look at it again.....and noticed that at the bottom back seam there were red triangles aligned with orange triangles - how had that happened. I still don't know. I thought about leaving it - but this is a competition I figured I better fix it. So that meant cutting two whole new pieces - I'm rapidly running out of fabric here. I sewed it together again and finally my bodice was done......the problem was I now did not have enough fabric for a skirt. I had one small piece about 60-80 cm long of yardage left, and a whole bunch of scraps.
I thought that maybe I could use some of my lightweight denim, paint a pattern on it and then pattern match that fabric as the skirt.
But nope - didn't like that.
Then I looked at the challenge again and really took note of point no. 2 Across at least one meeting point, the fabric design should match so that it looks 'seamless'. My seams line up nicely, but because they change direction at the meeting points they don't actually look seamless. Maybe I just need to use the remaining fabric to lengthen my bodice into a shirt making those seams match seamlessly. OK lets try that.

I could do it....but it just wasn't working for me. It wasn't what I wanted - This was supposed to be a dress. At this point I decided I needed to take a trip to the fabric store. Maybe I would get lucky and there would still be some of this fabric there....I doubted it, but I had to try. I wasn't lucky.....I found another plaid fabric in a double gauze that I loved, but there was only 3 yards of that on the bolt too - I bought it just in case I needed it. The second fabric store was no better - still nothing to match, and nothing else I wanted to start from scratch on either. I headed home determined to make my original plan work.
I thought maybe I could use the scraps of my fabric to make a ragged skirt - urgg nope.
I started to clean up and then as I was picking up all my many many pieces of scrap I decided to lay it out to see how much was there..
There's still quite a bit of fabric there - pattern matching really doesn't allow you to cut your fabric out economically. I started thinking about how in round 2 it was all about repurposing fabric to keep it out of landfill - and now here I was wasting so much fabric - and it go me to thinking - do I have to waste all this fabric - or can I piece together enough to make a skirt?
I carefully laid out all my pieces of left over fabric. All the pieces I'd cut wrong, the left over pieces from my original shirt and it started coming together. I reckon I can make a fairly substantial piece of fabric out of these scraps. I measured it out and it was about 39"x 42" that's not bad - I could work with that.
And so it started. It was not an easy task. First I had to figure out where each piece would go - and then figure out the best order in which to sew - these pieces were not nicely shaped - it wasn't like sewing together a bunch of squares. It was add one little 5 sided piece over here to a triangular piece over there. Plus of course the fact that every time I had to move it to sew a piece on - it disturbed all the other pieces and then I had to start laying out all over again. It took two days of meticulous piecing - and of course I had to follow all those steps I laid out above to make sure all the stripes lined up neatly.
But finally I was done. I had a full piece of fabric again.
It wasn't all that pretty on the back. I hadn't finished any of the seams as I went along.

But it was together.
And whilst every seam wasn't entirely seamless it was pretty good. There are about 6 seams in here.
And another 4 or 5 here.

But now I could use this fabric to make a skirt. My original plan was to make a pleated skirt and so I cut my fabric in half making sure I aligned the top rows of fabrics and pinned it on - and it didn't work. I didn't like it - so next option was a gored skirt. I used a pattern that I created for my Mum a couple of years ago to make a 8 paneled skirt. However since she has a smaller waist than I do I folded the top of the pattern over, based on the length of fabric that I had available. I used a scrap of muslin I had that was about the same size as my pieced together yardage to make a test run of the skirt. Cut it out and sewed it up and it was way too big around the waist. Now - I could have gone through and taken in each of the seams till I got the right waist diameter, but then I realised that I could just remove one of the panels and it fitted beautifully - That would make it fit on my fabric more easily if I only had to cut 7, plus then I don't have a seam down the front of my skirt so it's really a win win situation.
I tried on my muslin skirt with my bodice and like the way it looked so it was finally time to cut out my skirt. I cut 6 panels out of my fabric. 3 panels with centered around the white stripe and three with the orange stripe centered - I knew there was always going to be mismatch in the strips down a flared paneled skirt so I didn't think that it would matter much and it fitted much more easily this way. The 7th panel piece I was planning on cutting from two of the pieces of fabric that I had put aside earlier. I wasn't sure if this idea for the skirt would work or not so I kept a back up - the four pieces that I needed to make the bodice into the skirt were kept aside just in case. Before I cut into these I sewed up the six panels of my skirt with the muslin in the back as my 7th piece.
The skirt shape looked good......but the mismatch of stripes was horrible. What had I done! The panels that were centered on the white stripe looked great, the blue stripes then framed the gores nicely - but the panels centered on the orange stripe were terrible - the blue stripes disappeared and reappeared....oh crap! I felt so defeated that this point, but I vowed not to let it get me down - I'd pieced this fabric together once - I could do it again....But I had to make a decision - I needed that extra fabric I'd put aside. Deep Breaths - I decided to go for it. I took the 4 pieces of fabric I'd originally set aside and joined them together - cut one skirt piece out centered around the white stripe - now I've got 4 good pieces. I was able to take one of the wrong pieces and add it to a second one with one seam and then recut it based on the white stripe - that's 5. The remainder of that piece could be added to the last wrong piece to give me my 6th piece. But now I was struggling - I was back to scraps again and none of them very big. I think it took at least 12 seams to piece together that last piece of skirt.
Now finally I could get around to actually sewing the skirt together. To make sure everything matched I took each piece and ironed one edge under by the exact same amount. I then went around and aligned every single piece on top of its neighbour by the exact same amount, making sure I got everything as symmetrical as possible. This meant that in some places my seams are a scant 1/4" wide and in some place close to 1" but I wanted everything to look as good as possible with an uneven plaid.
Again - It's really not pretty inside.
But I was impressed at how seamless at least some of the seams are. How many seams can you see in this picture?
There are 10 in total.
And now finally I could add my skirt to my bodice. I would have loved to add a waistband in between but I was really out of scraps now. This is it - all that is left.
Now something strange is happening. Despite all my careful measuring and planning the diamond at the back is not the same distance from the seam as the diamond at the front. At the front the blue diamond finished right at the waistband which is what I wanted - but at the back it disappears.. I have no idea how that happened - but I just had to live with it. Looking at it now I would move the diamond up on the back and remove the top yoke seam. But oh well - it's done now.
The last thing I needed to do was figure out the necklines and armholes. I needed to shape them, finish them off, plus I needed to finish the inside of the skirt, so I decided that the best thing to do was make a full lining.
What fabric to use? I wanted something breathable and light as those were the two things I loved most about the original fabric and didn't want to ruin that, so I decided to use some of my leaf print rayon.
The lining was so simple - I taped all my pattern pieces back together so I just had one front and one back piece, with two darts at the bust and two at the yoke, and then 7 pieces of skirt. I was able to sew the whole thing in under half an hour. I then trimmed and pinned the neckline and armholes to the shape I wanted, transferred those changes to my main bodice (I removed the shoulder seams in order to so all this more easily), then sewed the lining to the dress at the front and back neckline and the two armholes.
With much fiddling I was able to understitch all of these seams to the lining.
Then I just had to finish the shoulders. I did this using the method I learned from the Closet Core Sallie Jumpsuit pattern where you turn the front of the shirt inside out over the back of the shirt and then sew the shoulder seams as a tube. It gives such a great finish.
The final step the hems. For the lining I did a machine stitched double turned hem at about 5/8". To keep as much length in the main skirt as possible I did a narrow hem. First I sewed around as close to the edge as I could get making sure it was even all the way around. I then turned the fabric along this stitching and sewed at 1/8" or as close to the edge as I could get. I then trimmed the excess off as close to this seam as possible, turned the fabric under again at just over 1/8" and stitched again as close as I could. This gives a beautiful narrow hem.
And finally....finally...my dress was finished.
Now don't ask about the styling - I tested out every pair of shoes in my wardrobe and somehow these boots just worked best I think it's a proportion thing - I decided not to question it, but just went with the slightly cowgirl vibes.
I'm really happy with the way the front turned out.
And the matching across the front dart was actually really nice.....just don't look at the side seams - not a match in sight It just wasn't possible with the front and back design - believe me I tried.
I'm really happy with the way the skirt turned out with the flared seams coming out of the blue.
The back is not the greatest.
And despite all my efforts, my bra straps still show - I still don't know how that works since all I did was take 1/2" off the outside shoulder.
Still at least it gives a good twirl.
I will admit, when I first finished sewing this I was a bit over it - I was getting headaches every time I looked at that plaid! But once I got all gussied up for the photos and wore it for a while I was sold. Now I can't wait till it warms up enough that I can actually wear it.


Wow. That is a crazy amount of work!!! It turned out looking so amazing. Way to go!
ReplyDeletesome really great sewing! well done on seeing it through! good luck
ReplyDelete