Monday, September 19, 2016

Shorts and the Pattern Review Sewing Bee

I've been in the process of finalising my ultimate shorts pattern recently - Its am amalgamation of all the pants and shorts that I've made over the last couple of years.

To test the pattern I made myself a pair of shorts using some left over purple linen.


These shorts are very basic.  I included front slant pockets and a 4 piece waistband,


However I decided that I was going to be lazy and I sewed the front seam together rather than putting in a zipper fly.


The waistband is secured with two purple snaps.

I didn't bother with back pockets and serged and turned under the lower edge for a simple hem.


When I finished these shorts they fit perfectly, however I've lost a bit of weight in the last couple of weeks, so when you combine that with the linen growing as you wear it I'm having trouble keeping these shorts on at the moment...I may have to take the side seams in a bit if I keep this weight loss going.  (I should probably pull out the iron at some stage too).


Just after I finished these shorts I went to the Pattern Review website and found out that the first challenge in the Pattern Review Sewing Bee was shorts  - I knew I had to enter.

The Pattern Review Sewing Bee started on Wednesday 1st September but I didn't have time to start making anything till that weekend.  On Saturday I started going through my stash of fabric to decide what I wanted to make my entry out of.  I came up with a piece of black eyelet lace that I had previously used to make this pair of shorts out of.    There was just enough fabric to get a second pair of shorts, as long as I cut the length off just a smidge.


 I cut out the eyelet lace and then went back to the stash to find a material to line the shorts with.  I found a beautiful piece of blue knit fabric that I thought would work perfectly (and that I had enough of) and sewed a piece onto the each piece of the pattern and then turned the pieces inside out.  This gives a neat Hong Kong finish to all the seams.


I did a full zip fly on this pair of shorts, but rather than the slant pockets in the front I put the pocket bags into the seam between the shorts and the waistband.


It was at this point, when I just had the button closure and the hems to do, that I went back and re-read the contest rules.   One of the rules was no knit fabric.  Whilst I assume that this was because they didn't want slip on shorts I decided I wasn't willing to risk getting eliminated over it and put those shorts aside and started all over again.  Once I had finished my second pair of shorts I came back to these and finished them off with 3 black star snaps at the waistband and cuffs on the legs.


For my second pair of shorts, I went back to the fabric stash - I needed a woven fabric.  I had two beautiful corduroy fabrics which I considered using, but they've been earmarked for pants so I didn't want to use those, then I came upon this piece of upholstery cotton in brown with colourful circle, petal motifs on it that I'd bought planning on making a pair of pants for my son.  I decided I needed it more than him and appropriated it for myself.


I used the same pattern again and cut out the material.  Again I put in a full zip fly at the front and this time I even did the fly shield as well.


I then cut front pockets to extend right across the front of the shorts and be caught in the fly to provide a nice stable front to the shorts.


I decided I wanted to extend myself a bit and decided on welt pockets in the back.  This was only my second time doing welt pockets.


Its a bit hard to see the pockets in all the print
They turned out ok, but I was a bit unhappy with the finish on the pockets on the inside.  The rest of the shorts I made using french seams so that the inside of my shorts were as beautiful as the outside, but I didn't know how to do that with the welt pockets, so they're a bit messy with just a serged finish.


The final piece of the puzzle was the buttons at the front.  I had no buttons in my stash that would work, but I did have a bunch of old jeans lying around. I found one pair with beautiful crystals on the buttons and decided I wanted to use those.  It took me some time to figure out how to get them off the jeans, but once I did they were easily installed onto the new pair of shorts.  The button holes were another thing though.  after a couple of practice attempts my first button hole went in perfectly, however the second one did not want to cooperate.  I picked that thing out at least 3 times before finally getting one that I was willing to accept.


So the good news is that these shorts did in fact get my through the first round of the Sewing Bee.


 Now onto Round 2 I go!  A bias garment!


Sunday, September 4, 2016

3rd and Final (probably) Refashioner entry

OK so I'm not quite done with the denim yet.  I still have quite a bit of left over denim fabric so I decided I needed another project.   This time Shoes. I need a new pair of shoes anyway and I figured what better material to make shoes out of than denim.


(beware this post is very long- it goes through my entire making process step by step - if you're not interested in the process feel free to skip to the end for more photos of the finished product.)

First order of business was to create a pattern for the shoes - yes yes I know I have a million and one shoe patterns already, but none of them are quite there yet.   I really loved my purple and turquoise corduroy shoes I made and decided I wanted to try and improve this pattern.

The first thing I wanted to do was simplify the pattern.  The original shoes had 7 pattern pieces, a toe, tongue, inner side, outer side, heel and heel stiffener and sole.  I figured that I could simplify this somewhat by combining the inner and outer sides with the heel piece and combining the toe section with the tongue.

To create the new side sections I retraced each side section minus the side seam allwance and added half of the heel section to the end, adding a new seam at the heel.  I then shortened these side pieces a bit as the original shoes were a bit too big.

I then went back to the toe and shortened the point on the toe - I've noticed I do trip over the point on the corduroy shoes occasionally.  I also incorporated the tongue into the toe piece bringing the front piece right up to the top of my foot.

These were pretty much all the changes I made.

I cut the toe and side pieces out of a navy cotton fabric as a lining for the shoe and then pulled out my denim pieces.  I had just enough of the dark denim to do the toe and the heel stiffener. and the two side pieces fitted onto the remaining sections of my embossed jeans.


I then needed stiffening material for the toe and heel - once again I turned to the yoghurt containers - its a good thing we eat a lot of yoghurt in this house.


The bottom sole pieces were cut out of the leg of one of the other pairs of jeans I had and I was ready to start sewing.


The first step was to sew the lining to the inner and outer side pieces along the top edge and the front edge.


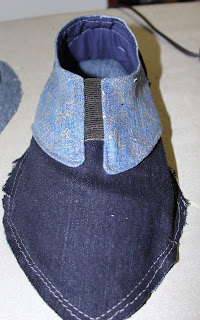
In the corduroy shoes I did not join the two side pieces together at center frontand then  needed to add a closure at the end.  This time I decided I would use 2" wide elastic between the two side pieces to provide a little give when getting the shoes on and off, but be snug enough to stay on my foot.

The elastic was sewn into one side of the shoe and that piece was turned inside right.


That first piece was then inserted inside the other piece so that it could be sewn into that side as well.


and we have the sides finished.


The lining was then sewn onto the toe piece and turned inside right and topstitched.


To hold the toe stiffener in place another small piece of lining material was cut and sewn into place between the toe and lining piece.


The sides were then top stitched in place on top of the toe.


And the seam up the back of the heel was sewed together.


 I top stitched around the ankle area to finish the ankle of the shoe.


The final piece of the upper is the heel stiffener.  The denim piece was sewed to a lining piece around the top curved edge, the stiffener was then placed inside and basted closed.


This piece was then top stitched in place at the heel of the upper.


This upper section was then basted onto the sole piece.


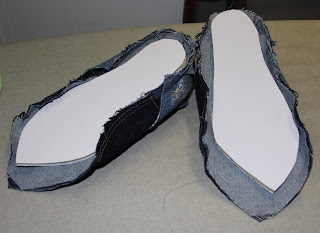
Next up was the inner sole.  I used a commercial innersole insert for this, cut to the correct size and shape.  I then backed this with a piece of cardboard for just a little added stiffness.


The upper section was hand sewn into place around the inner sole gathering the extra fabric as necessary.


Now all that was left was to glue on the outer sole.  The outer sole was cut out of a piece of black rubber base board that I picked up at the local hardware store.


I used contact adhesive to glue the two pieces together.  A coating of the glue was applied to the underside of the uppers and allowed to dry.  The next day I applied glue to the underside of the upper again and to the rubber sole, allowed it to dry for 5 minutes before attaching the two pieces together.


Pegs were used to hold everything together till it was dry.


And now for the final product.


I love these shoes so far.  I haven't had a chance to wear them out yet, but around the house they're beautifully comfortable.