We've had the in laws staying with us this week so I haven't had a lot of time (or any really) for sewing, but I woke up this morning inspired to get something done.
I have a whole list of little summer tops that I want to make so thought I'd get to work on one of those.
The inspiration for this top came from the character Toshiko on the Series Torchwood. When I first watched this show many years ago there was an episode "Greeks Bearing Gifts" in which Toshiko wore this cute little red top.
I said at the time that I wanted a shirt like that but never found one and never got around to making one, so I decided today was the day. Obviously it didn't turn out exactly the same, but the basic idea is the same.
I started drafting the pattern for this top at about 9:30 am on a Sunday morning and the top was finished by 2:30pm - not a bad days work if I do say so myself.
I started with my back sloper. I cut the back neckline a little deeper and wider than the sloper and then brought in the outer edge of the sleeve just a bit. I drew a line about half way down the arm hole for the top yoke and cut the sloper in two pieces. After adding seam allowance to this cut I had a back yoke piece.
For the lower back piece I removed the shaping along the side seams and drew a line straight from the arm hole to the hip line and then added about 1.25" to the center back seam to form a pleat a center back. I cut the top off at the high hip line to allow room for a bottom band.
On the front sloper I did the same modifications to the shoulder and created a front yoke piece.
I again straightened out the side pieces grading straight from the underarm to the hip line.
I then traced a second copy of the front and flipped it over and taped the two pieces together down the center front. I located the bust points and then free hand drew a curve down from the shoulder point, down the center of my body between the breasts, curved around under the breast and then ended about 3" above the hip hip line on the opposite side of the body to create the cross over front pieces.
The last thing to do was to added the gathers. I wanted gathers at the yoke edge and then gathers again at the side on the front piece, but not on the piece that goes underneath. This means I needed two separate pattern pieces for the front.
To create the gathers at the yoke I cut a line straight down from the outer shoulder to the seam allowance at the bottom, and then from the inner shoulder down to the same point and spread the pieces I cut a few extra slashes between the two and taped them back down in a fan pattern. I then copied this pattern and flipped it over and then did another slash and spread on one of the pieces from the same point as before across to the side seam. I've tried to get the slashes to show in the picture but this is the best I can do.
For the fabric I used a piece that I had in my stash - a teal and grey strip knit. Its very light weight material - I have no idea what its made of. The teal fabric is slightly see through and seems to have some metallic threads in it. The grey is a more substantial material adding some nice texture to the fabric.
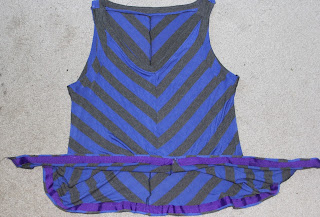
I cut the back, back yoke and front yoke pieces on the fold with the stripe running across the body, then decided that I wanted the yoke cut on the bias.
I decided to keep the piece cut on grain to use as lining and recut the yoke pieces.
 |
| Lining for front and back yoke cut with the grain |
The two front pieces were cut single layer - I tried to match up the stripes somewhat across my body but due to the gathers it's not a perfect match (and I didn't manage to match the side seams at all).
I sewed up the bias cut back yoke center seam to create a nice V shape - then sewed the lower back onto the back yoke creating an inverted pleat at center back.
I sewed the front yoke on at the shoulder seam then gathered the front pieces and sewed them onto the front yoke.
I sewed the additional yoke pieces together at the shoulder seams then sewed the yokes together around the neckline. I top stitched the neckline then turned the two edges of the arm hole in and top stitched them together. I finished off the rest of the arm holes simple by turning the edge over two to enclose all edges and stitching close to the edge. The front seam of the front pieces were finished in the same way.
 |
| Showing top stitching and seam finishing |
I pinned the side seams together and realised that the front pieces were way too wide. Looking back I realised that 1. I didn't take off the center front seam allowance when I flipped the pieces and joined them at the center line and 2. The fabric that would have been taken out by a dart in the original sloper was still in my pattern. I re-pinned it to where I wanted and ended up taking about 5-6" off the side of each front piece. I may have taken a bit too much off, if I were to make it again I'd only take about 4-5" off. I sewed up the wide seams using french seams to create a nice inner finish.
To finish off the bottom of the shirt I wanted to make a band around the bottom. I decided on cutting it on the cross grain as this fabric definitely sits nicer that way and it added another feature to the shirt. I cut pieces 6" wide on the cross grain with as much length as I could get and sewed them together to make one long length. I doubled it over and pinned it around the lower edge of the shirt with the extra length left dangling at one side. I tried on the shirt again and realised that I like the extra length tied up at the side so sewed the band on and left the extra hanging free. I used an over locking stitch on my machine to finish the seam band and top stitched it down using a straight stitch. The free hanging end can then be tied into a knot and creates a knot at the left side.
I love this top. There is one small issue that I would fix next time - the under arm gapes just a little bit and I'd raise it about 1/2" next time - otherwise this shirt is great.


