Saturday, September 9, 2017

Pattern Review Sewing Bee 2017 - Round 1

Well August turned out to be a very slow sewing month for me.  After July where I sewed up a storm I felt like my kids and I didn't really need any more summer clothes and I wasn't ready to start sewing fall stuff yet, so I just took some time off from sewing.  By the end of the month I was starting to get a little antsy though, but I didn't want to start anything knowing that the Pattern Review sewing bee was just around the corner.  I didn't want to use up any of my fabric stash and then find out,  I could have used that for the Bee etc...I know I know...I'm just a little obsessed.

But anyway on Friday September 1st Pattern Review finally announced the challenge for round 1 of the sewing bee.  It was to make a pencil skirt inspired by a piece of music or a musician.


Of course my first thoughts were of the metal/grunge music that I got into as a teenager.  And with that thought came the memory of the flanno shirt tied around the waist - it was pretty much my uniform for a number of years inspired by many of my favourite band members.  In order to narrow down my inspiration I went looking through photos on the internet - strangely enough the only photos that I could find of my favourite band members wearing this style was Axl Rose.  Well considering that Gun 'N Roses were probably the first band that I really fell in love with I figured that the following photos was going to be my inspiration for this competition.


I did have a second thought and contemplated creating a brown corduroy skirt  based on Eddie Vedder's brown corduroy jacket, but decided when I was looking at the brown corduroy that I was less likely to wear that skirt so went back to my original idea.

Once I had my idea down I headed for the fabric store, thankfully my husband had taken the day off work so he stayed home with the kids so I was able to browse for as long as I wanted.  I stopped first at my favourite discount fabric store Sewfisticated, but they didn't have anything close to what I was looking for so I headed down to Fabric Place Basement instead.

I had a piece of red flannel in mind that I was looking for, but unfortunately I couldn't find it - well not in flannel anyway.  I did find something that I really liked in a chiffon type fabric, but the right plaid flannel eluded me. I found another red plaid flannel that wasn't the perfect colour scheme, but was close enough to my vision and bought both that and the plaid chiffon. I also found some really nice looking and feeling black faux leather and since I knew I wanted some contrast on my skirt I bought that as well.

I spent the entire trip home trying to decide which piece of fabric to use and finally decided that I wanted to go with the flannel - that was the inspiration after all - and I'm really glad I did because I love the way it turned out.

Whilst I put my fabric through the washer and dryer I grabbed the computer and started searching for patterns. I found a number of patterns that were ok, especially on the Lekala website, but there was nothing that was perfect, so in the end I decided I would make the pattern from scratch and that way I could get all the details in that I wanted.

Specifically I wanted a V shaped waistband.  I like this style on me because it can make me look a little less short waisted, but also I wanted the V shape to copy the shape of the shirt tied around the waist look.

For anyone not interested in all the nitty gritty details skip to the photos at the end of the post now - I wanted to document this in case I want to try it again another day!

In order to create the pattern I grabbed some old bottom weight cotton that I bought cheaply to use as muslin material and set to work with my dress form.  I cut a strip the width that I wanted the waistband and then draped it on the dress form, sewed a seam up the front to create the V and seams down the sides contouring around my waist.  I then cut 4 panels a bit bigger than each section of the waist band and sewed them to the bottom edges of the waistband allowing for plenty of overlap at each join.  Because of the angle of the waistband in the front this left a large gap in the center of the skirt so I cut another triangular piece of fabric that I sewed between the two front pieces to fill in the gap.  When I saw the way that looked I knew I had to keep that feature.  I was like that's the gap between the edge of the flanno shirt.

So then I started sewing up all the vertical seams.  This took a few tries to get the balance right taking some width out at the side seams, some out at the triangle at the front and some out along the back seam. till I finally got it to a place that I was happy with.


I then trimmed all the seams to 1/2" wide and took the whole thing apart and traced around them to create an actual pattern, this allowed me to account for any slight differences between the two sides to make it symmetrical etc - especially on that front triangle.

I could then start cutting out my actual fabric. I aligned the stripe in the fabric with the angle of the waistband so that plaid was on an angle rather than straight up and down.

Not bad work for one day.

Day 2 I started putting the final skirt together.  First I took each piece of the plaid flannel material and serged around all the edges to stop any fraying.

I started with the back pieces first sewing the lower flannel pieces to the leather waistband.
Each seam was pressed and then top stitched at both 1/8" and 1/4" to strengthen the seam.


Next step was to put the front section together, the two side front pieces were sewed onto the faux leather center triangle, and finally the two side seams were sewn up.

To allow me to get the skirt on and off I went with an exposed metal teeth zipper right down the back.  I originally planned to just put in a 9" long zipper, but I really struggled to get the seam below the zipper to sit nicely so in the end I changed to a full length separating zipper.

I used an iron on interfacing along the length of the back seam before sewing on the zipper.


I then had to think about the lining.  I knew I wanted to line the skirt as I assume I'll probably wear it most in winter with leggings underneath so I didn't want flannel inside.  I picked up some polyester fabric from the discount table at Fabric Place Basement.  It has a really nice feel to it, soft and slippery, but not satiny like normal lining material.

I taped all my pattern pieces together so I just had a front and back and cut those pieces out of the poly material.  I sewed the pieces together at the side seam and then serged all free edges.


 I then sewed it to the main skirt along the top edge and the down the back seams encasing the zipper.

To finish the lining I turned the bottom up twice and hand stitched the hem.  The main fabric I sewed some black 2" bias hem binding to the bottom, turned it up and again hand stitched it.

I hand stitched the hem and lining down the back seam below the zipper to neatly finish all edges.


Once the skirt was finished I decided that it might be a bit too plain for a contest, it didn't really show too many sewing techniques so I decided to go back and add some pockets.  I found a scrap of leather on the floor cut at an angle and decided that it actually looked pretty good so that gave me the idea of making flap pockets.

I did a some research on how to make flap pockets, having never done one before and made a few practice pockets on scrap fabric.

Then I had to figure out where I wanted them front or back.


I decided on back so that they weren't competing with the triangular insert.

It wasn't easy trying to install the pockets when I already had the lining in place, and actually managed to make a tiny cut in the lining at one point, but I got them done.

I left off the welt under the flap just because I wanted to keep the pockets as minimal as possible as I didn't want an lot of extra bulk on my bum.


Then I just needed a few embellishments - I mean since when was Axl Rose ever seen without a  bling all over.

I took myself to the local Michaels craft store and found some charms with musical notes on them which I thought would fit the theme nicely.

They were a silver colour however and I thought that might look a bit weird with the gold zipper so I bought some gold metallic paint and gave them a thin coat.  They were then hand stitched on above the sewn on snaps that I used to hold the flap closed.


When I was at the craft store I also found some stickers that look like gold studs.  I stuck a few along the bottom edge of the leather waistband to make a real "Metal" statement.


I love the skirt and will probably wear it with a black t shirt if I ever wear it, but I wanted to really make it pop for the contest, so I decided to make a shirt to go with it.

After sketching out a few ideas one kept popping up that looked best. I used the leather again to make another angled band around the bottom, then draped the plaid fabric around, added a few bust darts and a couple of leather straps and it was done well enough for what I needed.  I used my other gold zipper to do up the top, but didn't bother with any real finishing techniques.  I doubt I'll ever wear the top outside of these photos as it requires a strapless bra and they are so uncomfortable!


Final verdict - I love my new skirt, but I don't know how much I'll wear it.  Whilst it's comfortable to wear, its not exactly practical - even getting up and down stairs is hard work in a pencil skirt, getting into the car even harder.  And it's really not good for lounging around in.  That said I do think I'll actually wear the skirt on occasion, just cause it's so cool.


Sunday, August 6, 2017

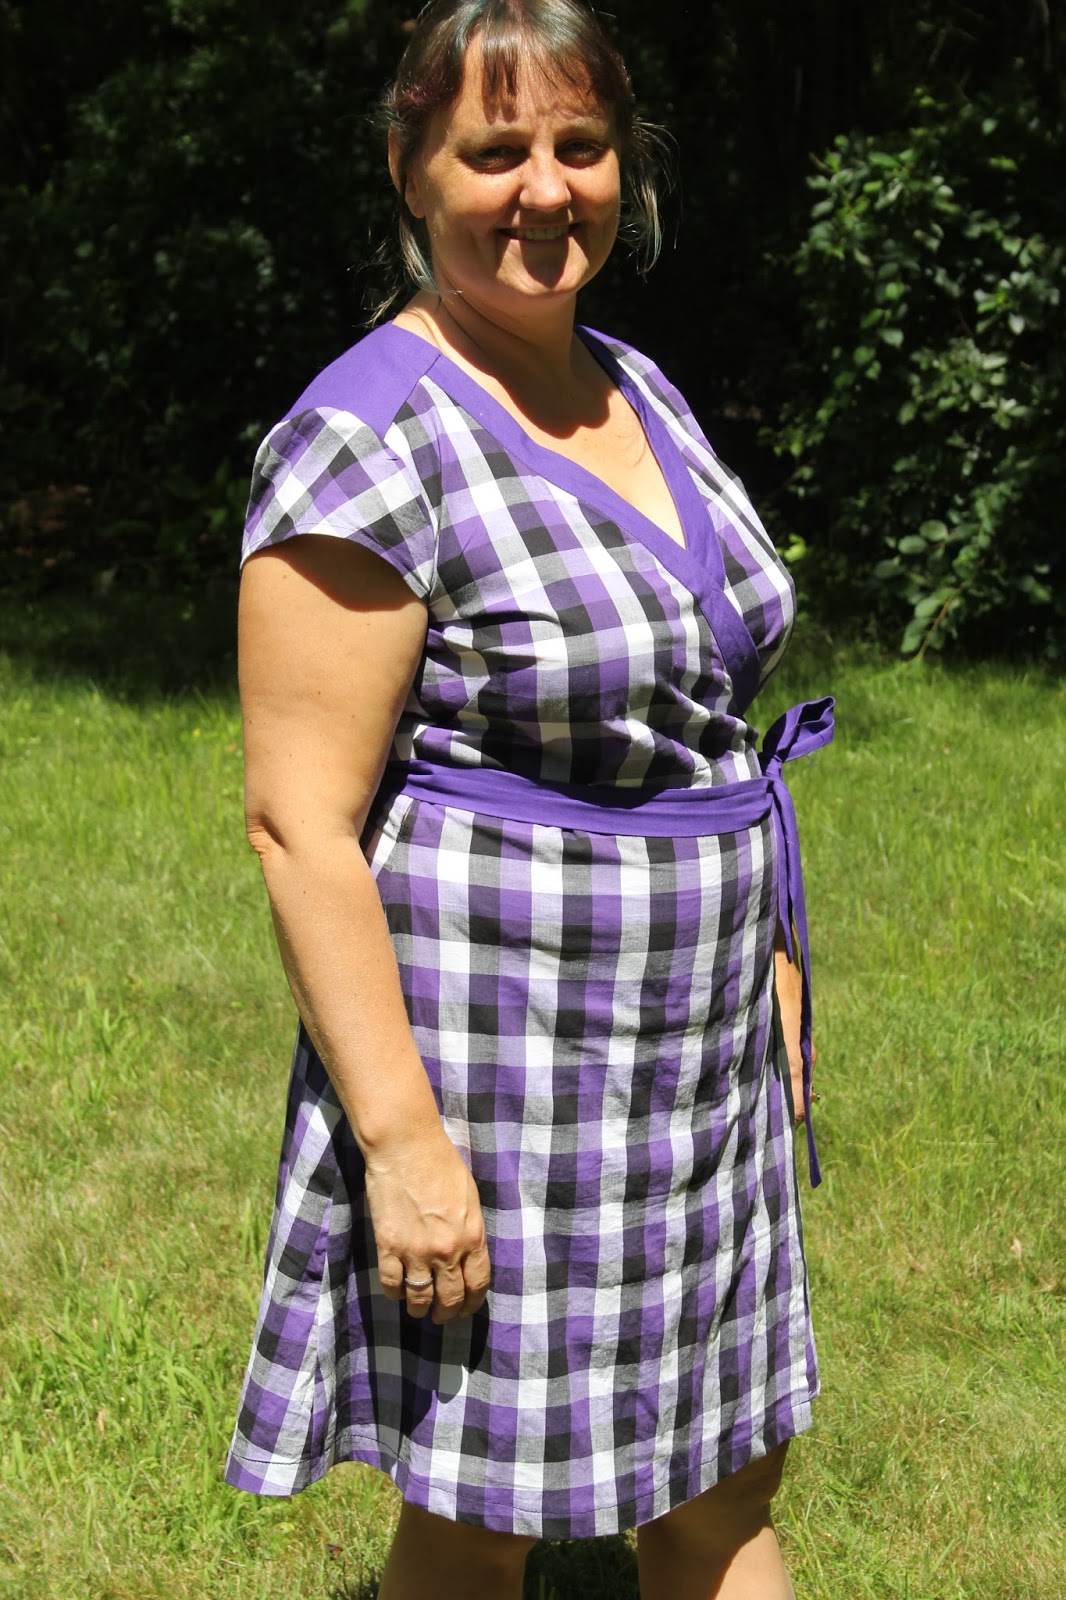
Purple Black Plaid Claire Wrap Dress

As soon as I finished my first Claire Wrap dress from Pattern Review I knew I wanted to make another, there were a couple of tweaks I wanted to make to see if I could get a bit better fit.

To make my second version I chose from my stash a piece of cotton fabric in purple, black and white plaid.    This is a material with no stretch so according to the pattern instructions I really should have gone up a size, however this totally didn't cross my mind when I started the project so I went ahead and again cut out a size 14.  This means that I've ended up with a dress that is just slightly to small.


I only had 2 yards of this fabric so I knew I was going to have to do a contrast, thankfully I managed to find in my stash just enough purple poplin cotton to make the yoke neckbands and ties.  I did have to piece the longer tie together to get it out of the scrap of purple and I also had to make the neckband and yoke facings out of a plain black cotton to fit all the pattern pieces on.


The changes that I made to the bodice pattern were to take a 1/2" out of the length of the bodice above the bust and through the arm hole.  I then added that 1/2" back in at the lengthen line where I originally took out 1", so that is back to a 1/2" adjustment. (Still a total of 1" taken out of the length of the bodice).

I like the way this sits around the arm holes better, but there are still some issues under my bust.  I'm hoping that most of them are just due to the the lack of stretch making the dress sit in the wrong place on my bust, but I'll have to try again at the larger size to see for sure.

Unfortunately that does mean that the dress has a tendency to gape at the neckline - I've pinned it together here to get it to sit nicely.


I made a mistake when cutting out the back piece.  I didn't have enough material to place the back piece on the fold so I planned to cut an extra seam allowance and put a seam up the back, but forgot when it came to cutting.


Thankfully I had one scrap piece big enough that I was able to cut an extra strip of fabric and pattern match it so that it's not too noticeable.


For the sleeves I again used the same cap sleeve pattern piece as last time rather than the sleeve that came with this pattern.  I cut the sleeve on the bias to provide a bit more contrast (and so I didn't have to worry about pattern matching).


As for the skirt I found that the skirt on my original dress poofed out a bit at the hips so this time I folded both the front and the back skirt pattern pieces straight down from the waist, taking about 2" off the width of the skirt at the hem.  What I didn't think about was how that was going to make the side seams sit.  I should have changed only the front piece and not the back.  As it sits now there's not quite enough material to go around my butt anymore.   If - sorry make that when - I make this again I think I'll put darts into the back skirt piece to provide more room for my butt without creating extra width at the side.

But back to this version - due to my lack of forethought, the side seams are now a bit too far back on my body, which makes the pockets a bit hard to get my hands into, and it means that the overlap in the front isn't quite as deep as it could be.


So overall I'm not 100% happy with how this dress fits.  It probably would have been better if I had gone up a size, as is I will need a snap/safety pin to be put in to hold the neckline closed, but I'll still wear it as a day dress I'm sure.

Next up I'd  like to try this pattern in a knit fabric to see how that fits.


Thursday, August 3, 2017

Silver Batik Dress

In my last post I mentioned some more peacock fabric that I picked up on my last vacation.  My plan for this fabric is to make another dress similar to my Avian Dress.  However upon further wearing I've noticed a few minor issues with the fit of that dress  - specifically the neckline gapes a little and I don't like the racer back.  Rather than risk ruining my good peacock fabric I decided to try the design changes I wanted to make on another material first.


I've had this material in my stash for a couple of month now, I picked it up at my favourite store one day when I found it, but had no idea what I was going to do with it.  Its a cotton fabric in a grey colour with large splodges of bright colours randomly placed all over it.  On top of this is a silver embossed geometric design in stripes.


As far as the pattern goes I made a modification to the shoulder slope for the front piece to make the front neckline sit flatter,


And then in the back I removed the racer back and created a deep scoop instead.


 I cut out the bodice and tried it on and liked the way it was sitting so went ahead and created  an all in one facing for the neck line and arm holes.  I finished the bodice seams using the overlocker then cut two strips to use as the waistband flaring them from the bodice out by about 1" each side.


The skirt is two rectangles sewed together with the silver stripes running horizontally as opposed to the rest of the dress where the silver stripes run vertically.  The top of the skirt is simply gathered and sewed onto the waistband and overlocked.  Pockets were sewed into the side seams of the skirt as all dresses need pockets as far as I'm concerned.


This dress is pretty simple, it only took one morning to make.  It slips on over my head so no closures are required and is a bit more relaxed fitting than my avian dress, I think because the waistband is a bit more flared.  Its cool, its comfortable and I really love wearing it.  I still don't love a gathered skirt and will go back to pleats on my next version, but for this dress I'm happy with the gathers.


Wednesday, August 2, 2017

Another Simple Tank

During our latest vacation we spent a couple of days in the Amish country in Pennsylvania.  This of course required many stops at quilt shops to look at the beautiful quilts.

There was one quilt pattern in particular that I was really drawn to,  the Cathedral Window Quilt.  I'm not a great fan of the muslin white as a background as was typically found in the Amish quilts, but I was really intrigued by how this went together so I allowed myself to be talked into buying the pattern.


Once we were home I grabbed a few scraps of fabric and started sewing.  This was done all by hand sitting in front of the TV at nights which was very relaxing.  I'm not sure what I can use this for, I've run out of the scrap material I was using and can't find any more so I can't make it any bigger, but I really like the way it turns out. (mind you there was no pressing involved here, this was just a trial to see how the pieces go together.)


Out of all the quilt stores that we went into (and just ask my kids - it was a lot)  my favourite was also a fabric store.  Of course most of the fabric was quilting cotton but I had to look anyway.  I found two pieces of fabric that I just had to have.

The first is another peacock design.  I don't love the light background colour, but I just knew I had to have this material, the colours on the peacock are just so bright and vibrant and me.  I bought a full 3 yards of this material and have plans to make another dress similar to my Avian dress.


The second piece of fabric I found is probably not me, but again it was an "I have to have this" fabric. I think more than anything I love the metallic gold print with the purples and blues.  Add to that the combination of floral and geometric design and I really love this.


I only bought 1 meter (sorry yard) of this fabric.  I knew that it was going to be another little tank top like my peacock tank.  I used the same pattern, although this time I skipped on the front wrap/overlap and just cut the front piece on the fold.


I modified the neckline a little too making both the front and the back into a deeper V.  I also cut the top a little longer, but an inch or so, and skipped using a band at the bottom.


As I only bought 1 yard of the fabric I ended up having to put a seam down the back.


Not too bad a job on pattern matching.

All openings were finished using facings which were then turned under and top stitched in place. I used french seams throughout the top for a really clean finish inside.


This top somehow ended up being a little tighter than my peacock top, but not in a bad way.  It's still comfortable and easy wearing.   I think one more iteration on this pattern and I should have it down, there's still a little pulling at the back I want to get rid of.


Tuesday, August 1, 2017

A Peacock Tank

I've been playing around with a lot more woven fabrics at the moment and I've been trying to create a basic tank pattern.  After a couple of disasterous draping attempts I decided that rather than reinvent the wheel I'd start with a free tank pattern and decided on the Sorbetto Tank from Collette.  I knew that there were a few issues with the pattern but I also knew that I was going to have to do a lot of adjustments anyway so just decided to start with that.

To begin the process I used a piece of satin left over from making a pajama set for my mum. As I was limited with fabric I eliminated the front pleat.

I cut the sorbetto to a size 12 all around and then basted it together and tried it on.  Quite a few modifications were required.  Once I was happy with my modifications I trimmed all the seam lines down, took everything apart and compared it to the pattern.

The shoulders and neckline were cut to about a size 6.  On the back piece I graded between a 6 under the arms, a 12 at the waist and a 10 at the hips.  On the front piece I graded between 10 under the arms, 8 at the waist and 12 at the hips.

Of course I couldn't leave it there though. I decided to try and make the pattern into a cross over top. I made the back neckline into a shallow V  and brought the front neckline down from the shoulder to about 3" across the center line.


To make the shirt I used a peacock fabric that I picked up at Walmart of all places.  I've noticed that my local Walmarts have started stocking Pellon interfacing really cheaply and I wanted to pick some up and I saw this fabric on the shelf.  I  have a love affair going with peacocks and couldn't resist buying this.

 I used a 1.5" band folded over and clean finished to complete the front and back necklines and 1" facings on the armhole that I turned under and stitched down.  After trying on the shirt the cross over gaped quite a bit so in the end I top stitched the whole neckline down.


I added a 3" band to the bottom of the shirt, but after trying it on decided I didn't like that length.  Rather than take it all apart I just turned the band up and stitched it in place. I like the way the extra weight makes the shirt hang.


I love the way the shirt feels.  Its cool and airy and very comfortable so I find myself reaching for it quite a bit.  I just need to make more shorts to match it!


It looks from these pictures like I need to do a few modifications to the back piece - it seems to be pulling up in the center a bit.