Sunday, February 28, 2016

Two Blue Snuggly Shirts

During one of my many trips to the fabric store I found a fantastic piece of fleece that I couldn't resist. Its a nice blue, not bright but not pastel, fuzzy fleece on one side and a smooth knit on the other.

At the time I had an idea that I would use the material to line the teal vinyl raincoat I was making, but after realising just how stretchy the material was I quickly scrapped that idea.  So what to use of this beautifully snuggly fabric for now?

After sitting in my fabric stash for a while I finally realised that this material would make for a really comfortable, warm shirt. 


After reading about how Amanda made this baseball shirt I decided that this exposed seam technique would work fantastically with my fabric.  I also liked how her side seams curved around to the back, however I thought it'd be even better if the seam curved around the the front.

I took my basic knit pattern and modified the side seams, cutting  a triangle out of the front and adding it to the back.


As I also wanted to the shirt to be a raglan sleeve I modified the front and back pieces by cutting them off at the raglan line that I wanted and then adding those cut off pieces to my sleeve piece to create the raglan sleeve.  So I now have a basic raglan sleeve knit pattern.  I scooped out the neckline, though not quite as much as I had planned, and not enough for the neck band that I cut so the neck band unfortunately does not fit flatly against my skin.  I could take it off and cut it down but.......I'm too lazy so it stays as is.


Each of the seams is sewn with wrong sides together, then the seams opened out and   a decorative stitch used to stitch down the middle of the seam.  The edges of the seams were cut off close to the stitching line.  The strip of fabric I used for the neck band I folded inside out so that there is a texture difference between the bands and the main shirt.  The ends of the sleeve were turned to create the same texture difference and stitched using a double needle.  The hem at the bottom however was turned under and again stitched with the double needle.

I did make one slight mistake when cutting out this pattern.  I forgot to cut the front and back pieces on the fold so I ended up having to sew a seam down the front and back of the shirt.  This seam I sewed right sides together so that its not as noticeable.


Final thoughts - it's quite a clingy fabric so not the most flattering as it shows off all my bulges, but that's my body not the shirt.  Again the neckline wasn't perfect but I still like this shirt.....and I LOVE wearing it - its so cozy and warm I never want to take it off.

Since I was so happy with the feel, if not the look of this shirt I wanted to try another version.

This time I thought that instead of just curving the side seam around I wanted to add a contrasting colour at the sides to give the illusion of a waist......it didn't quite work as I had planned.


The idea was to do a colour block with a contrast colour at the neck band, waist band, cuffs and two curved panels at the sides.  I still think the idea is good, but the execution not so much.  One of the biggest problems is that this one turned out slightly larger than the original.  Even though I took the seam allowance off the center back and front seams when I remembered to cut this one on the fold, it still ended up quite a bit larger than the original.  I assume that it has something to do with the seams at the colour block but whatever it is, the sides of this shirt don't sit as nicely as the original.

In order to get the new pattern I went back to the original side seams then drew a curve that I thought would work.  I probably could have brought it in a bit more at the front and it definitely needed to come in a lot more at the back as they're barely noticeable from the back.


I then put the two curves together at the sides to create one side piece starting at the underarm and finishing at the bottom band.


The fabric that I used for this side piece was a scrap of thin black knit that I had in my stash.  To make sure there were no issues with different material thicknesses etc, and to make sure the top stayed as cozy as the original, I also cut the side piece in the blue fleece and basted the two fabrics together before sewing them in.  

The neck band, bottom band and cuffs were made from some black knit ribbing that I had in the stash.  I think this was one of the major problems for this shirt.  Whilst the cuffs are fine, the bottom seam does not sit nicely at all. 

The neck band is probably my biggest issue though.  I actually scooped the front neckline out further than the original and made it into a V shape, but then I cut the neck band too short so the neckline, whilst sitting nicely against the neck is quite tight.  I lapped the ends of the neck band over each other in a V, but one end is pulling really badly.


So overall I like this one less than the original, and yet is does have potential.


I've noticed writing these last couple of posts that I always have plans to fix each pattern that I make, however the next time around I feel the need to modify the pattern so much that its essentially a new pattern with a whole new set of problems so I never end up with that perfect piece.  You know what? I'm actually OK with that.  The thing I like most about sewing is learning new things, working out how pieces go together, If I was just following existing sewing patterns I'd probably get bored - I need the challenge, so to that end, I accept my not so great finished projects and wear them proudly!


Playing Catch up

Well I've been doing a lot of sewing lately but not a lot of blogging.  I never seem to get a chance to take photos of my new makes so I put off writing them up and then end up as I am, at least, 7 makes behind.

Oh well let us go back to last year....yep we have to go that far to catch up with all my new winter shirts for the season.


This is a self drafted pattern.  I was getting bored of shirts that are just basic basic and wanted to try something slightly different, so I decided on a fake wrap top.  Now I will start by saying that I've always had a bit of a problem with wrap tops and dresses in that my boobs are too big and the wraps never seem to sit properly.   I find that either the wraps cross right across the top of the breasts as is happening here, or if I make them cross below my boobs, then the cleavage is almost indecent.  For this first iteration, I wanted a higher cross as this is a winter top and the last thing I want in winter is a lot of exposed skin.  I'm not happy with the way it sits but it's certainly wearable.

The pattern for this top consists of a basic sleeve, and back piece, and then  two front pieces starting from the shoulder and crossing to the opposite side seam.


 Due to an issue with the amount of fabric I had I had to modify the pattern slightly so the front piece that crosses underneath actually stops just below my breast rather than extending all the way down.


The neck band is a simple doubled up length that extends from one side seam, up and around the neck and back down to the other side seam.

The material for this shirt is the grey knit that I bought when I was making my grey and white striped shirt I blogged about here, but only used a small amount of it in the bottom band and collar. It is actually a two layer material, the grey is backed with a white knit. Unfortunately I didn't buy a lot of it, and as I said earlier there wasn't quite enough material so I had to get creative.  The sleeves I could only make 3/4 length and i had to cut off the front under piece below my breasts.  I did not want to leave the sleeves 3/4 length as I hate 3/4 length sleeves, especially in a winter shirt when I want warmth so I went through my stash for a fabric that would go with this.  I found this piece of knit that my son chose for a shirt a couple of years ago and cut an extra long cuff out of it.  To balance it out I also added a band of this fabric around the bottom.  I considered doing the neck band in the contrast colour, but decided against it as I don't like the look of an unsymmetrial contrast band.

overall its not perfect, but I'm certainly happy to wear it, and I have plenty of ideas on how to modify this pattern for another top.


Monday, January 18, 2016

A Tale of Two Sweaters

Whilst I'm here at the computer I also want to document two sweaters that I've finished in the last week or so.

The first was a red fleece sweater.


I started with the basic sloper pattern that I created, then cut a yoke on the front and back pieces. I then changed the front dart into a princess seam.


I added pockets into the front princess seam.  This is the one area that didn't work perfectly. I'm not sure if there is just too much flare in the front seams, or it was just the way I put the pockets in, but unfortunately that front area does not sit nicely.


Again all seams were finished with the new overlocker and a separating zipper was added to the front seam.


I don't think its a bad first attempt.  With a little tweaking I know I'll make this again.


The second sweater is a knitted sweater.


The wool is a 100% superwash merino sport weight yarn from Cascade Yarns.  Colour 114.  When I originally bought the yarn I was planning on using it to knit a pair of leggings...However after much thought I decided that, after spending all that money I wasn't willing to take a chance that they would not get worn so decided to make it into a sweater instead.  But of course I didn't have quite enough yarn to make a long sweater - so I knitted the sleeves first to the length I needed then just knitted  the body till I ran out of wool.

The pattern is self made.   I knitted up a swatch in a number of different needle sizes and chose the one that gave the gauge I wanted, not to tight, but no big holes.  I then calculated how many stitches I would require in the body and worked upwards to figure out how many stitches to cast on.

It was knitted top down in the round so the first element I had to figure out was the neckline.  I knew I wanted a cable down the front and I wanted the cable to wrap up around the neck line and ended up bringing that ribbing up into a collar.


To figure out the cable down the front of the sweater I again swatched a number of different options before picking the one that I was most happy with.  


On the back I knew I wanted one big cable detail.


I knitted downwards from the collar, increasing front and back for the raglan sleeve.  Once I joined the front and back under the arms I put the main body of the jumper aside and knitted  the sleeves to ensure that I had enough wool to finish them.

At the ends of the sleeves I knitted more cable details.


The cuff ended up a lot tighter than I had planned so when I got the to bottom band, rather than do the same cable details I did a knit 4 purl 2 ribbing with just 5 of the cables spaced around the band and the front cable continuing down into the ban in place of the 6th cable.


I also did a small twisted cable under the arm running down the sleeve and then down the side of the body.


I added some shaping around the bust/waist and overall I'm really happy with the fit of the sweater, in fact I'm very happy with the entire sweater.


Cream Leather Alabama Chanin Style Bag

Lately I've been reading lots of posts about Alabama Chanin style clothes and I have to admit that I really like the look.  I love the whole idea of making your own fabric designs.  I was thinking about trying something myself but I wasn't sure if I wanted to commit to a big project, so I came up with the idea of making a bag.


My thoughts immediately went to the teal vinyl material that I used to make my raincoat (not yet blogged about).  Looking at the left over scraps I thought that it'd make a really nice bag especially if paired with a white/cream material, then on a trip to my local discount fabric store I found a piece of super soft cream kid leather that I immediately fell in love with.


The next problem was the design.  I looked at a number of patterns online, but couldn't find exactly what I wanted so I sat down with a pencil and paper to draft my own design.

My first draft was quite floral.


However I soon realised that I had an issue.  The left over pieces of the teal vinyl were not quite as large as I thought and I wasn't going to be able to get the whole piece out of a single offcut.  I needed to graft a couple of pieces together.  I butted the pieces up against each other and used a faggotting stitch to hold them together.


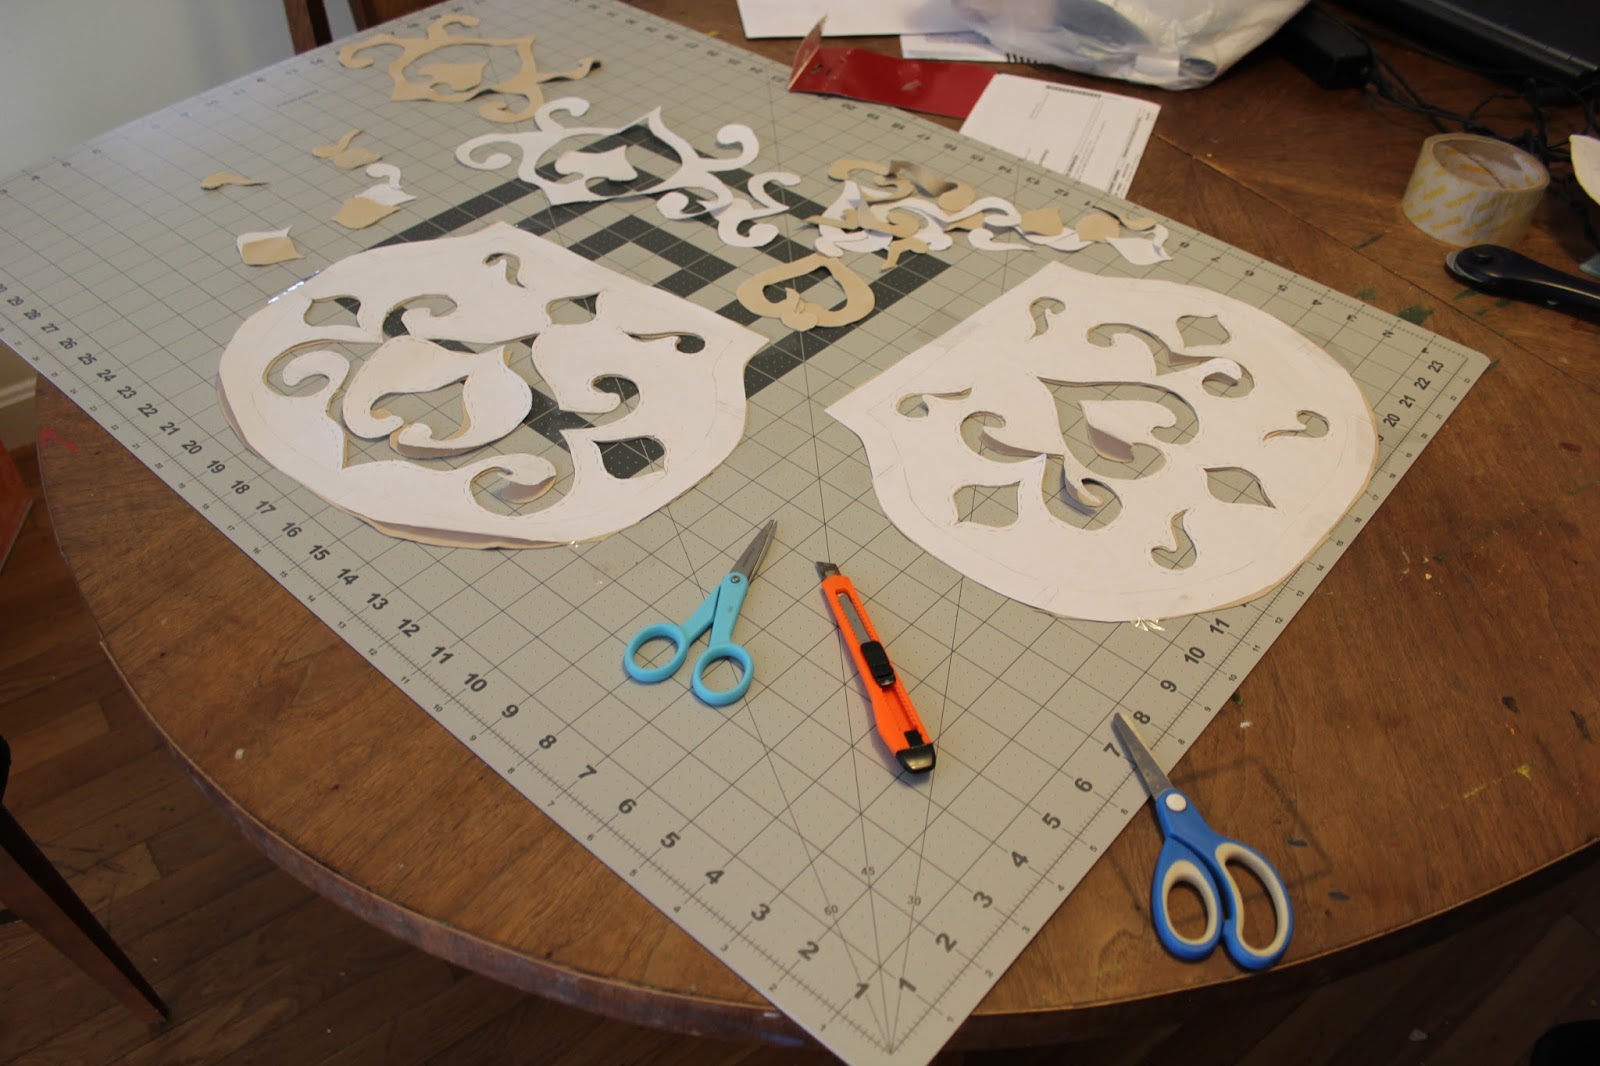
I then needed to come up with designs that didn't occur over any of the joints.  After much playing around, drawing and redrawing I came up with the following designs - I had to do two different ones rather than the same on both sides due to the different placement of the seams.


Next was the rather terrifying step of cutting out the leather.  I used a little box cutter knife as that was all I had on hand.  An exact-o knife would have been better, maybe I should invest in one for next time.


The cut out leather was placed over the pieced together vinyl.


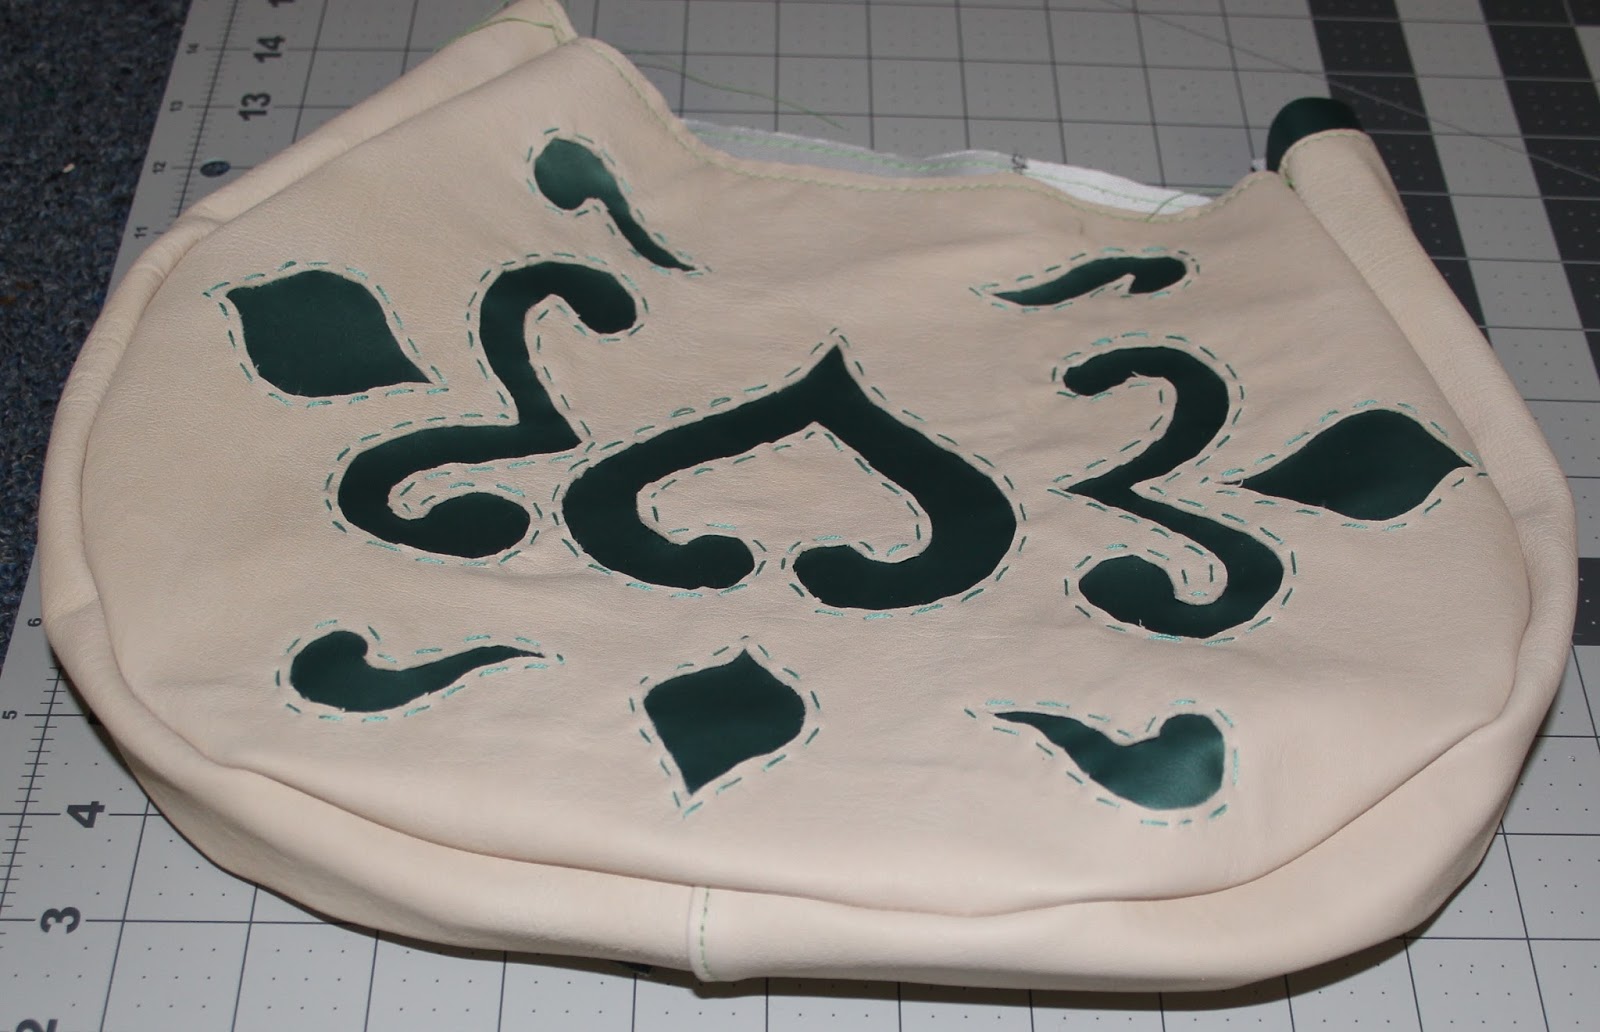
I used two strands of embroidery thread to top stitch around each cut out.  The hardest part was keeping the two layers of fabric together.  I didn't want to use pins as I knew the pin holes would stay in the leather, but the sticky tape that I had didn't stick to the vinyl very well.  Still I finally managed to get it all stitched, then used my machine with the walking foot on to stitch around the outside edge, then cut the vinyl down to size.


Unfortunately, after cutting out the two main pieces of leather I did not have a lot of material left over for the remaining pieces of the bag, but I still needed the sides and bottom of the bag and a strap.

I managed to piece together two pieces to get the bottom/sides, but the straps had to be made out of a bunch of scraps.  4 or 5 pieces for the front and 4 or 5 pieces for the back.  Each piece was sewed together, serged and topstitched.

I decided that in order to keep all pieces of the bag at the same stiffness each piece would need a vinyl backing, which of course also needed to be pieced together.


The bag was sewn together with two long seams.


The strap  was sewn up and turned inside out ready to be attached.  A lining material, a teal knit fabric with silver flecks through it was sewn up to match the bag.


The strap was tacked to the sides of the bag.


A teal zipper was sewn in between the lining and outer fabric.  Finally some more hand top stitching was done to hold the lining back from the stitching.


And voila we have an Alabama Chanin style bag.