Monday, February 6, 2017

Another round of swimsuits

So I'm still trying to get together everything I need for my trip back to Australia - and that means another round of swimsuits.

I pulled out my entire stash of swimsuit material and let each kid chose what they wanted and also worked with them on what features they prefer in a swim suit.

First up J.  He chose to have green shorts and a blue shirt with green trim.  These were made out of poly lycra fabrics that I bought at the local discount fabric store.  They have a good weight to them.


For the shorts I used his standard shorts pattern with 5/8" cut off all around.  I also cut down the front rise as he really prefers to wear all his pants underneath his belly, very low down, so I figured I may as well cut them that way, rather than cut them higher and have them all scrunched down.


The shorts were very simple. I sewed each seam on the serger and then top stitched in black thread with a zig zag stitch to flatten each seam.  For the waistband I zig zaged a 1/2" piece of elastic around the top edge of the shorts and folded it over twice to encase the elastic and then top stitched it all down with a zig zag stitch again.  The hem is just turned up twice at 1/2" width and stitched with a zig zag stitch

For the shirt I used my basic raglan sleeve t shirt pattern - at a size 8 - with 5/8" taken off each seam. The sleeves were finished with a green cuff.


The neckline was finished with an unstretched neckband about 1.25" wide.  I asked whether he wanted a zipper in the front of his shirt and he said no, but then decided that he would like a half zip, just to make it easier to get it on and off over his head.  To do this I just cut a slit down the front of the shirt to the length I wanted, then turned the edges under and sewed then to the zipper tape leaving an exposed zip.  Again the zipper was top stitched in place with a zig zag stitch.

To finish the bottom edge I turned the edge up to create a wide cuff, and stitched it in place with a zig zag stitch.

shirt with original cuffs and bottom band.
Once I had the shirt finished I tried it on J, and I wasn't overly happy with it.  The cuffs were too large and flared out and the shirt was too short, so I ended up taking off the cuffs entirely  and cutting them down by about 1.25" to make then sit snugly around his arms.

I also changed the bottom hem -  I  took it down again and just turned it under twice at about 1/2" wide.


Both pieces are a little too big, but J will grow into them.  And most importantly he's happy with them.

Next up was L.  She chose a piece of fabric that I picked up from the swim fabric remnants bin at Fabric Place Basement last year.  This material has an ombre colour design fading from bright pink at the selvage to dark purple in the center and back to pink at the opposite edge.   Again it is a good heavy weight fabric.


For the shorts I used L's standard shorts pattern with 5/8" cut off all around.  L prefers to wear her pants pulled up very high so she has a much higher rise on her pants.  For her shorts I cut a yoke that angles  down to center back and center front.


I cut the yoke from the bright pink and the shorts in the medium purple.  Again all seams were serged then top stitched with a zig zag stitch.  The hems were finished by turning up twice at about 5/8" and stitching with a zig zag stitch.  The top was finished by basting 1/2" elastic around the top edge then turning it over twice and top stitching with a zig zag stitch.  All top stitching was done with a light purple thread.

For the shirt I used the same basic raglan sleeve t shirt pattern - at a size 8 - with 5/8" taken off each seam.  I cut it off about 3" shorter than for J and then added a 3.5" band doubled up around the bottom.

I cut the top so that it shaded from pink at the top to dark purple at the waist band. 


The neckline was finished with a thin neckband and the sleeves were turned under once and top stitched in place.

L wanted a full zipper in her shirt.  I only had black in the size I needed so that's what we went with.  The zipper is stitched in place and then top stitched with a zig zag stitch.


I think the bottom band is a smidge too tight which is why shes getting all the puffiness in the shirt, but L loves it and that's the main thing.

And finally more additions to my suits.

I decided that I really didn't like the shorts I made to go with my captain america suit (so called because the material has what looks like Captain America shields all over it).


So I decided to go ahead and make a new pair of pants to go with this top.  Since I didn't have enough material to make these I knew I'd have to buy more, and since the fabric store only sells in yard increments I decided I may as well make a matching rash shirt too.

I didn't realise just how flimsy this material was until after making the suits for the kids, so the first thing I did was line the material for my pants.  I used some teal coloured power mesh that I had, and underlined both the front and the back pieces.


The top of the pants was finished with a 1/5" wide waistband enclosing 1,5" wide elastic. and the leg openings were finished with 5/8" wide cuffs enclosing 1/2" wide elastic.


The rash vest I made using the same pattern as my previous rash vest.


I'm really happy with how this turned out - now to try them out!


Friday, February 3, 2017

Red Plaid Shirt


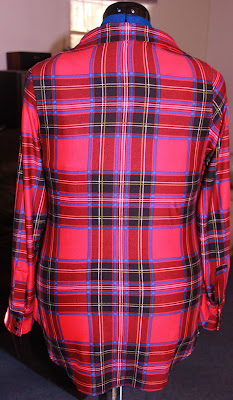
When I first bought home this fabric I had a vague plan to make a button up shirt from it - like a plaid flannel shirt, but in a super soft knit fabric.   The thing is - I didn't want it to be too much like a flannel shirt - the boxy look is just not one that works on me, so I knew that I would need to make this a more fitted shirt.

However,  when I've used plaid materials in the past, I've found it hard to get a good fit without ruining the lines of the plaid.  Under bust darts and princess seams , which are what I usually use, don't look great, so what could I use instead.

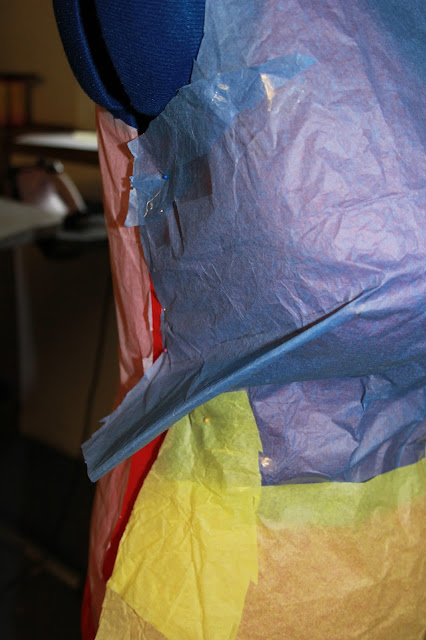
So I started playing around with my new dress form, using tissue paper to create a dart that doesn't interfere with the plaid lines.  In other words a dart from the side seam.


I managed to get the tissue paper to fit fairly well using this dart and decided to go ahead and try and make a shirt using this pattern.

I created a paper pattern out of my tissue paper and cut it out of the plaid material.


Basting it all together before trying it on my dress form.


Not the greatest fit - so I took the darts out, turned it inside out and re positioned the darts directly onto the material,  lining up the dart up with the direction of the plaid stripe and the fit ended up a lot better.


So the next step was to create sleeves.  I cut out a set of sleeves to one of my basic sleeve patterns and basted it in,  the sleeves did not fit (I've since realised that Mummy2 (as my kids have named my dress form) has wider shoulders than I do), the sleeve seam was hanging way off my actual shoulder line. And for some reason the whole thing when I tried it on, just wasn't great.  I wasn't sure what I wanted to do with the neckline, but it wasn't working as is. I got a bit fed up with it at this point and gave it a time out whilst I went on and made myself a bra out of the material.

When I was ready to take another look at this project, I decided to ignore the sleeves and start with the neckline, so I grabbed my copy of  New Look 6704 and cut out a collar and collar stand.  I had to make a trip to the store to get some more interfacing having used up my entire stash on the blanket I made (yet to be blogged), but the next day I basted on the collar and stand and liked how it looked.  Next question, do I just make a partial band down the front cut out of the shirt, or do I extend the band the entire length of the front.  I cut the button bands full length, and after pinning them in place decided that I actually like the look of the full button band best so I took the scissors to the shirt and sliced it up the middle so I could attach the front button bands. 

At this point I was quite happy with how the shirt was going, so I took it all apart and sewed it together properly (minus the sleeves), finishing all seams on the serger.  The collar and button band were inserted as per the New look pattern instructions.


In order to fix the sleeve issue, I cut the front and back shoulder back to my actual shoulder line, and removed a lot of the sleeve head, especially around the front arm scythe to make the sleeve sit better.  I also used the pattern for a sleeve cuff that I created for my Colette Rue dress to put a placket and cuff on the bottom of the sleeve.  Silly me however didn't interface any of the cuff pieces so it ended up a bit wonky - still it's not bad.


The next issue was the bottom hem.  My initial vision was of a curved bottom hem, slightly higher in the front than at the back, so that's what I decided to go with.  I put the shirt on the dress form and just hacked the bottom edge off till I was happy, then turned the edge over twice and stitched it down with a stretch stitch on the sewing machine.


And last but not least was buttons.  I knew I didn't want actual buttons, but I originally planned to put snaps on instead, but after sitting around in this shirt for a while whist I was working on the sleeves etc I realised just how much it gaped down the front so - since I knew I would never use the snaps anyway I decided to just sew the two button bands together.  I inserted a few snaps down the front just for decoration, but they don't actually attach to anything.


I'm really quite please with how this turned out.  It's not my normal style, but its comfortable enough that I think that I will wear it (I already have a couple of times in fact).   It somehow ended up a smidge tighter around the waist than I had planned (probably due to putting the button band down the front) and I think that the bust darts are a little too high, but for a first draft of a pattern I'm quite happy.

Now maybe one day I'll get around to making an actual plaid flannel shirt - its been years since I owned one of those - and they were mostly worn tied around my waist,,,,,


Wednesday, February 1, 2017

Sock Sock and More socks


I feel like I've been knitting socks forever. It all started back in November when I decided that, since my Parents-in-law were going to be here in cold New England for Christmas I could knit them each a pair of socks as presents (Most of the people who I would like to knit for celebrate Christmas in the middle of Summer so the last thing they would want is something warm and snuggly)

I started with my Father-in-Law. I obviously wanted something a bit more masuline, and I found just the yarn I was after at Fabric Place Basement. Cascade Yarn Heritage Wave in Checkers colourway. This yarn has an almost tweed type look and fades from Red to Grey and back again.

As far as pattern goes I went with the Boyfriend Sock Pattern by Alice Bell in a size large.

Once these socks were finished I moved onto my Mother-in-law. I used the same Cascade Yarn Heritage Wave but in Nightshade which blends from purple to grey and back. I again used the boyfriend sock pattern this time in a size small.

Unfortunately I didn't get any photos of these socks before giving them away.

I then got a request from my best friend for a new pair of socks to replace the ones that I made her last year that have worn through.  I decided to go with the same pattern yet again - in a size medium this time.  For yarn I bought some  Supersocke Carneval Sock Yarn.  This yarn stripes in shades of blue, green, yellow and brown.

And then finally I could get around to knitting some socks for myself.  I used the same pattern but sized it down below a size small to fit my tiny foot, I also added some ribbing under the arch of my foot just to make sure they were nice and snug around my feet.   I used the same Supersocke Carneval Sock yarn but in a blue, orange, yellow, green and purple colorway.


I love these socks, the are so comfortable and warm, but I'm all done with socks for a while, 4 pairs in two months are more than enough.