Friday, August 26, 2016

Refashioners - Take 2

When I was making my dress for the 2016 Refashioners challenge I wasn't quite game enough to  cut into my very small pair of embossed jeans that I wanted to use without first muslining the pattern so I cut the girdle part of the dress out of another pair of plain jeans first.  I then had a bit of a problem with the shape of the front arm scythe on my original front top piece - I cut it out deeper than my original pattern, but once I tried it on was not happy with it so went back and re cut the top front pieces. This meant that once my final dress was finished I had on my hands almost a complete top (girdle plus front top).  So what was I to do with it....throw it out?  That didn't seem to be in line with the challenge at all so I decided I wanted to try and reuse the pieces to make another item.


The first thing I needed to do was cut new back top pieces since I didn't have extra of these - easy I had plenty of material left over.  I did need to position these pieces over an existing seam but that wasn't a problem and the extra seam is located right under my arm so it's barley noticeable.

The first issue I wanted to deal with was the front bust dart.  I wasn't totally happy with the dart in the original dress and wanted to try and modify the dart into a princess seam, also allowing me to take in a bit of gaping in the arm area.  This turned out pretty easy to do and I'm happy with the way this seam turned out and the new fit through the bust.


In order to deal with the arm hole that was cut away too much I figured I just needed to add a sleeve to the top.  I used the cap sleeve pattern from New Look 6704. I was able to cut it out of the same dark jeans as the rest of the top but I needed to put a seam down the top of the shoulder.
Once the sleeves were inserted I had the beginnings of a top, now I just had to figure out how to finish the bottom half.

My original idea was to turn it into a shorts jumpsuit so I took one of my still intact pairs of jeans, removed the waistband, took the pants in as required until they fit, cut them off to shorts length and tried them on with the top.

I spent a good couple of hours playing around with different attachments - adding the shorts straight to the top, adding in an extra strip etc but nothing I did looked any good.  In the end I scratched the idea entirely.

However, I had pinned an extra piece to the bottom of the top as it existed and when I took off the shorts I had a bit of a revelation - It worked quite nicely as a top. I played around with this additional piece of fabric pinning and draping till I was happy and in the end found that two legs sewed around the lower edge starting center front and ending center back, and then darted at the sides to account for the V shaped girdle gave a really beautiful shape and my final design was born.


I pinned it all together, cut all the seams to the right width and then took the entire thing apart (everything to this point had been sewn with a long stitch length and loose tension so It would come apart easily) and put it all back together finishing my seams as I went.  To finish the neck line I reused the lining material I had originally cut for the dress to cut out a front and back neck facing.  The facing was top stitched at 1/8" and turned under and stitched again at 1" with grey thread.


The final touch was a bit of applique - I wanted to use some of that beautiful embossed denim to create a small applique detail just to add something extra to the top.  These pieces were left with raw edges and stitched down with the grey thread.


The bottom of the top was finished by utilising the existing leg seam.  When I cut the bottom pair of jeans apart I cut along the edge of the seam. This seamed edge was used on the bottom edge of the shirt and creates a nice finish.


I'm quite happy with the top, though I'm still not entirely sure what I'll wear it with.  I had to do a lot of trolling through my wardrobe to try and find something that it matched - usually my fall back is jeans - but I don't like the whole denim on denim thing.  It looks like a new pair of black pants is in my future (The ones I'm wearing here are way too small these days).


Lacy cardigan

There's been a lot if sewing on the blog lately, but that doesn't mean I've been neglecting my knitting.  The latest project, hot off my needles, is this lacy cardigan.


This project started with a ball of wool I picked up during my Thursday knitting group.  One day one of the librarians came over to our knitting group with a large basket of wool, said it had been donated to the library for the knitting group to use.  It wasn't until we got to the bottom of the basket and found a signed note that we realised that the basket of wool had originally belonged to one of our members who had recently passed away.  So of course I wanted to do something special with this wool, but I only had one ball.

I started thinking about what I wanted to make.  I really wanted some sort of lightweight shrug that I could throw on just when I was getting cool, but didn't need a big jumper, so I decided on a lacy cardigan.


If course I couldn't find a pattern for exactly what I wanted so I just started looking for a lace pattern that I liked and found the no place like home scarf.


The next problem was figuring out how to translate the scarf pattern into a cardigan pattern.  I started of course with a gauge swatch.  I made it pretty big so that I could get an accurate idea if how much the lace would stretch when made up and found that 6 repeats of the pattern would fit across my back nicely, with three repeats for each front piece.  The sleeves would need a three and a half repeats around.  From there I could work upwards, creating raglan decreases at each shoulder.  I drew out the pattern on graph paper, one stitch per square and then worked out how best to fit the pattern within those stitches and finally I was ready to start.


I undid my swatch gauge as I knew I would need all the yarn I could get, and then started knitting from the top down.

I did make a few mistakes in the lace pattern, but between the colour and the lace its not really noticeable so I didn't bother going back and fixing it.


I got down to the bottom of the armholes and joined the front and back, leaving the sleeves stitches on holders before I ran out of my ball of yarn.  Thankfully the yarn is pretty common so a quick trip to the local Michaels store allowed me to pick up two more balls of the same yarn.

I decided to work on the arms first as they need to be a certain length, whereas if I run out of wool on the body I can just call it a cropped sweater.  I did 5 repeats of the pattern to get to full length, then finished the sleeves with 6 rows of garter stitch.


The sleeves are just a tiny smidge too short, they have a tendency to ride up a bit, but as this cardigan is only really for keeping off the chill that's not too much of a problem.

The body of the cardigan was finished off in the same way with 5 repeats of the pattern, followed by 6 rows of garter stitch.

The center front  band was created by slipping the first stitch of every row, then knitting the second stitch.  The end of the row was finished with a knit stitch followed by a knit through the back loop stitch.


To finish the sweater I just needed to sew up the gaps under the arms, weave in all the loose ends and sew on 4 purple buttons I found in my button collection.  The buttons are small enough that I don't need button holes, I just use one of the lace holes.

I did a quick steam block to stretch it out to the right width.   It's quite snug across the chest, but the lace has enough stretch that there isn't really any issue.

I really like this cardigan.  It's the perfect weight to bringing to a restaurant - I find the in summer restaurants are always way over air conditioned and I tend to freeze wearing summer clothes, this gives just enough coverage to take off the chill.


Tuesday, August 16, 2016

The Refashioners Challenge 2016 - Jeans!


This dress was inspired by Portia over at Makery.uk.  Portia is currently running a Refashioners contest and the theme is Jeans.  I originally heard about this contest when Lisa at Pattern and Branch won second place in last years competition. When I found out that this years theme was Jeans I was actually a bit dissapointed.  I've never really been interested in making anything out of Jeans other than smaller jeans.  But isn't that what this is about after all - making you think outside the box.  Once I saw some of the beautiful creations being made by the refashioners team on Makery I knew I had to give it a go!

So what to make????  I knew I didn't want to make accessories - I've never been a fan of denim bags or hats - I don't particularly like making home furnishings to that was out too.  Pants and shorts were out - as really any pants or shorts you make from jeans are just more jeans.....So what did that leave me - a top or a dress.  I don't wear woven tops ever, and the idea of a heavy top made out of jeans material really didn't appeal to me so that left me with Dress!

I started thinking about Jeans dresses - I've only ever owned one jeans dress - It was a figure hugging, zip up the front dress that I loved but never wore - unfortunately it was covered in ugly Nascar type badges - I once tried to unpick one of them but never managed it so despite the fact the I loved how I looked in the dress I ever wore it - It is however still sitting down in my to be refashioned pile.

So I decided I wanted something fitted.  

Which led me to thinking about a dress that I've been coveting for the last 18 years - I found this dress when looking for something to wear to one of my Engineering Balls at university.  It was a V neck at both back and front, laced up at both back and front, princess seams and the the skirt was full length and split at each seam. I didn't buy it at the time (didn't have a spare $200 to spend on one dress) but I did try to make a version of it.  The muslin that my mum and I came up with was great - unforunately I made a mistake when I chose my final fabric and it ruined the dress entirely - so I've never managed to make this dress.  Maybe now is the time.

Only problem was - I have no jeans to refashion.  I haven't bought a pair of jeans for many years now and the old ones were all thrown out long ago as I didn't see (at the time) what I could do with them.  So off to the thrift shops we went!  

I may very well have warped my kids sense of money on these trips.  I got a few weird looks for the other shoppers when my kids - at the top of their lungs - would announce "Oh man $5 for a pair of jeans - no way"  and the one consignment store that we went into that was selling jeans for $20/pair - my son scoffed mightily (and quite loudly) at that before I hurried him out of there.

But in the end I found a few pairs that I liked - at prices that I was willing to pay for something that was just going to be cut up - I specifically went looking for jeans with great details on the pockets etc that I could use to embellish my dress - this is what I ended up with.


 My favourite pair is the pair on the left that are embossed all over with a metallic design.  I knew I wanted to make a feature out of this fabric, so I started sketching.  I took my original idea and modified it to include a girdle where I could showcase the embossed fabric.  I decided I wanted to use all the back pockets to make a feature around the hem of the skirt.


Finally I noticed the pair of jeans with embroidery all over the legs (in the center of the picture above) and decided that I could use that as a center back and center front panel of my skirt with the embroidery down the bottom of the skirt.  I decided to go with the dark fabric from the pair of jeans on the right for the top of the dress and the other pairs would be used as panels in the skirt and their pockets for the hemline. (in the end I only used 5 pairs of the jeans in the final dress, plus one pair for muslin fabric).


To create the pattern I went back to my McCall's 4488 that I've used for my last three makes - I used the top front piece as is, and then cut the back and lower front pieces to get the girdle pieces that I wanted.

I ended up cutting each of the girdle pieces in half in order to get them out of the embossed fabric that I wanted to use, as that pair of jeans were a very small size and skinny jeans.

The skirt I had a few problems with.  I cut up the first pair of jeans with all the embroidery and sewed the two front pieces together tapering them at the top so that the seam lines matched those of the girdle.


And then did the same for the back.


I thought about using the existing front pockets from one of the pairs of jeans to make pockets in the skirt - I painstakingly took apart the pair of pants - took off the back pockets to reuse later and tried sewing the pants in place, but the shape of the girdle made the pocket placement a problem  and the dark patch on the back where the pocket had been looked a little out of place.

So after a day of playing around with it I gave up, flipped the pants legs upside down and tapered them from the girdle seam lines out as far as I could.  I then had to cut off the legs at the crotch line to remove the pockets/darker areas - this left the side pieces shorter the the front and back panels.


After some serious thinking I decided that instead of doing the pockets around the bottom of the hem I could just cut the pocket out still attached to the Jeans in a large enough area to fill in this gap.


I thought about leaving all the skirt seams split up to mid thigh, but after much  tinkering I decided I liked the skirt best with just the splits up the two front seams.


To finish the top half of the dress I decided to go with a single dart in the top rather than gathering the material like the original pattern had - unfortunately to get the dart to line up with the other existing seams, and still be large enough I ended up with a distinct point at the end of the dart.  This doesn't bother me too much in real life, but if I were to make this again I think I would make that piece with princess seams so that I could eliminate that point and the slight gaping under the arm.


I put an invisible zipper in the back of the dress.  I ended up having to hand stitch it in as I couldn't get the invisible zip foot to work with the thickness of the fabrics.  It could probably do with a hook and eye at the top, but I'd never be able to get it done up so I didn't bother


\
 The top is fully lined in a navy and red cotton fabric to finish the armholes and neckline.


All seams were finished on the over locker except the hem which I just left as is to fray as it wants to.

I had fully expected to do a lot of top stitiching on this dress but in the end the only top stitching I did was on the armholes, neckline and to attach the lining under the bust.  This was just done in plain black thread so it's barely noticeable.


Overall I love this dress - The top does not fit as well I had originally hoped, but there is only so much fitting I can do - I just wanted the dress finished in the end so I'll put up with what I've got.

I love the combination of dressy - full length, V neck etc but yet casual with the denim - and even better - I do believe that I will wear this dress so it's win win all around.


 So again a big thank you to Portia and everyone else who has worked on this challenge for encouraging me to step outside my comfort zone and do something a little different!


A McCalls 4488 and 3252 Mash-up


Whilst going through my new stash of patterns that I picked up at the yard sale this spring I came across McCall's 3252.


I really took a liking to view B of this pattern.   However once again the pattern I have is in a size 12, which would seem by the dimensions  on the back of the envelope to be way too small for me.

 However I noticed that the top part of the pattern was very similar to McCall's 4488 that I've now sewn up twice (Beatles shirt and Grey dress)and have got to fit fairly well.  I decided to have a look into sewing the 3252 pattern using my modified 4488 pattern pieces.

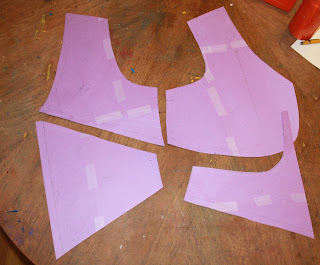
I used the modified top front piece from 4488 and then combined the lower top piece of 4488 with the lower front piece of 3252.  The back of the dress from 3252 is made in two pieces - top and bottom, but I modified it into a single piece using my previously modified pattern piece for 4488.  In the end, all I've really taken from 3252 is the shape of the skirt.


To finish the neckline and armholes I cut a second set of the front top piece, and a second set of the top half of the back pieces and used it to self line the top half of the dress.


I decided not to go with a long sleeve dress, mainly because i didn't have enough material to do so.

The skirt length shown on the pattern is just below the knee, however on my short frame the pattern came down almost to my ankles.  I took about 3 inches off the bottom of the skirt as I traced it - and then took the skirt pattern up at the lengthen/shorten line about another 3 inches - and this still left enough length to do a double turned hem 1.5 inches deep.


The final length of the dress is longer than I usually wear my skirts but I quite like it....maybe I'm just getting old.

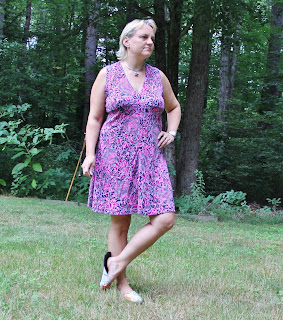
The material I used is a piece that I found at my local fabric store that I love.  It's a grey and pink knit fabric with a flowery/paisley design and black sparkly dots all over.


I'm pretty happy with the final dress.


My only real issue with the dress is the material.  I absolutely love this material, but it does have those little black sparkly dots all  over it.  I was originally worried that they might create issues whilst sewing, but that thankfully didn't happen, what it has done however has made it just slightly uncomfortable to wear, especially in the underarm region where my skin rubs directly against the fabric...also I probably shouldn't have used the same material as a lining.....oh well its not too bad, and hasn't stopped me wearing this dress a lot since I finished it.