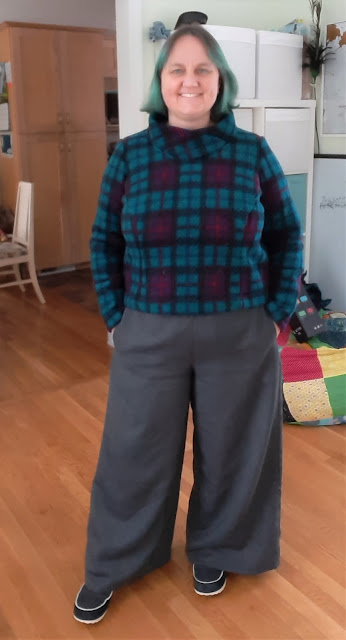
I've found that I definitely have a new dressing style this winter. I've wanted to avoid the living in a tracksuit look that would be so easy to slip into during this pandemic and since I've found and loved the Cashmerette Calder pants that's all I want to wear. Thankfully I now have three pairs so I can pretty much wear them full time. However I have found that I prefer a more cropped top to go with this style. I feel like the longer hip length jumpers don't showcase that beautiful flat front on the pants that I think is one of my favourite details of these pants. And so I have been slowly accumulating shorter cropped shirts and sweaters that I can wear. This is my latest addition.
This fleece is absolutely beautiful. It is much thicker than most of the other fleece fabrics that I've found but still has a good stretch in one direction, and I love the colour combination of greens and purples (Though I could not get a good photo showing the green colour correctly)
For this pattern I started once again with my basic muslin. This time I split the front pattern piece into two by cutting through the pattern at the bust point creating a princess seam originating at the arm hole (the armhole dart) and running through the under bust dart. I kept the seams right at the dart line for the arm hole dart, but added about 1/4" ease at the bottom of the underbust dart tapering to 1/2" at the underbust point and back to nothing at the bust point. I then moved the lower armhole point 2.2cm down and 1/2" out and tapered the side seam from this point to 1/4" out at the high hip point. At the neckline I lowered the center point by 7cm and drew in a new neckline that finishes 4.8cm in from the neck point along the shoulder seam.
For the back I used the same standard adjustment lowering the armhole 2.2cm and widening 1/2" then tapering the side seam to a 1/4" at the high hip line for ease (whilst ignoring the back darts). I kept the neck darts in place, then removed about 1" depth at the center back neckline curving out to a point 4.8cm in from the neckline at the shoulder seam.
The sleeve pattern is my basic sleeve pattern, slightly adjusted for the armscyth for this pattern.
The final pattern piece for this was the neck band. I sketched out my design on my croquis and played around with a number of different looks and decided to go with this one. A folded cowl the crosses over at the front to make a slight V. I was slightly basing this collar on the Paprika Pattterns Jasper cowl collar so I started with that pattern piece. Adjusted the height to what I wanted (about 2") , then used the differences between the front neckline on my design and the front neckline on the Jasper to get the right dip to the front of the collar piece. As I wanted the collar to cross over at the front and create a V I added that line onto my pattern, but now the top edge of my collar was no longer straight, which is what I wanted so I could fold it over. I therefore had the change the angle of my pattern piece. I wasn't sure I had gotten it right, so I tried cutting it out of a piece of scrap fleece and pinning it to my dress form and it seemed to work so I went with it.
Now I was ready to cut out. I tried to keep all my pattern pieces aligned on the pattern so that the stripes of the checks at least were all lined up. I ended up having to cut the outer front pieces separately just to make sure I got it all right, pinning each piece to my dressform as I went to check my alignment. I'm pretty happy with how it turned out.
I cut the collar piece on the bias for some extra interest (and so I didn't have to worry about aligning checks there). Then it was a simple case of sewing everything together. I didn't do any seam finishing on the main seams other than clipping the curves of the front princess seams. For the sleeve and bottom hem I simply turned the edge under once and stitched using a 5mm long stitch in two rows around the edge of the hem then trimming and excess off. For the neckline I sewed the collar piece to the neckline, graded all the many layers of fleece, the folded the outer layer over all the others and stitch just under 1/4" away from the seam to enclose all the raw edges.
I contemplated putting pockets into this but decided against it. I find with the Calder pants, which is what I plan to wear this with most of the time, I use the pockets in my pants when I need them so I didn't feel like it was necessary to have a pocket in this as well.
I really like how this turned out. The length is perfect. The neckline is a smidge wider than I probably wanted. I think next time I would bring the sides of the neckline in a bit and lower the front a bit more. But otherwise this is great.


That top turned out great and looks really good with those pants!
ReplyDelete