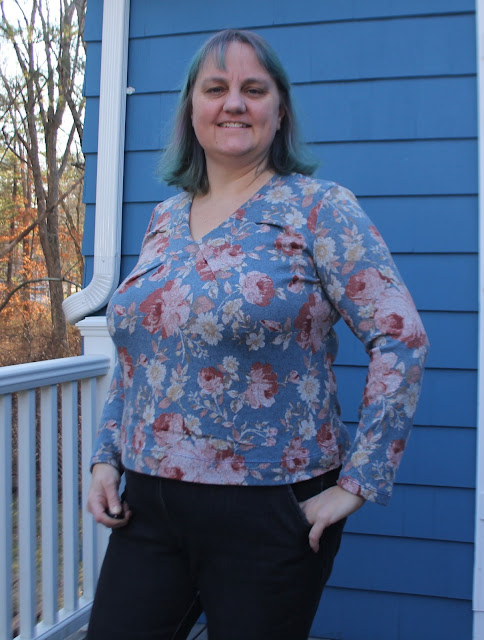
More playing around with my pattern. This shirt actually came about thanks to the Great British Sewing Bee (again). They did an episode where one challenge was to drape a garment on a dress form and I thought, now that I have my dress form looking like me, maybe I should try doing that too.
However I didn't want to cut into my good fabric so I took the entire length of fabric and just started draping. My first attempt was actually quite interesting.
I really liked the way those darts/pleats worked as so I decided to go ahead and try and draft a pattern with this arrangement of darts.
I started with my woven sloper, traced it out again and then started doing the modifications needed to make it a knit sloper.
On the back this was easy, I just moved the back darts out to the side seams, removed 1/4" from the side seam to allow for stretch and took 1/4" off the outside edge of the shoulder seam. The final change was to raise the underarm by 1/2" and redraw the back armhole between the two new points.
For the front pattern piece it was a bit harder. Again I brought in the shoulder point by 1/4"and raised the underarm by 1/2". I took 1/4" off the side seams. I then had to try and remove some of the under bust dart.
Originally the under bust dart tapered from 0 at the bust point to 6cm at the underbust, then back to 5 cm at the waist and 2.5cm at hip (Shown by a dashed line in the picture below). I started by just moving 2.5 cm out to the side seam from the underbust right down through the waist and high hip but that creates a really steep angle between the bust and underbust. So instead I moved the 2.5cm out to the side seam at the hip line and waist lines, but at the underbust line, I only took 1.5 cm off the front side seam, and then took 1cm off the back side seam as well - It just gave a more balanced pattern. This still leaves a 3cm dart at the underbust and a 2cm dart at the waist, but if I take out any more it ends up really warped.
I then lowered the center front point 3" and created a V neck, then rotated the armhole dart around to the center front point. This created the lower of the two pleats (or technically they are released darts) at the neckline. To create the second pleat/dart I just drew a line from a point about 1.25" above the center front point on the neckline, out to the armhole and spread my pattern piece around that point. I opened the second dart the same amount as the first.
And now my pattern was just about complete. I cut the pattern out of my fabric - a sweater knit that is grey on the back and printed in blue with red flowers on the front, and basted it all together and tried it on - I was quite pleased with it. I had to unpick my pleats/darts a bit to get the right look I was going for but otherwise the fit was really good so I took it apart and serged it all together properly.
The sleeve and bottom hems were double turned and then stitched with a twin needle for a really nice finish.
I really like this pattern - something slightly different to my normal tops - fairly fitted but not too tight. There is only one small issues at the back sleeve - I feel like the seam line should be moved in just a touch so I've drawn this onto the pattern to try for next time, and there will be a next time with this pattern - though maybe next time I'll make three smaller darts at the front instead of the two larger ones. So many options!


Very interesting! Nice job!
ReplyDelete